If looking for a lower-carb, nutrient-and-protein-dense dinner, look no further. My husband came up with this adaptation based on his mom’s traditional lasagna recipe, and we’ve never looked back. If you cook the meat ahead of time, too, (BONUS) you can easily freeze this and have a quick dinner for another night down the road. This is also, obviously, gluten-free (awesome!) and can be adapted to suit whatever additional veggies or fillings you’d like to include.
Here goes!
What you’ll need:
1lb ground beef (we used 85%, and drained off the fat after cooking)
1 large spaghetti squash
2 cans (16oz) Hunt’s tomato sauce
1 bag (8oz) shredded mozzarella cheese*
1 bag (8oz) shredded parmesan cheese*
(*or whatever cheeses you’d like)
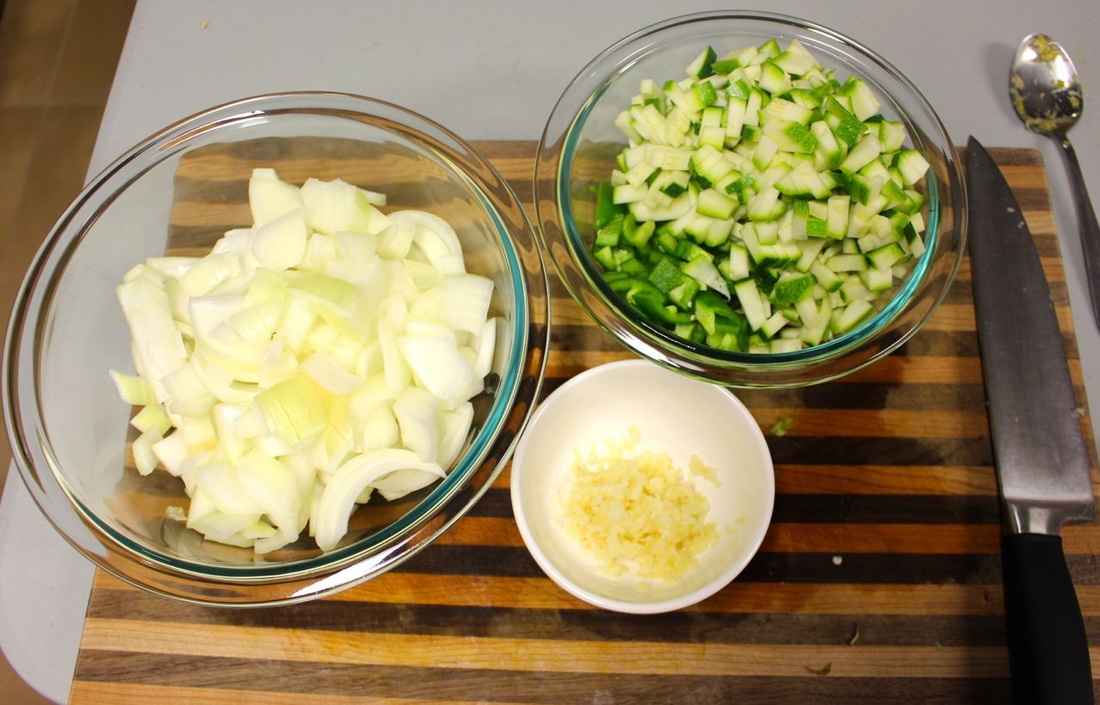
Any additional veggies you want to add, roughly chopped (we used 1 yellow onion, 3 cloves of garlic, and several small green bell peppers from a friend’s garden.)
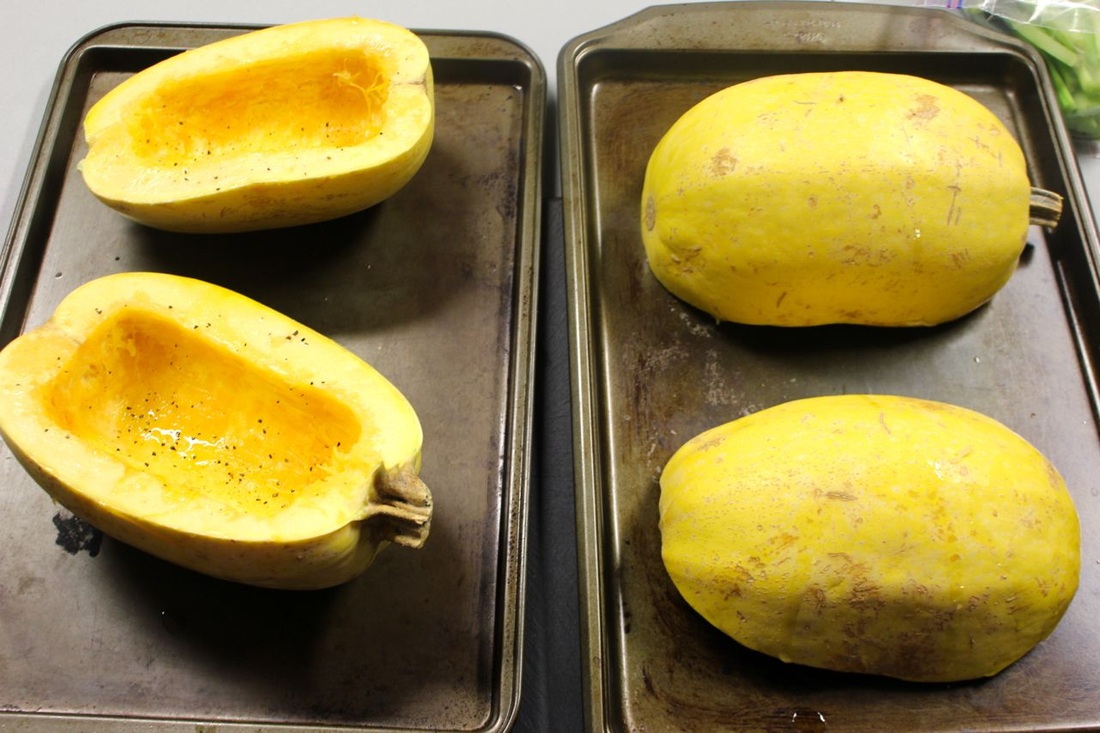
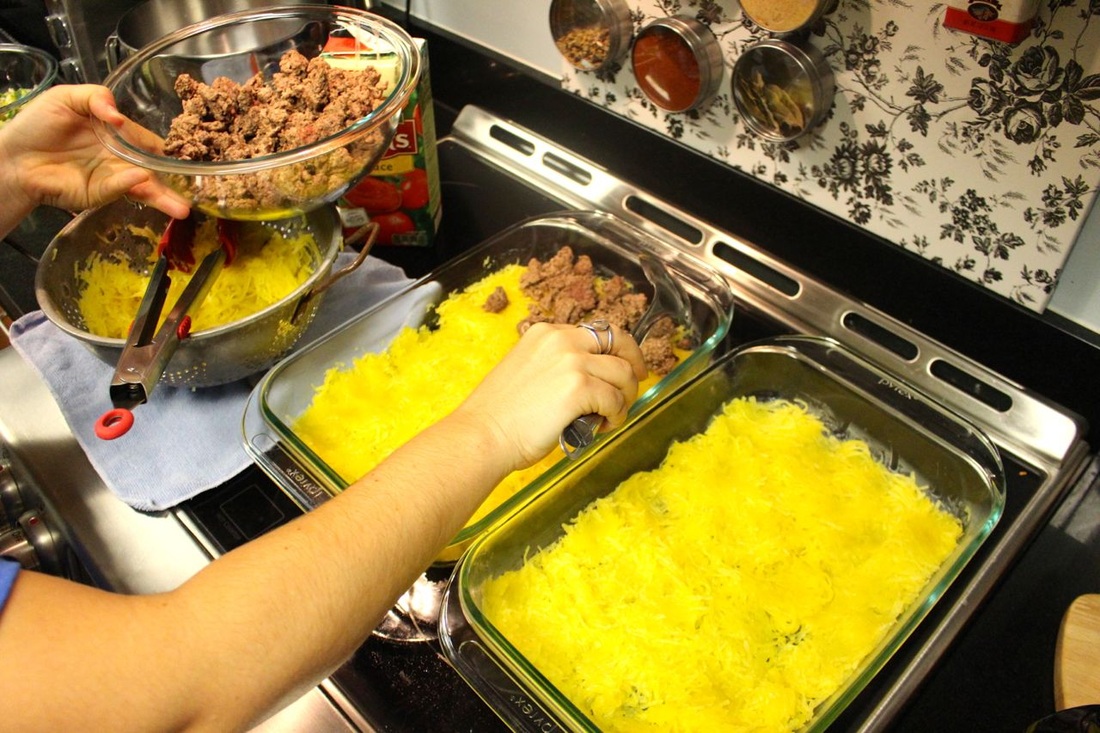
Step 1. Preheat your oven to 400°F, and slice your spaghetti squash in half lengthwise (you can see we decided to make two lasagnas at once!)
Step 2. Scoop out the seeds and stringy pulp in the center, and discard. Brush each half with olive oil, sprinkle with salt and pepper to your taste. Step 4. Place squash halves face-down on a cookie sheet and bake at 400ºF for 30-40 minutes, or until the flesh can be easily shredded with a fork.
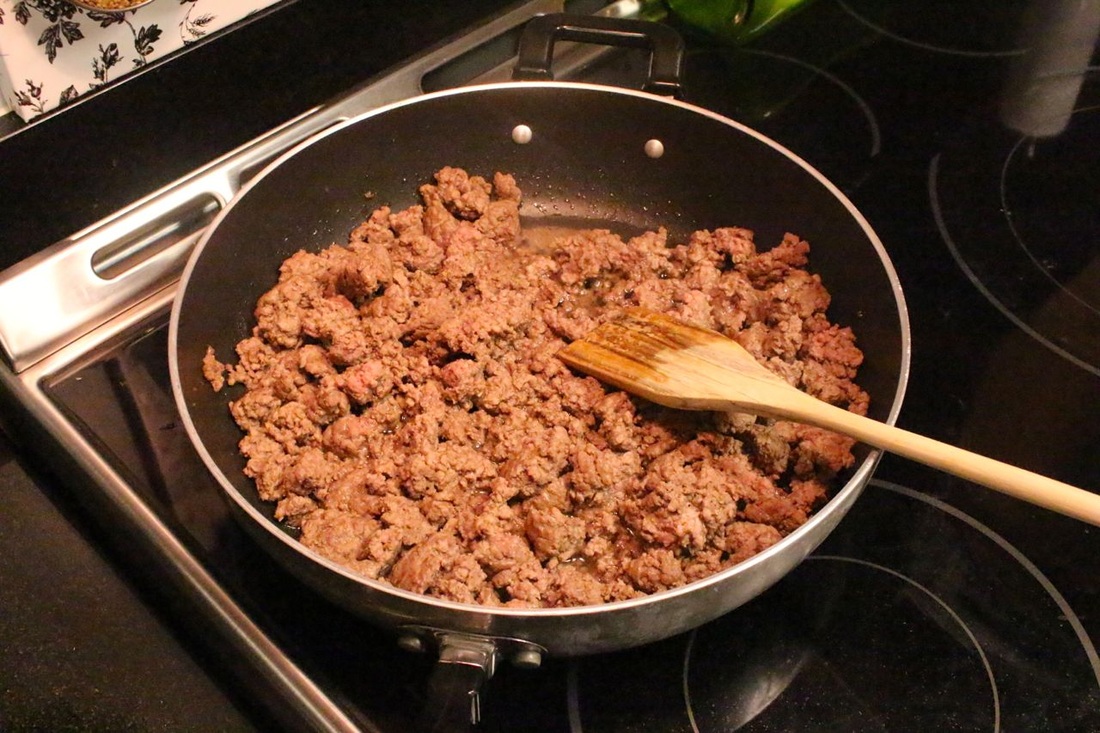
Step 5. While the squash is baking, brown the ground beef (or ground meat of your choice; ground turkey is excellent in this recipe) over medium-high heat. Remove from heat and set aside.
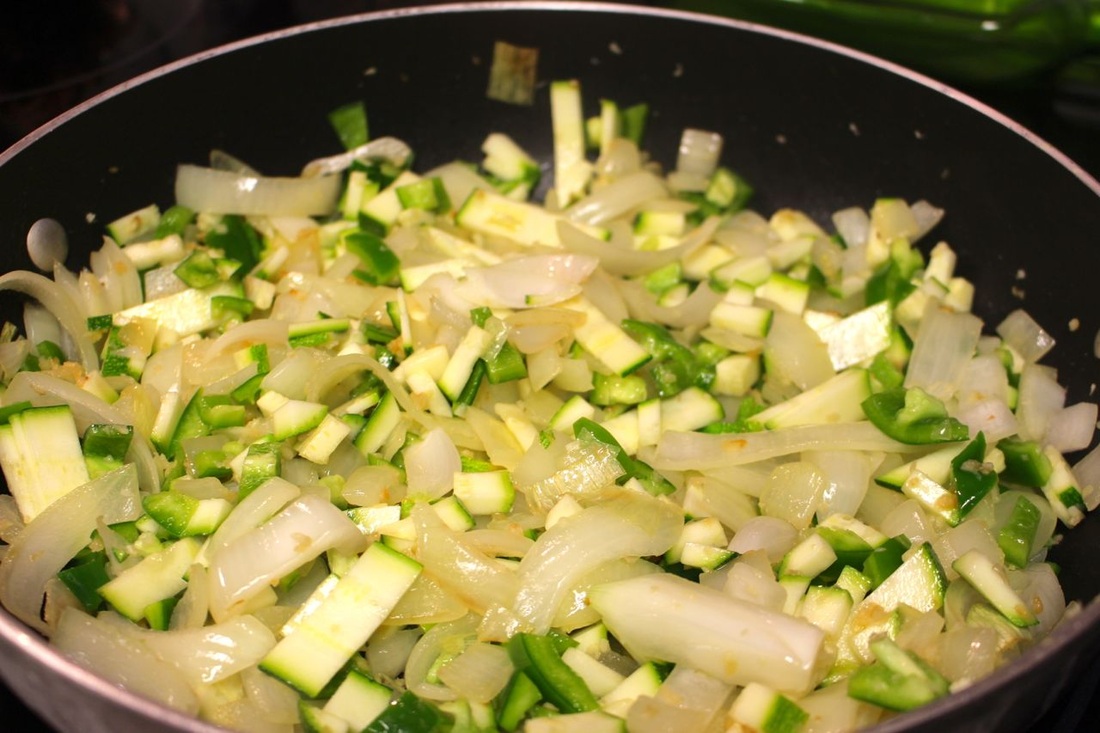
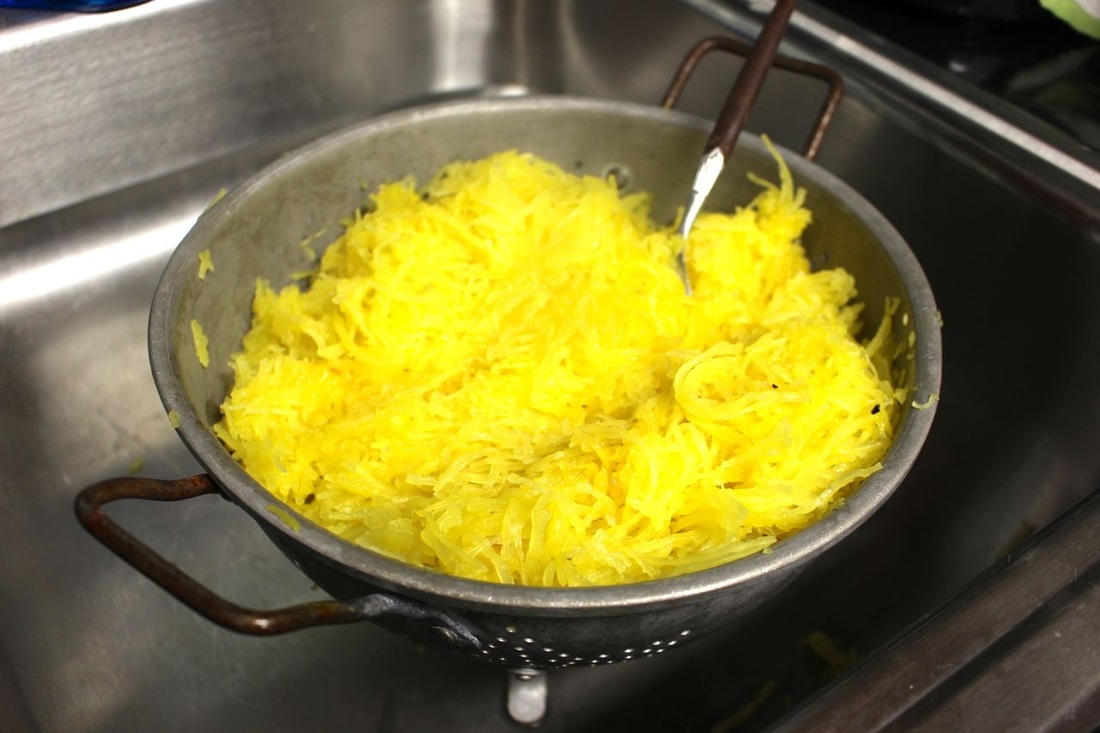
Step 6. Chop additional vegetables (if using) and saute over medium-high heat with a little bit of olive oil, or until the veggies are just cooked through. Remove from heat and set aside. Step 7. Once the squash has finished cooking, use a fork to shred the flesh into “spaghetti”. I like to shred into a colander, so the excess liquid can drain. This prevents the bottom of the lasagna from getting too soggy during baking. Step 8: Reduce your oven’s temperature to 350ºF.
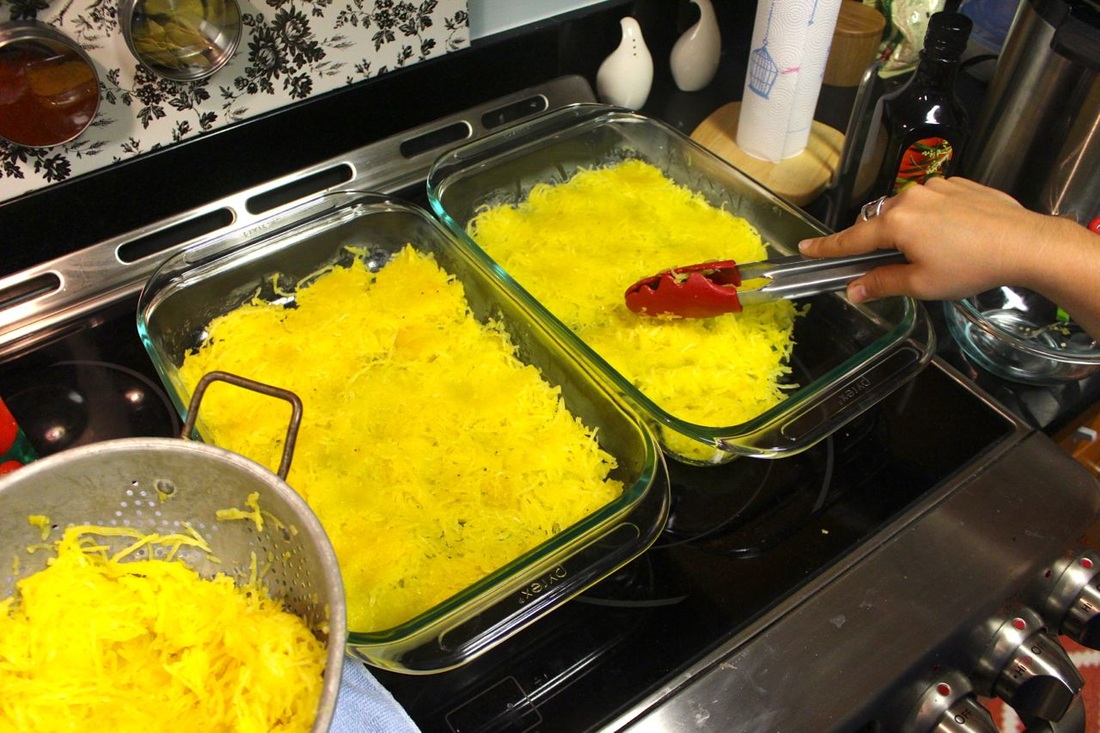
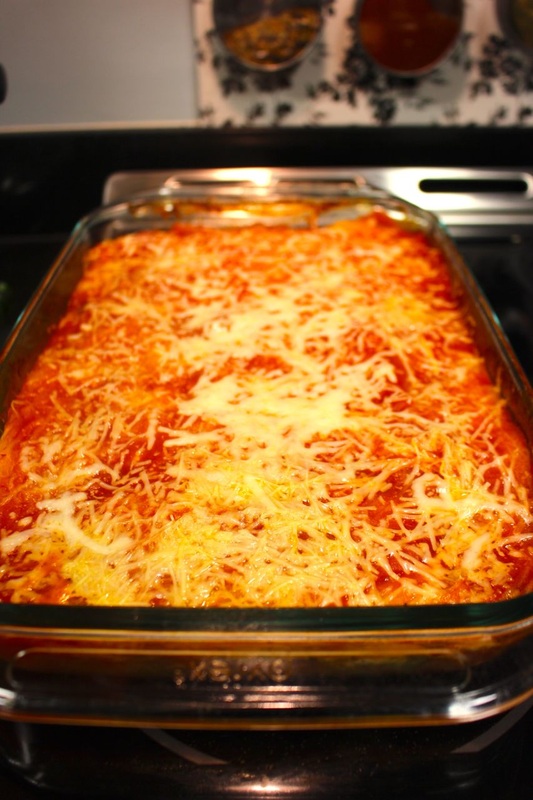
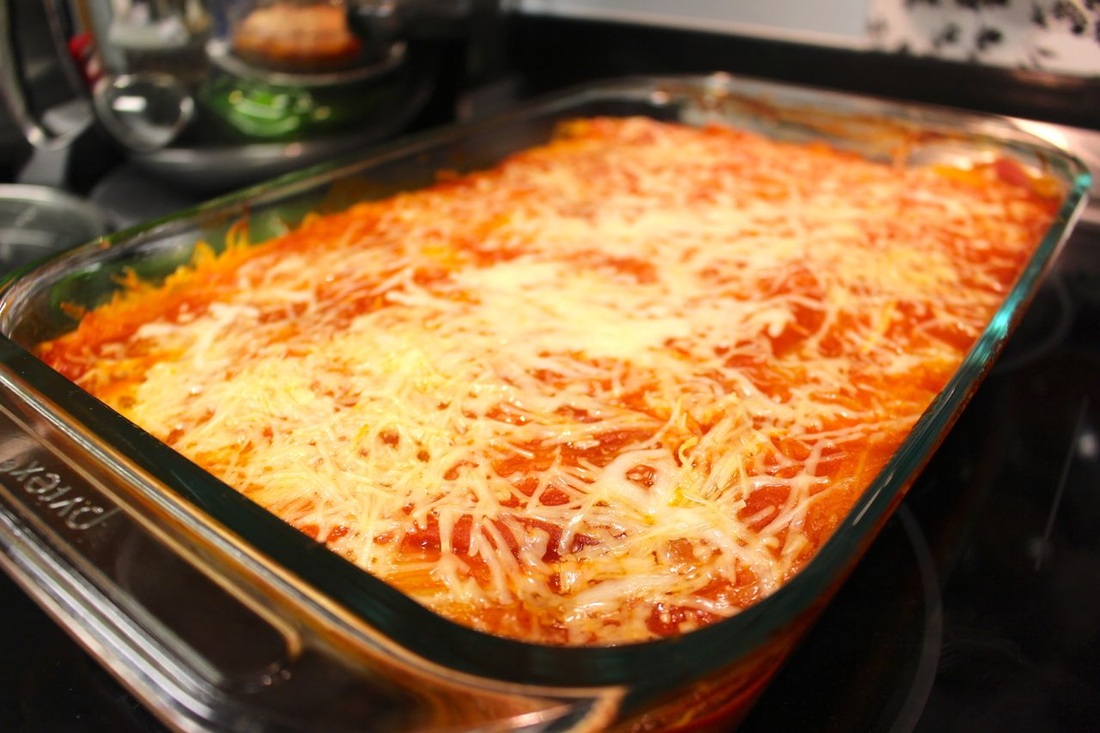
Step 9: Now it’s time to assemble! Start by lighly greasing a 9×14 baking pan (we love our pyrex dishes for this recipe), then add a thin layer of spaghetti squash to the bottom. I like to use tongs for this because it helps me spread out the “noodles” evenly.
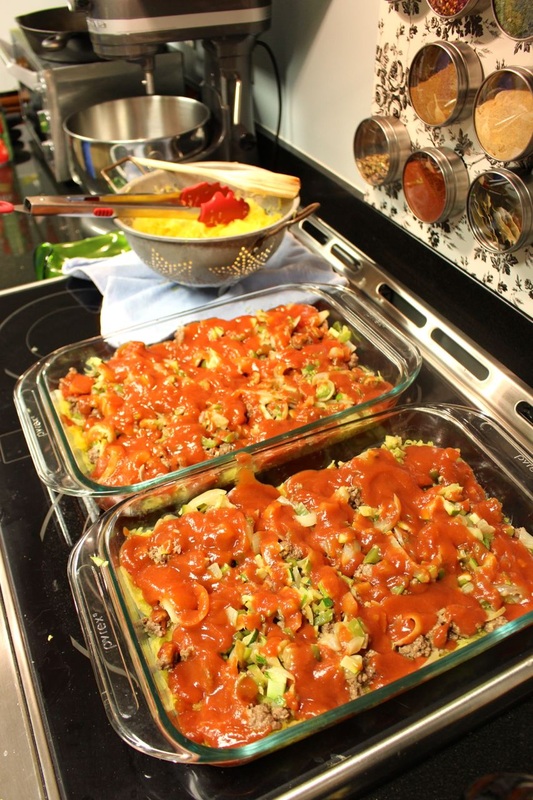
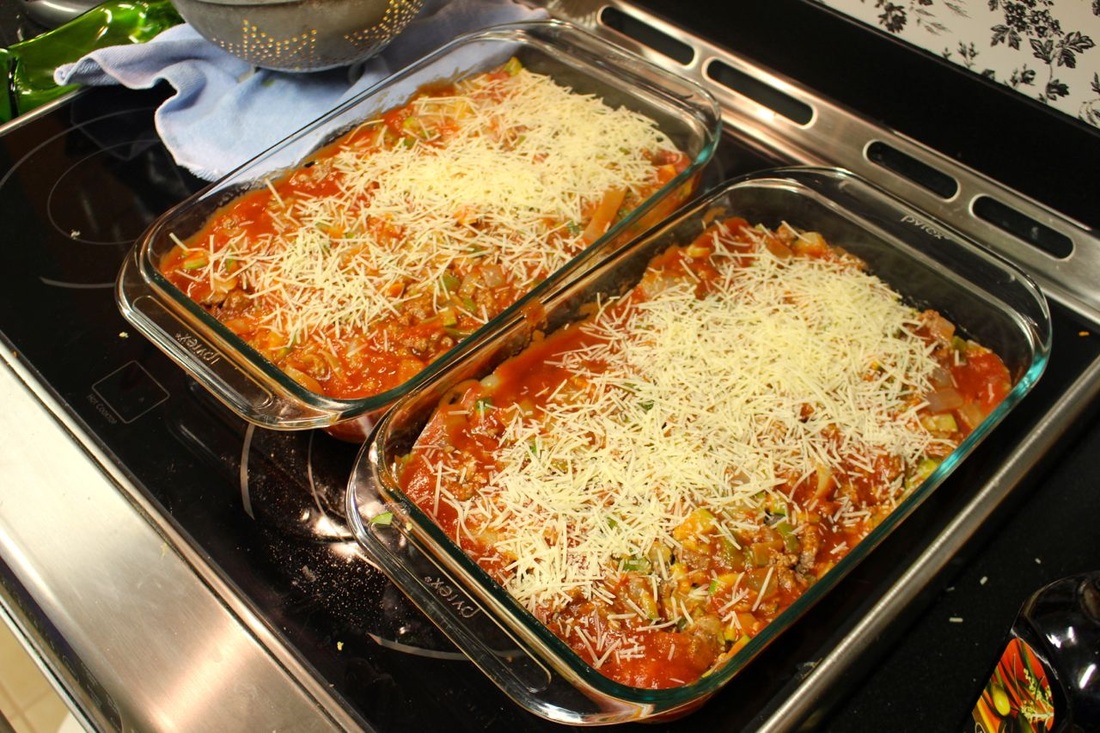
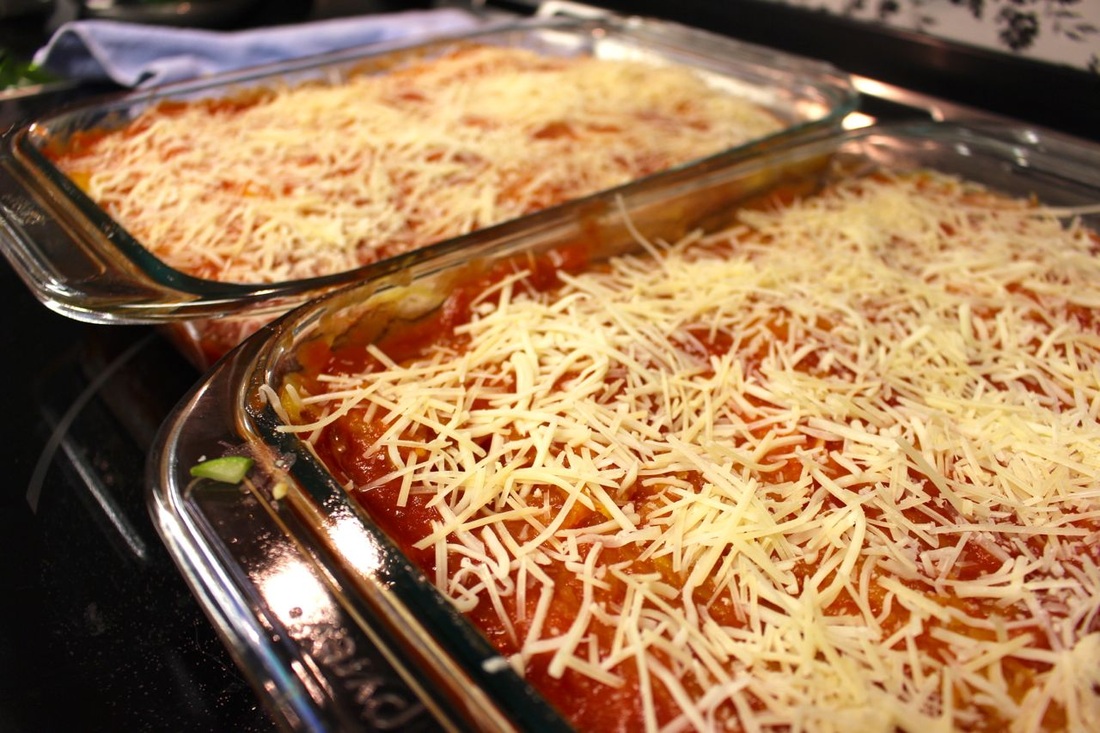
Then add your ground meat in an even layer… …followed by the vegetables. Next, top with the tomato sauce, and use a spatula to spread it evenly across the layers you’ve already made. Top with an even distribution of each of the cheeses… …and then repeat with another layer of spaghetti squash, tomato sauce, and cheese. Step 10. Bake your lasagna at 350ºF for 30 minutes, or until the lasagna is cooked through and the cheese is melted. You could also broil the top a little bit if you’re feeling fancy, to get that crispy-melty cheese top. Yumm. Step 11. Eat and enjoy!
Thanks for reading!
- Kaitlin
Ever since I made a gigantic crock pot of mulled wine for Thanksgiving last year, I have been loving hot mulled drinks this time of year. I wanted to come up with one that didn't take hours in a slow cooker, so I whipped up this recipe for quick stovetop apple cider!
Ingredients:
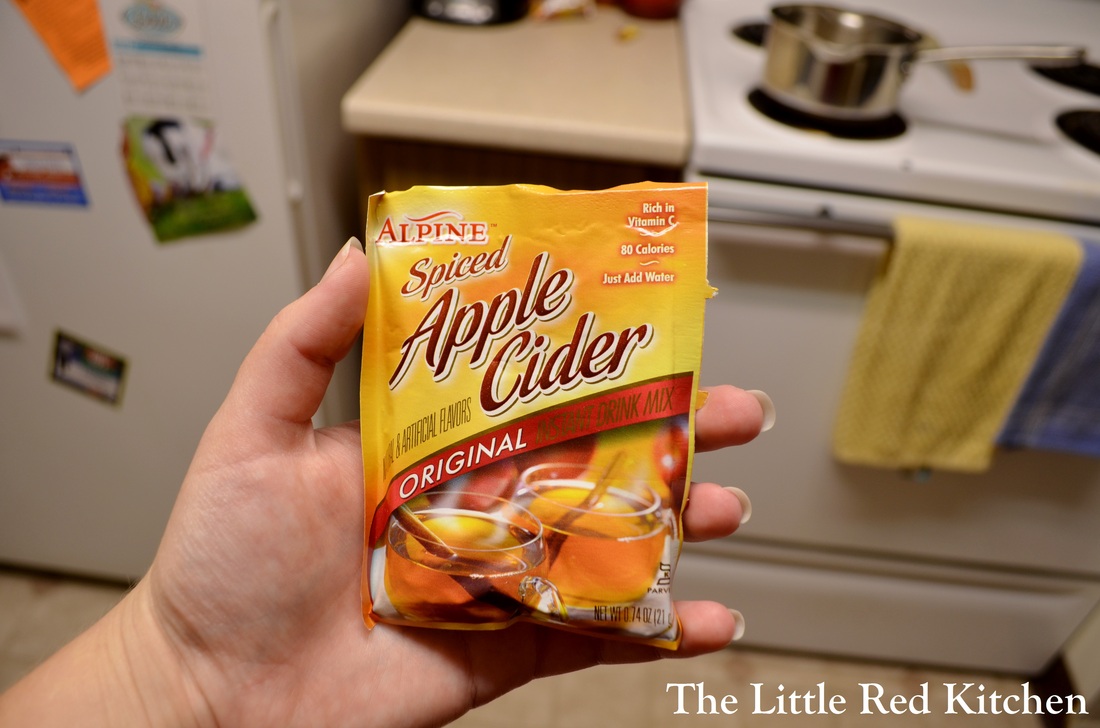
2 pouches of instant apple cider plus 14 oz. of water, or, 14 oz. of prepared apple cider
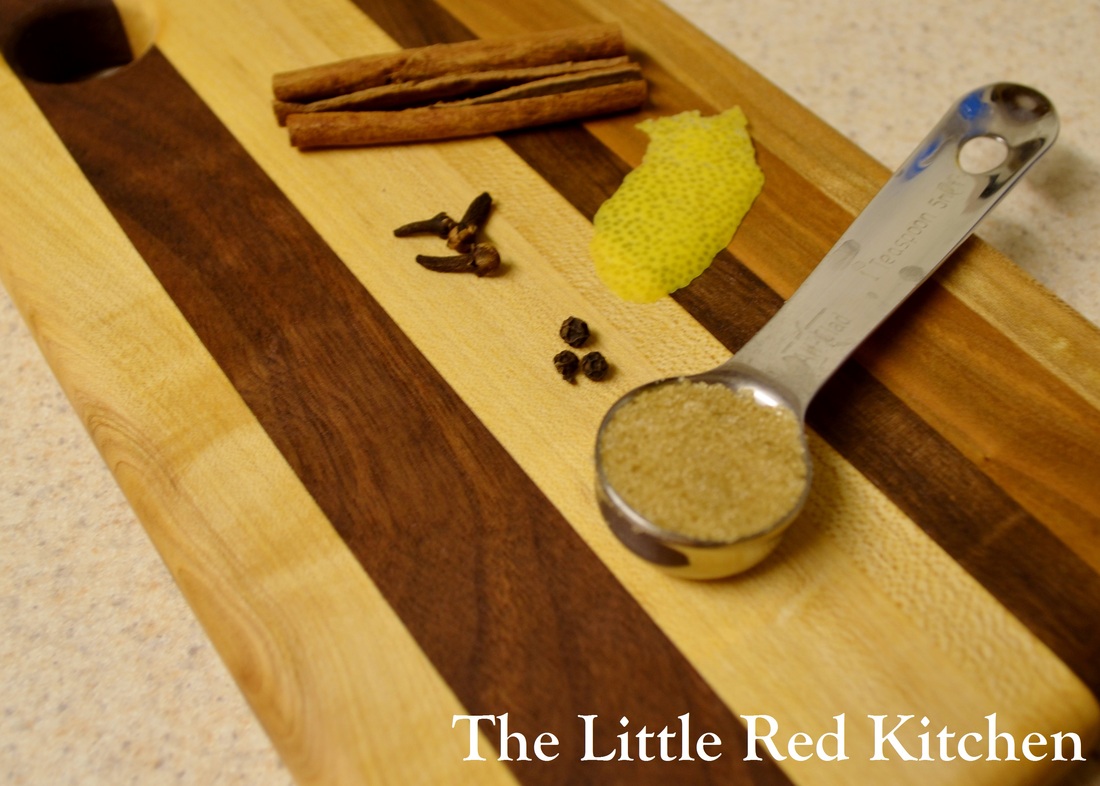
4 whole cloves
4 whole peppercorns
1 cinnamon stick, broken in half or cracked
1-inch piece of citrus zest (I used lemon, orange would work wonderfully too)
1 tsp. brown sugar
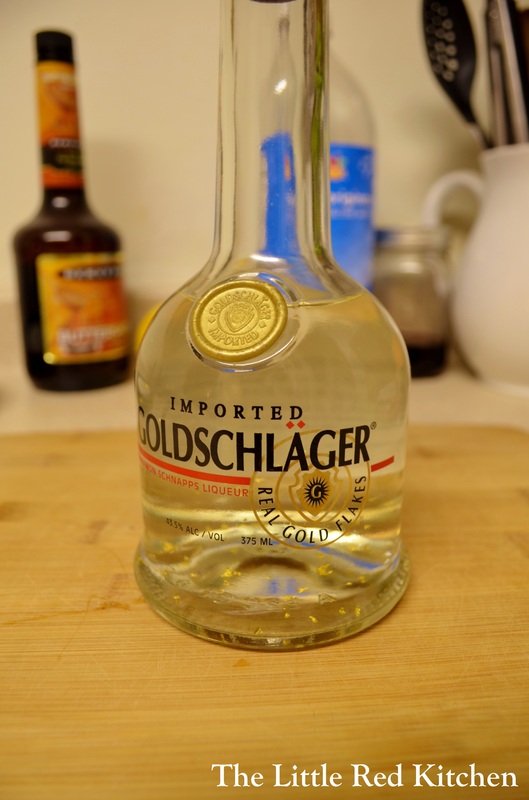
1 tbsp. plus 1 tsp. cinnamon liqueur
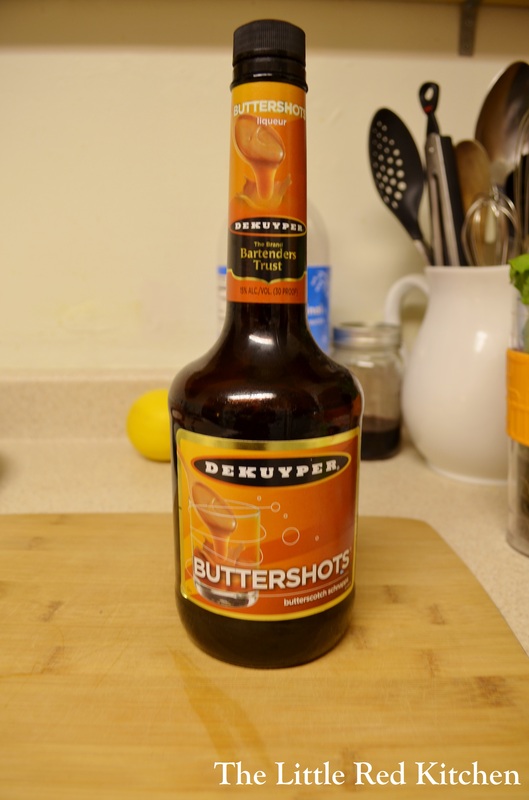
2 tsp. butterscotch schnapps (optional)
Serves 1 very large portion, or 2 regular portions. Can be easily doubled, tripled, etc. In fact, if you wanted to make a giant crock pot of this to cook on low all day, you can do that too!
This is a super easy recipe. It's really all about the ingredients. The small amount of sugar is added to cut the inherent tartness in the cider, and then the peppercorns and cloves are added to balance out that
extra sweetness from the sugar. Cooking is often a balancing act! Step 1:
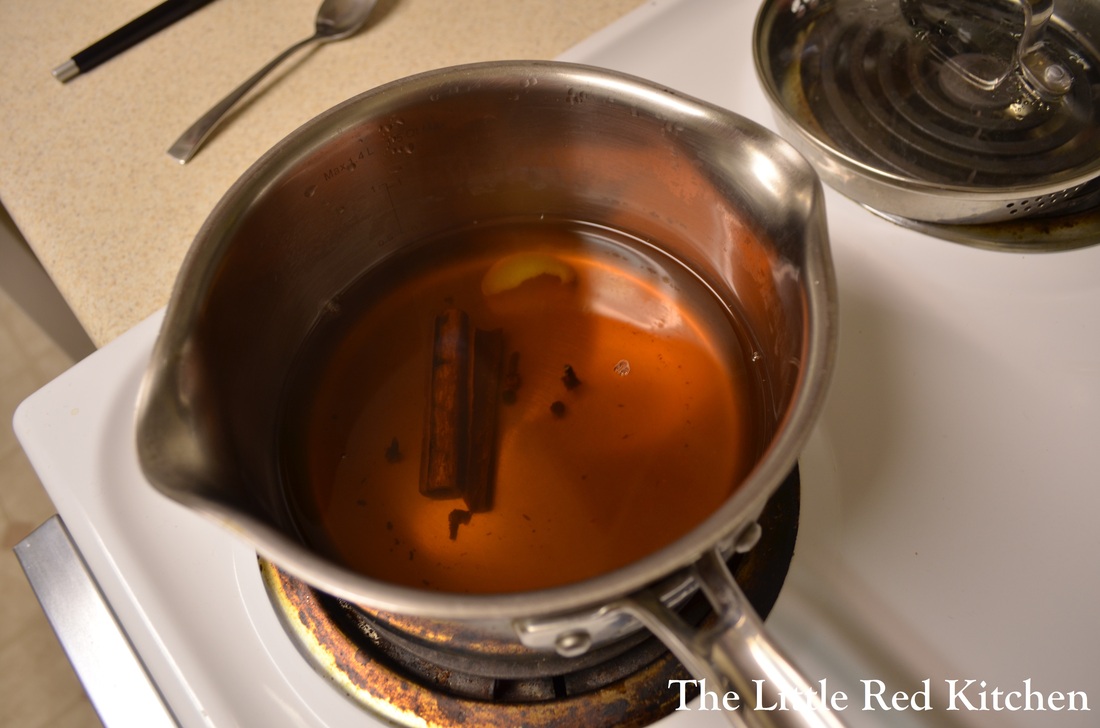
Pour the apple cider (or water and apple cider powder) into a small saucepan along with the cinnamon, cloves, peppercorns, sugar, and lemon. You can get a piece of lemon zest just using a regular vegetable peeler, but don't cut too deep and get any of the bitter white pith. Bring to a simmer over medium-high heat, which should take about 5 minutes, stirring until the sugar and powder have dissolved and the cider is clear. Cover with a lid and turn the heat down to medium-low, or whatever output allows you to keep the cider at a gentle simmer. Then just simmer away for 20 minutes! The kitchen will smell tantalizingly delicious. Imagine cooking this up before you have guests over, and they are greeted by the amazing smell of hot apples and cinnamon bubbling away on the stovetop when they walk through the door....
Step 2:
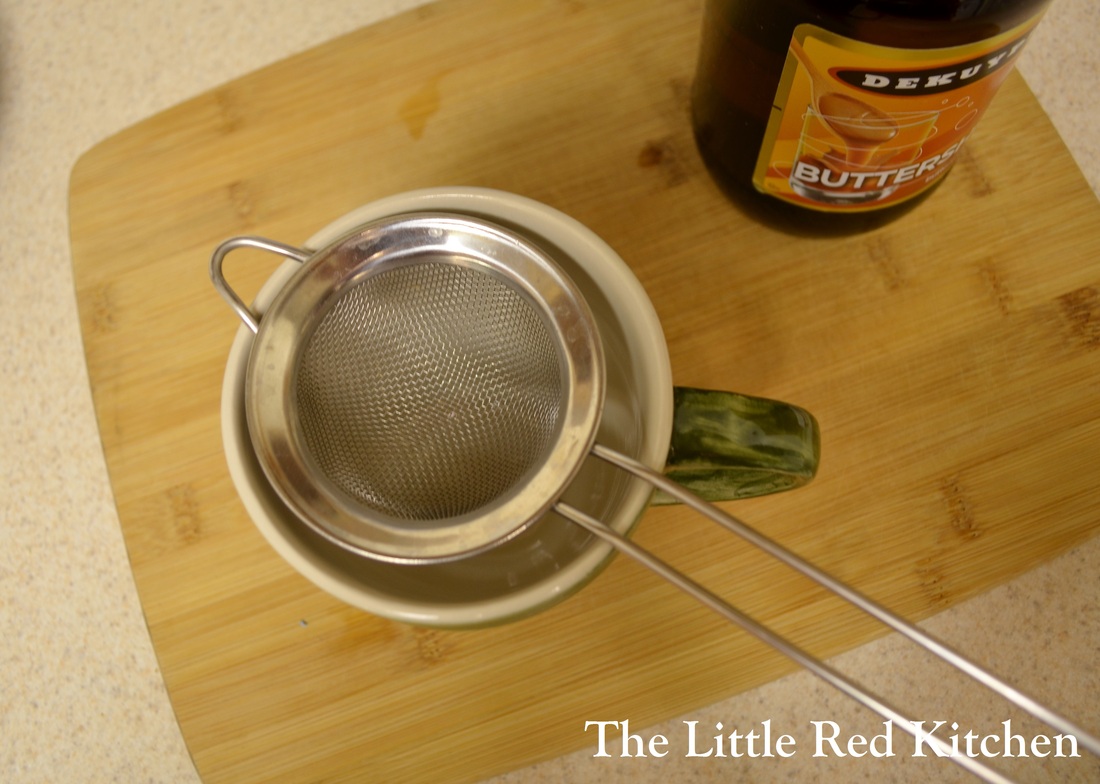
After 20 minutes, remove the pot from the burner and let it sit for a couple minutes with the lid on. Then, the best part: Pour in the cinnamon liqueur and schnapps, if using, stir to combine and briefly take the edge off the alcohol, for just a couple seconds, then serve while piping hot! I would recommend pouring through a little strainer to remove the broken bits of cinnamon stick that have probably formed. Notice how rich the color got, just in 20 minutes of stove time?
A mug of this drink will make you want to have a festive party surrounded by twinkle lights this holiday season, or snuggle up under blankets and have a movie marathon on a chilly Sunday. Both perfectly good options that we would advocate for this time of year. :) Enjoy!
~Lauren
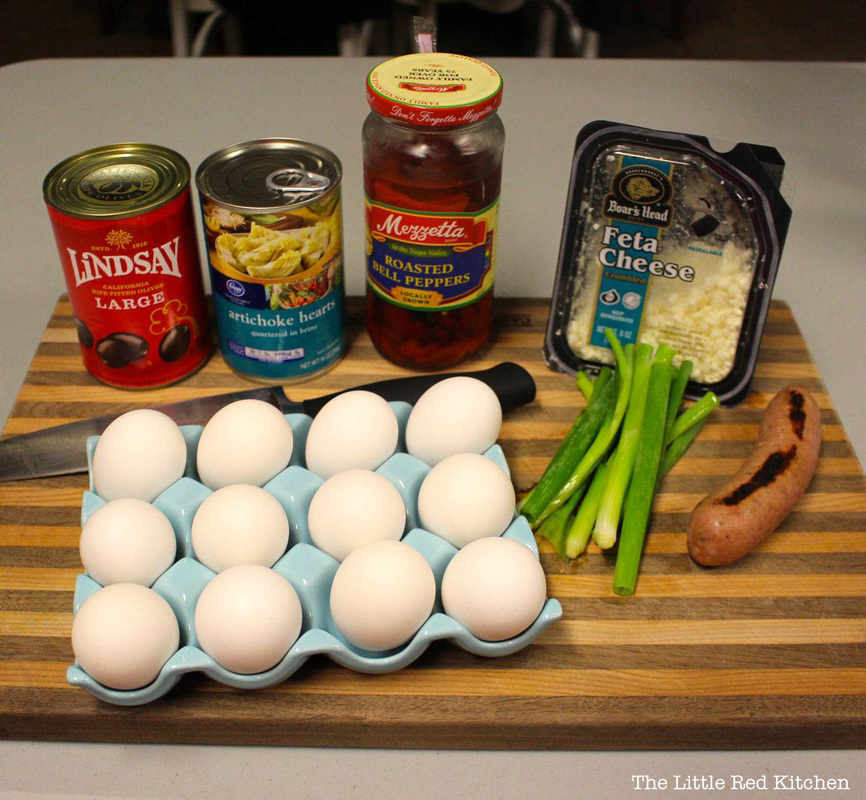
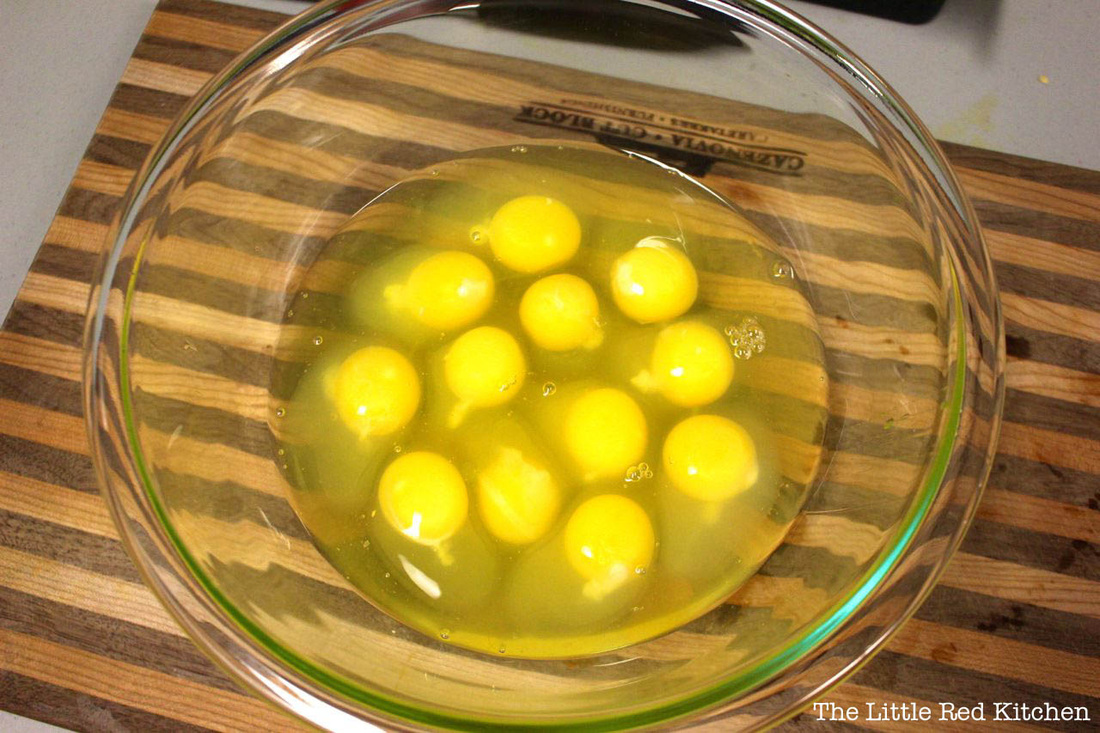
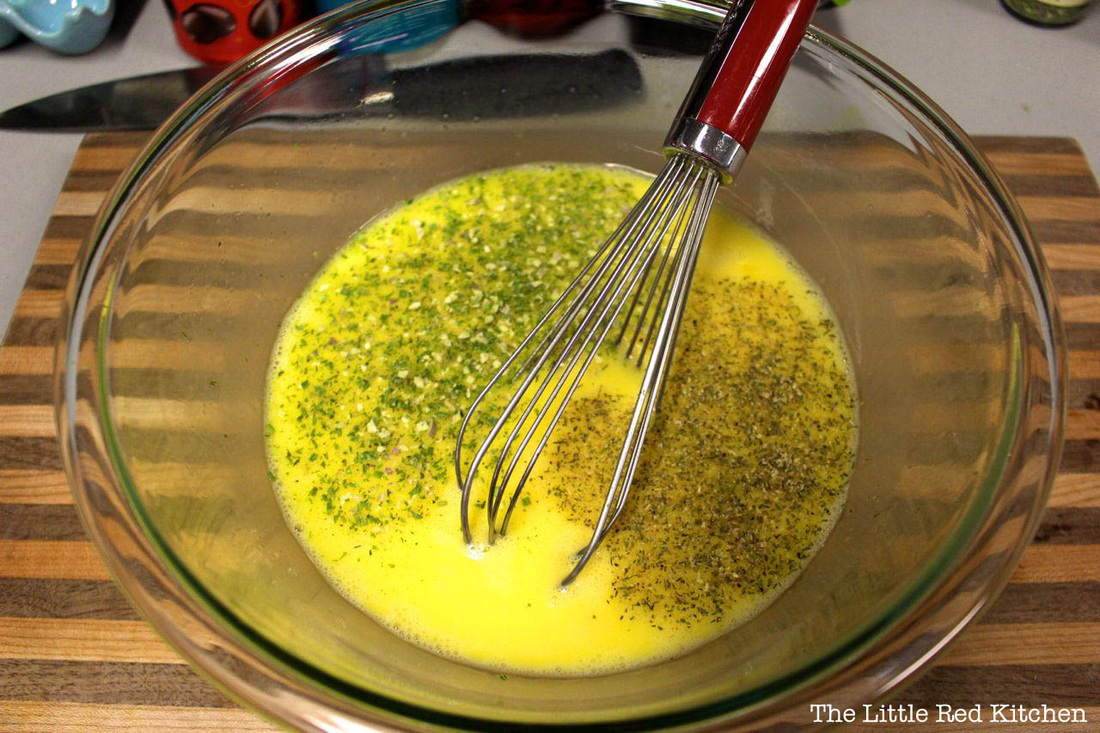
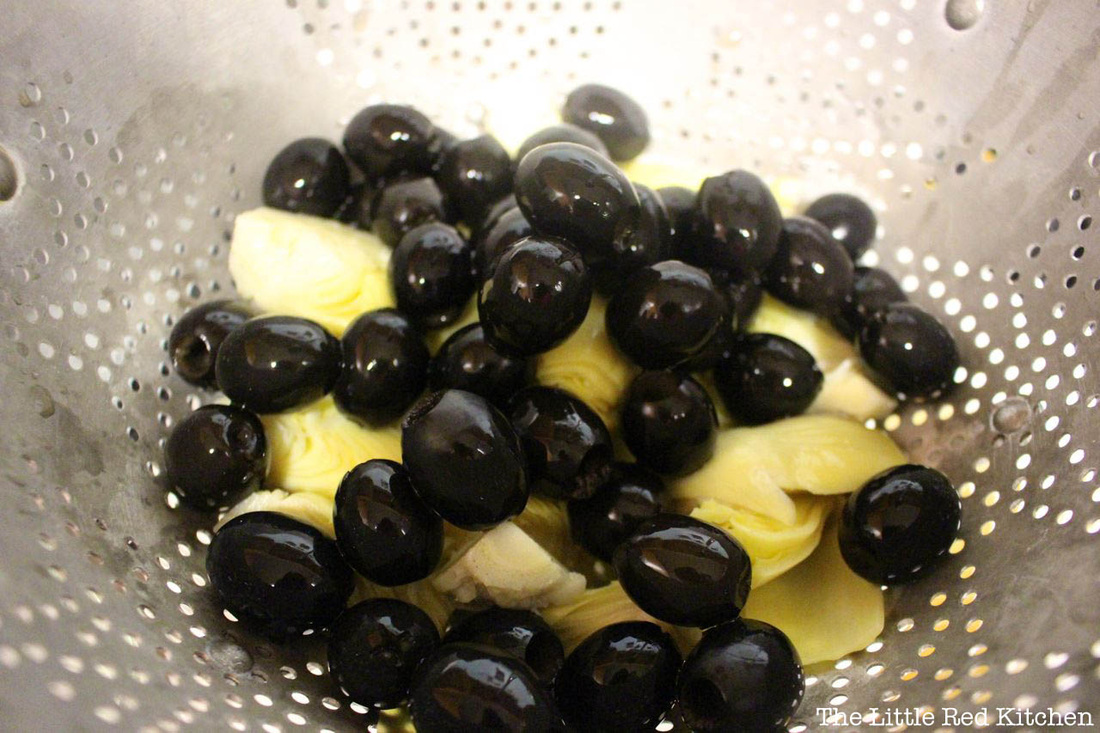
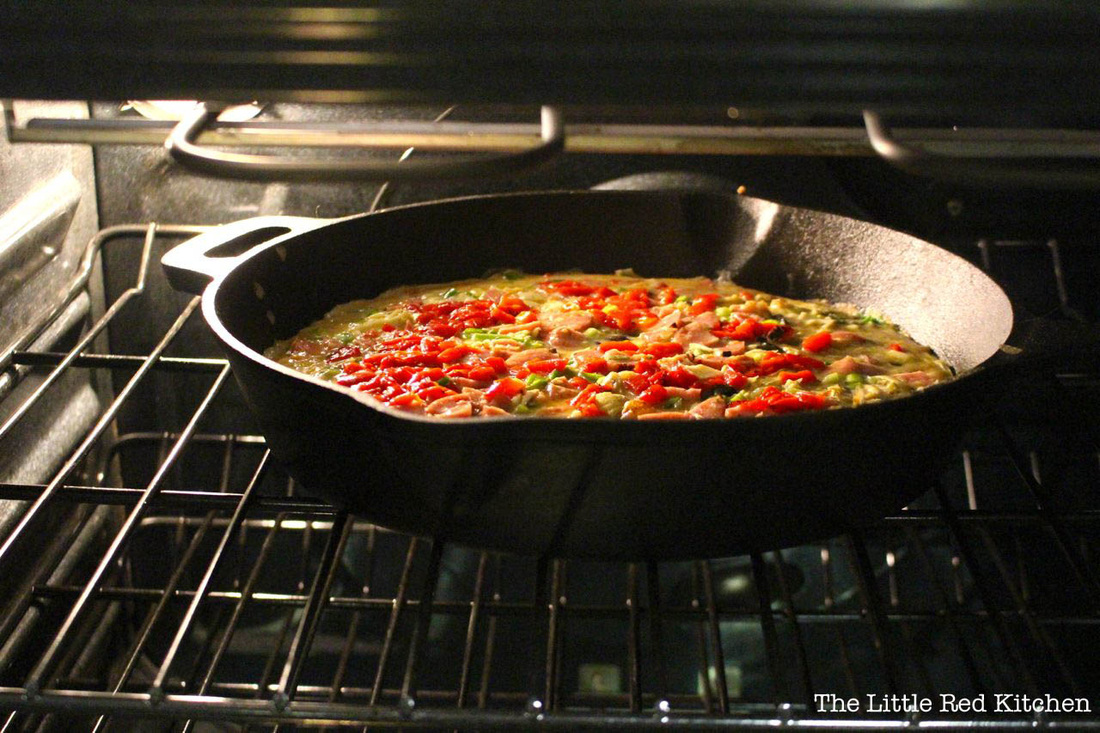
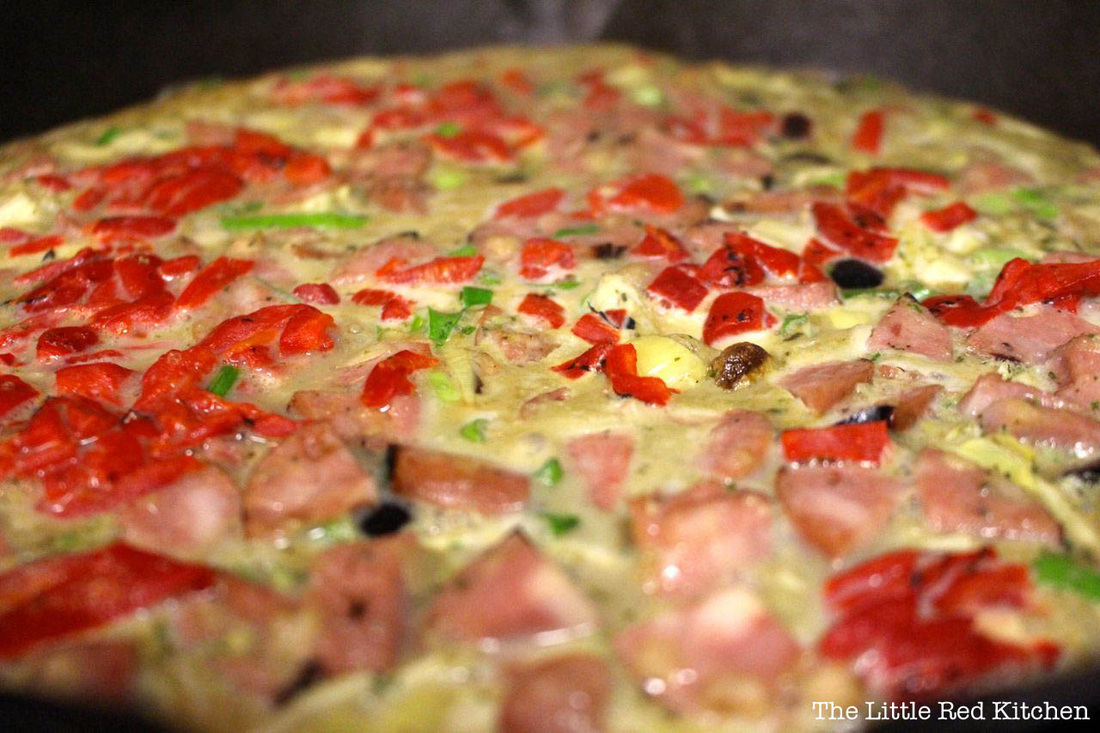
I had the first day of my (new!) full-time job today, so this post is going to be a quick one! I think in addition to providing you all with some quality recipes, I'd also like to occasionally provide you with some that can be altered based on your mood/tastes/what you have in the fridge. Part of learning (or continuing) to cook is adapting recipes to suit your needs, and it's been one of the greatest things I've learned over the years. Today's recipe is a great make-ahead breakfast frittata that should last two people at least 3-4 days, depending on how much you eat! Inspired by the Spanish Frittata Gillie's in Blacksburg (fellow Hokies know what I'm talking about, yum!), this is a delicious, nutritious, protein-filled way to start the day. This can also easily be altered to be vegetarian (just put in whatever veggies you'd like, chopped finely, and sauteed ahead of time if necessary). What you'll need: An oven-safe skillet ( mine is cast iron and 12'') Oil to coat the pan (1-2 tbsp olive oil or Pam) A dozen eggs (Good thing eggs are cheap!) "Fillings" of your choice-- I used: 1/2 can artichoke hearts, drained and rinsed, roughly chopped 1/2 can black olives, drained and rinsed, roughly chopped 1/4 cup roasted red bell peppers, finely chopped 1/4 cup feta cheese 1 chicken-apple sausage (by Aidells-- so good, and good for you!) 1 handful of green onions, tops only, sliced into 1/4 inch sections 1 tsp Penzey's Sunny Paris Seasoning (if you don't own this, you should!) 1/2 tsp Penzey's Mural of Flavor (salt substitute) Step 1: Preheat your oven to 375F, and crack one dozen eggs into a large bowl. Look how sunny and happy they look! Step 2: Season as you'd like, and whisk until well blended. (Optional: Add a splash or two of milk if you're into that kind of thing!) Step 3: Drain and rinse your olives and artichoke hearts, if you're using them. Drain them really well after you've rinsed them too-- you don't want watery artichokes making your eggs runny. Prepare remaining ingredients as desired (I roughly or finely chopped all of the ingredients on my list above).
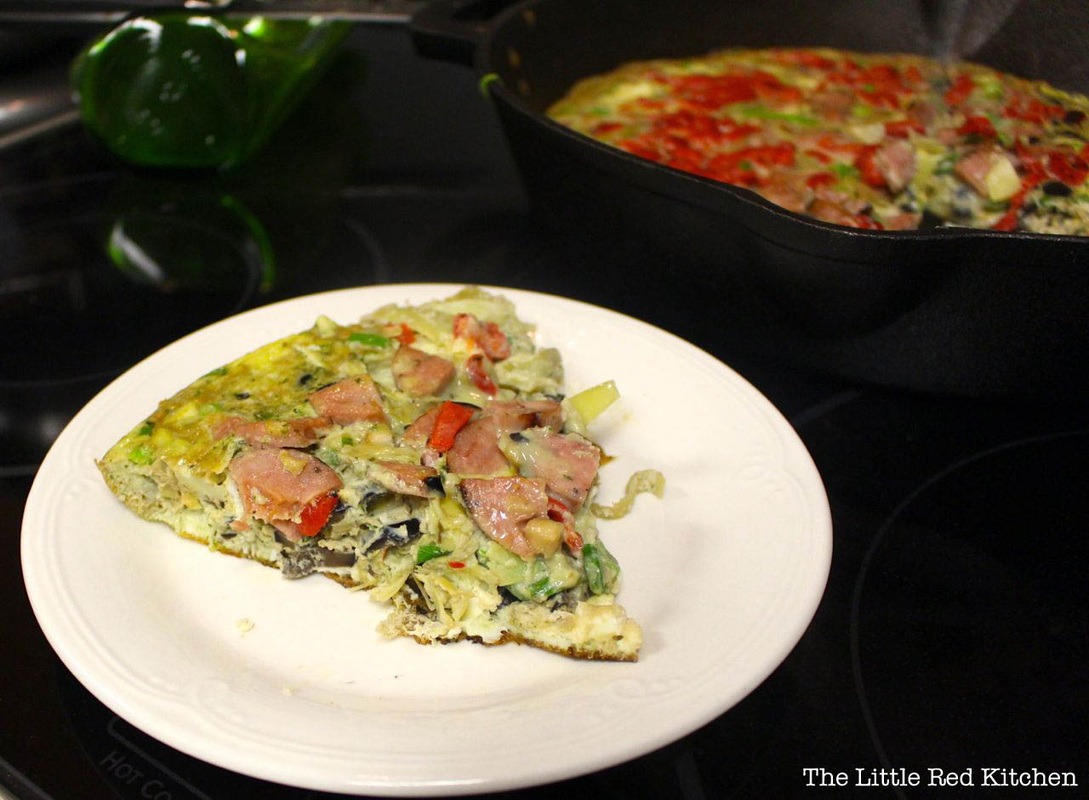
In the meantime, warm your oven-safe skillet over medium heat, and coat with a thin layer of cooking spray/ olive oil. Step 4: Pour eggs into skillet and distribute toppings evenly throughout the pan, pressing down with your spatula if necessary to ensure that all ingredients are at least partially submerged in the egg. Step 5: Once the bottom of your frittata has set, put on oven mitts and carefully transfer the skillet to the oven. Bake at 375F for 5-10 minutes, or until the middle of the frittata is firm (the eggs have browned very slightly and the frittata doesn't jiggle when you move the pan). Remove from oven. Doesn't it look marvelous? Cut up using a knife, and your frittata should easily lift out of the pan in pizza-shaped pieces. This is great on its own OR, if you're
...like my husband: with ketchup.
...like me, with a little balsamic and olive oil.
YUM. Keep this bad boy in the fridge for up to 5 days. Thanks for reading!
- Kaitlin
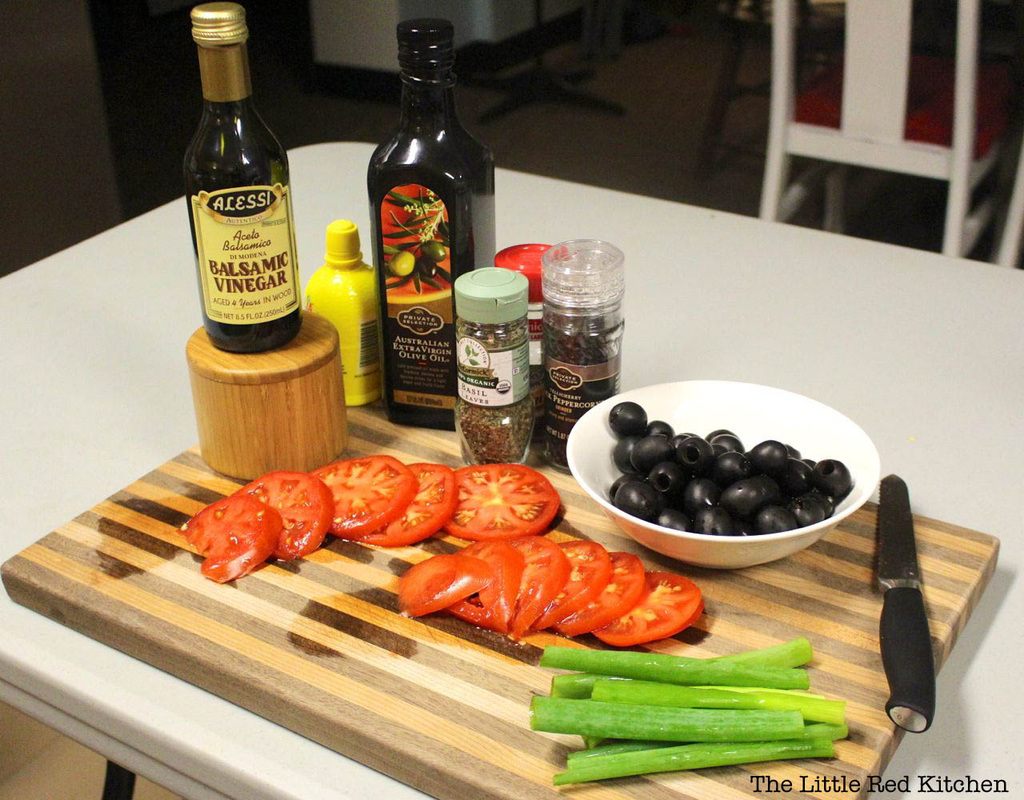
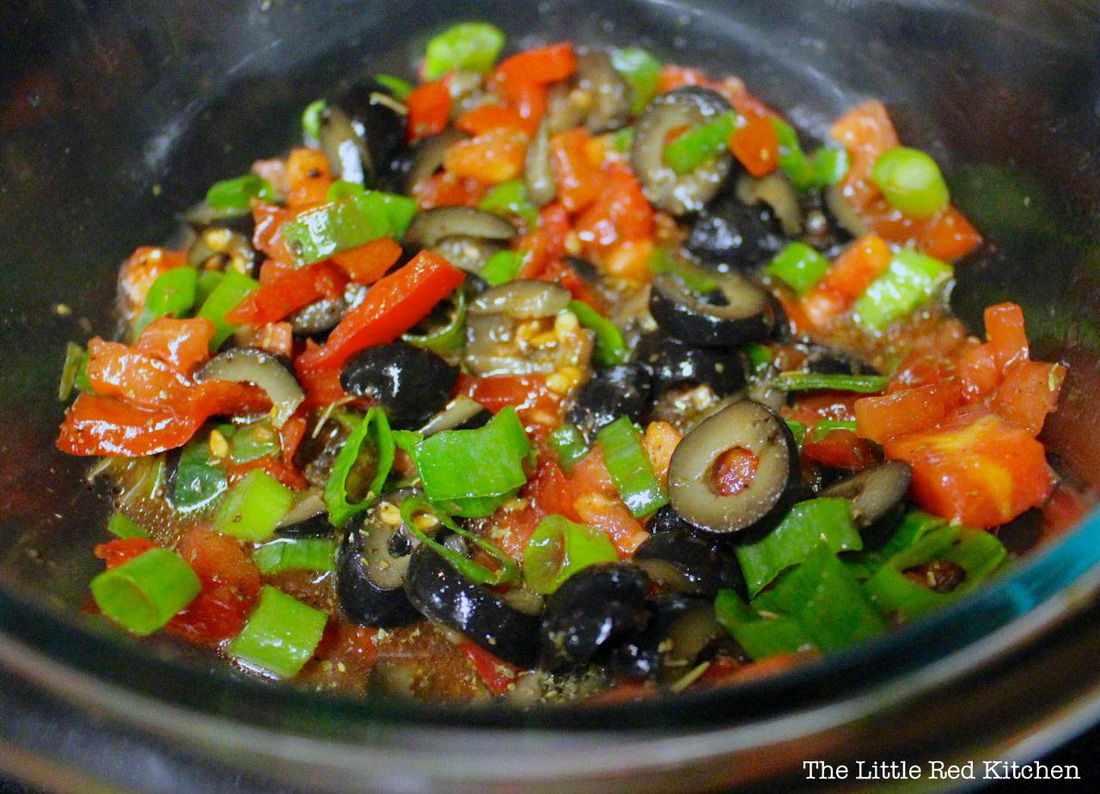
Sometimes recipes are inspired by complex ideas, and other times... you just have to use up what's in your pantry. My parents brought us a generous supply of garden-fresh tomatoes when they came to visit a few weekends ago, and the last few needed to be used. I'd also been in the mood for olives (I think at this point I've gone through three 16 oz cans in as many days?), and thus, this mediterranean "salsa" idea was born.
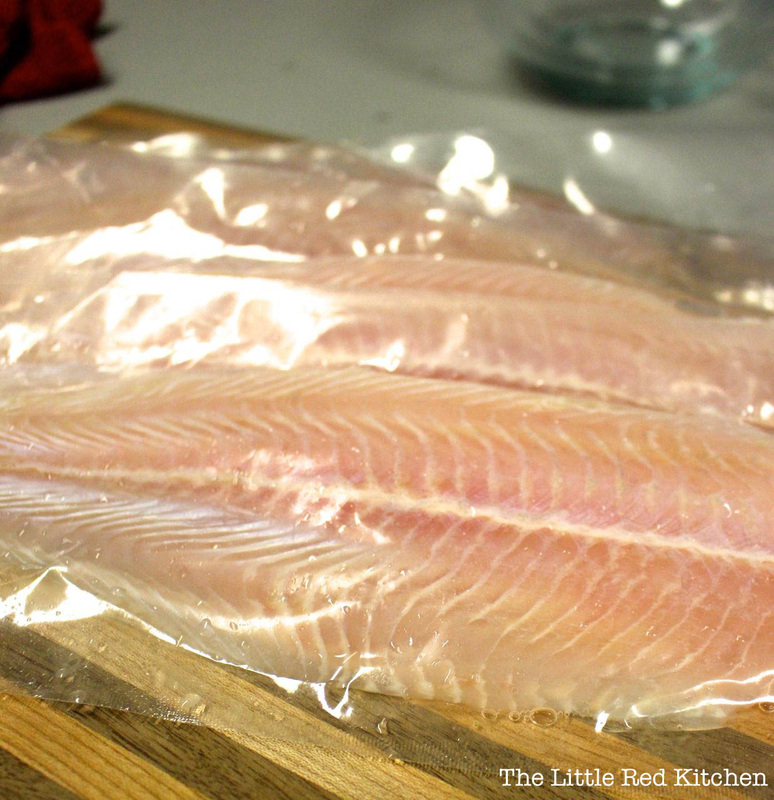
My husband, Jay, and I also stock up on frozen Swai... it's a really under-appreciated white fish in my opinion! It's fatty, buttery, and cheap. (You can get "river farmed" swai for $3-4 a pound.) I like to think of it as a fattier version of tilapia, but it's apparently a catfish-like fish found in Southeast Asia. Anyway, yum.
This recipe is super easy, but it looks impressive (and should only take you about 35 minutes).
What you'll need:
For the fish:
3-4 large frozen swai fillets, thawed
2-3tbsp olive oil
For the salsa:
2 medium beefsteak tomatoes, diced
1/3 cup green onions, finely chopped
1/2 cup black olives, roughly chopped
1 tbsp balsamic vinegar
2 tbsp lemon or lime juice (lime would be better, but I was out!)
1 tsp dried basil
1 tsp dried oregano
1/4 tsp salt
1/8 tsp freshly ground black pepper
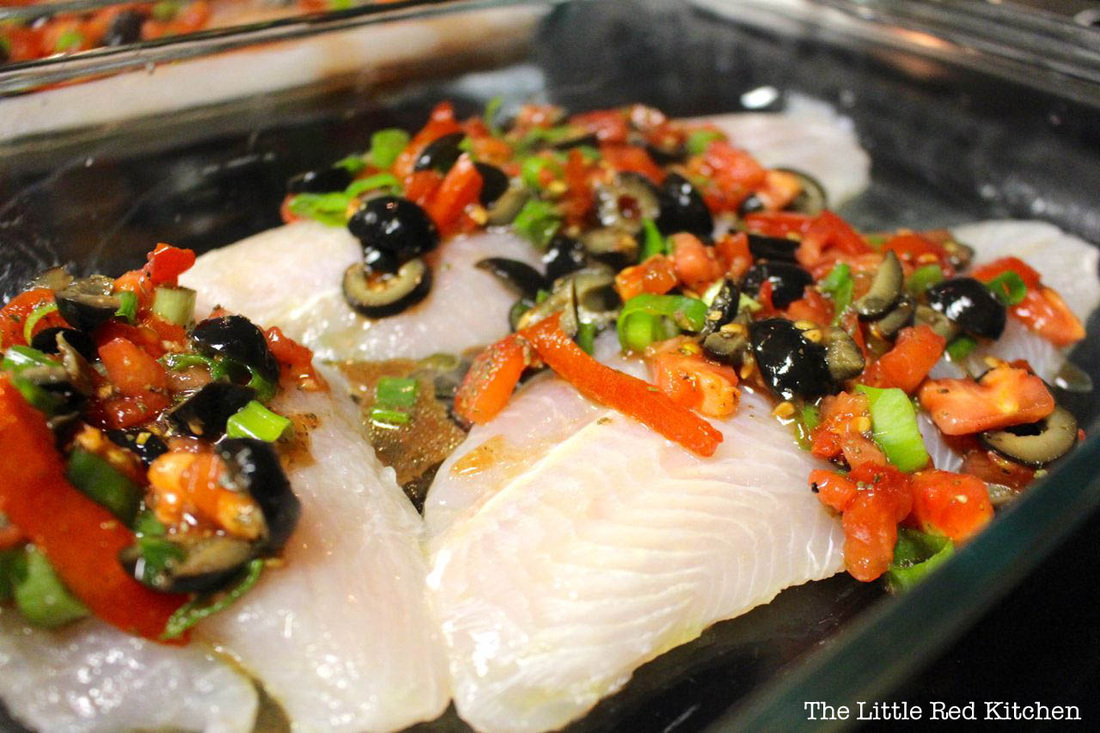
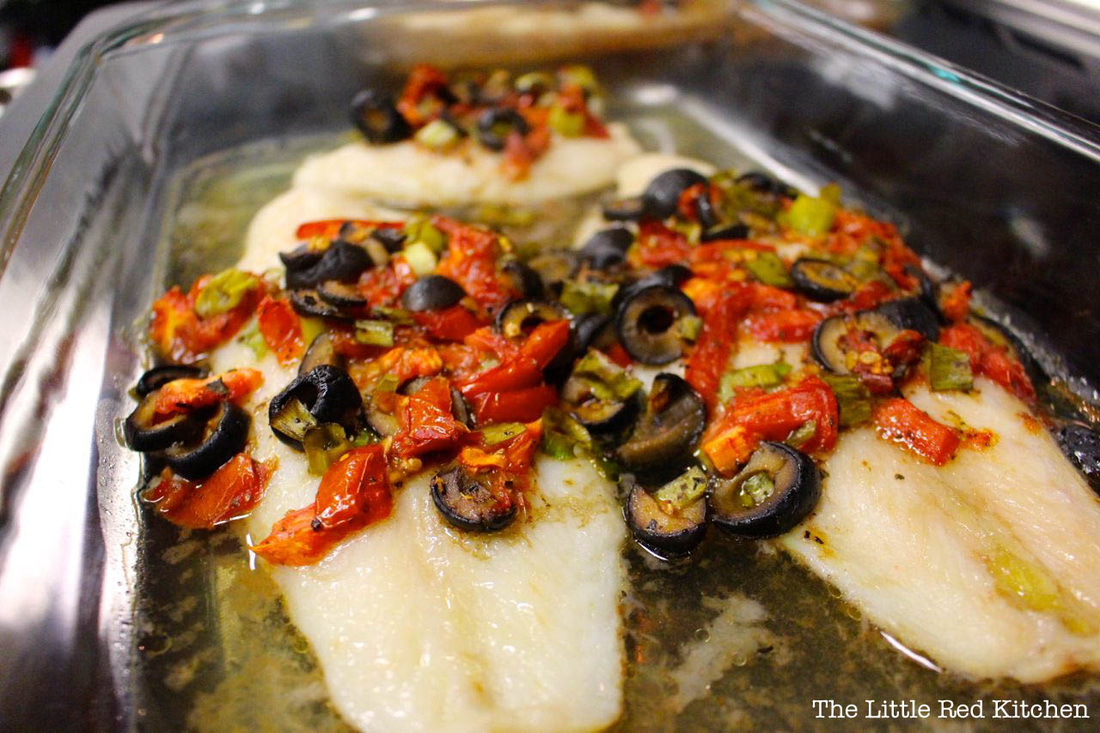
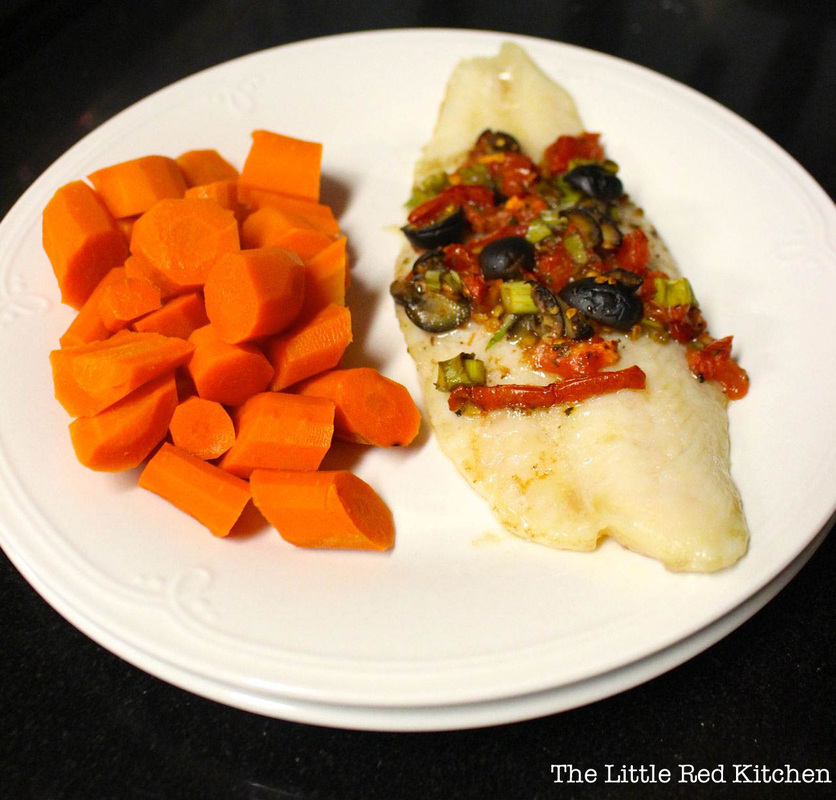
Step 1: Preheat your oven to 350F, remove swai fillets from packaging and pat dry. Step 2: Place the fish in a baking pan large enough that the fillets don't overlap. Brush both sides of the swai with enough olive oil to just coat them. Step 3: Combine all salsa ingredients listed above, and stir to combine. Step 4: Throw that salsa on top of the fillets... really, however you'd like. Bake the fish at 350F for about 30 minutes, or until the fillets are cooked through. Doesn't it look fancy and delicious? (It was.) ...and here was my dinner plate: mmm carrots. (Not the most 'mediterranean' option, but hey.) Thanks for reading!
- Kaitlin
Spaghetti squash, like eggs, is one of those foods that gets me so pumped about what food is. It's a squash like any other squash, but then you run your fork through it after baking and BAM! Perfectly formed spaghetti strands. Food can be amazing, and spaghetti squash needs no embellishment, which is why I paired mine with a simple and quick sage and walnut butter sauce. This is a classic sauce...you don't always have to reinvent the wheel in the kitchen. But it pairs so perfectly with the delicate squash, and it's so yummy to boot. Vegetarian or not, this is a fantastic Fall supper.
Ingredients:
1 spaghetti squash, about 2 lbs. (whatever size you use, you just have to adjust the cooking time; if you use a 3 lb. squash or larger, increase the butter to 5 tbsp.)
3/4 tsp. salt
1/2 tsp. coarse ground black pepper
4 tbsp. butter
10-15 fresh sage leaves
1/2 cup shelled walnuts, roughly chopped
1 tbsp. grated parmesan or pecorino cheese
Our 2 lb. squash would serve about 3 entrée sized portions. The 3 lb. (logically) would serve more!
Step 1:
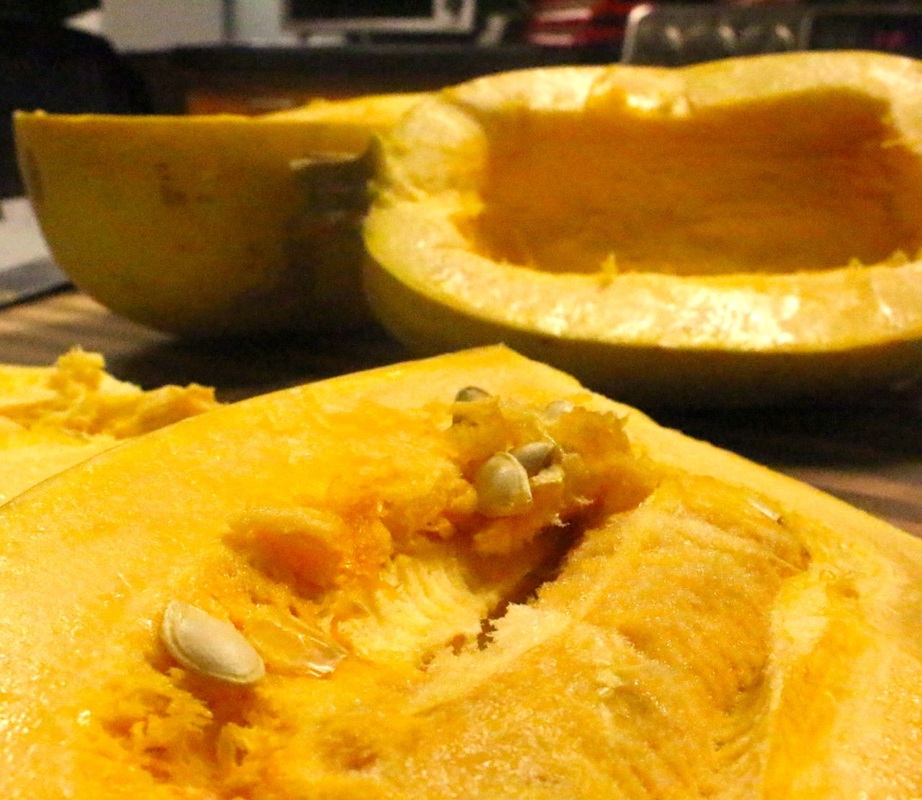
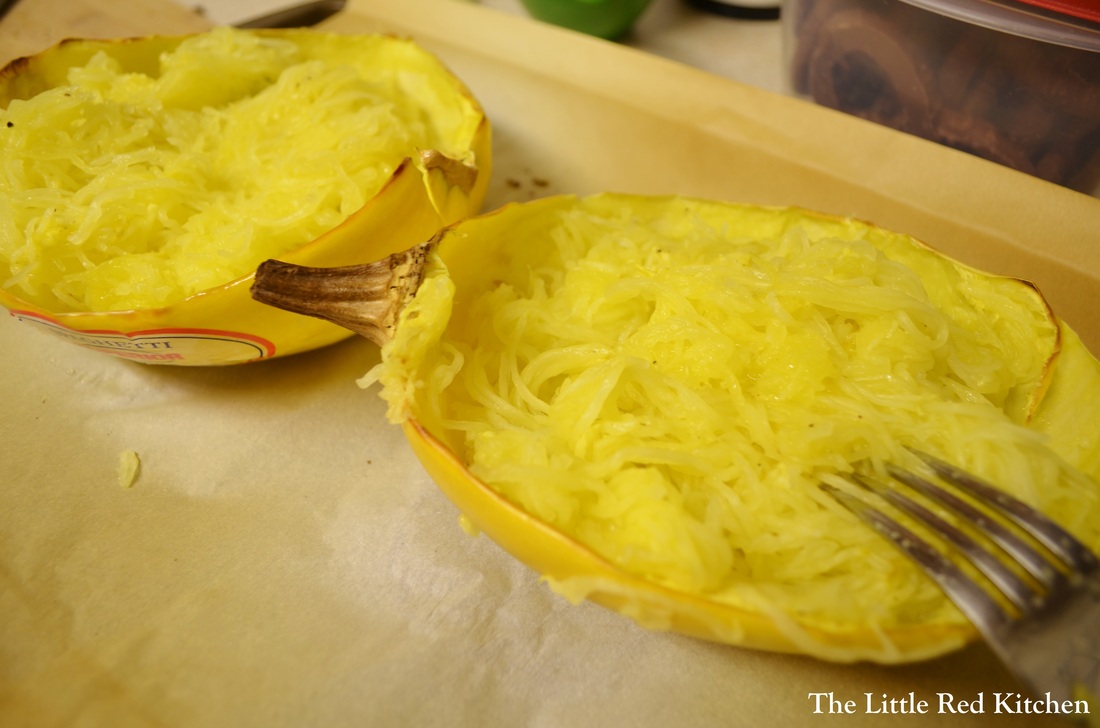
Preheat your oven to 400 degrees with the oven rack in the middle of the oven. Using a sharp knife, carefully halve your squash lengthwise and scoop out the seeds from each half.
Step 2:
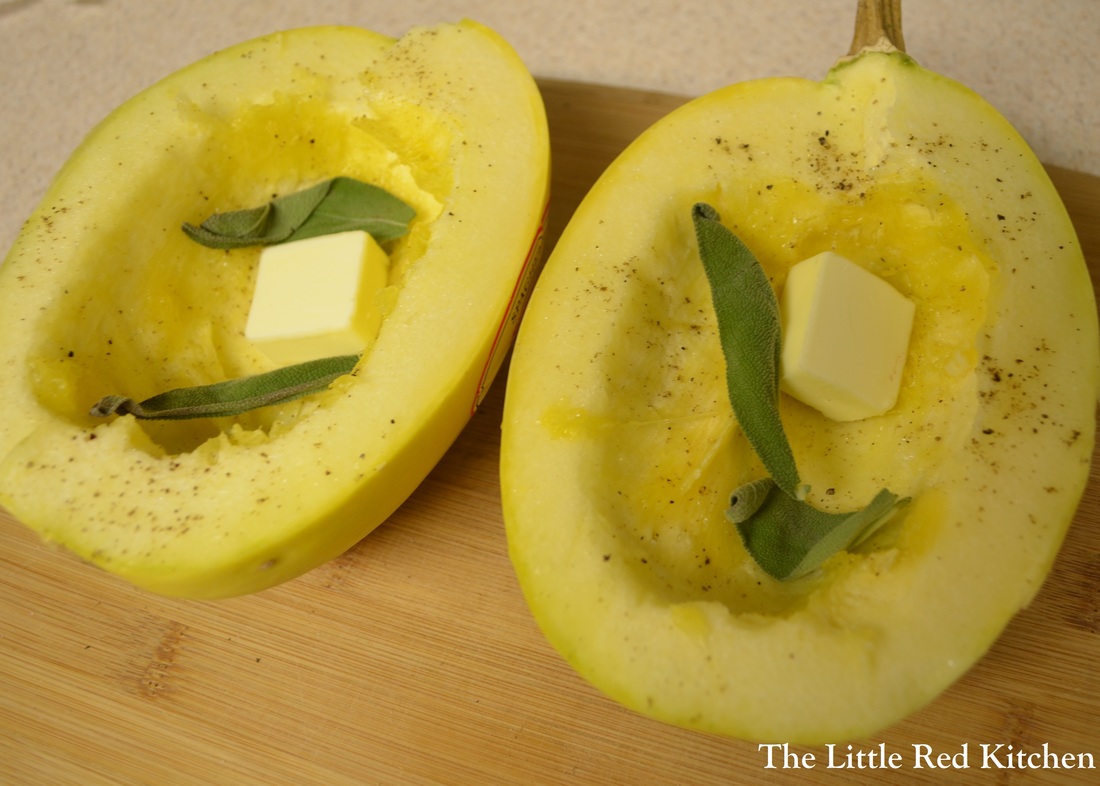
Place each half on a rimmed baking sheet, flesh side up. I put parchment down first, like always, so that in case the squash leaks or bubbles, I don't have to clean up a sticky baking sheet, I just have to throw away the parchment. Season each half with a 1/4 tsp. of the salt and pepper, then place 1 tbsp. of the butter and 2 sage leaves in the hollows of each squash half. 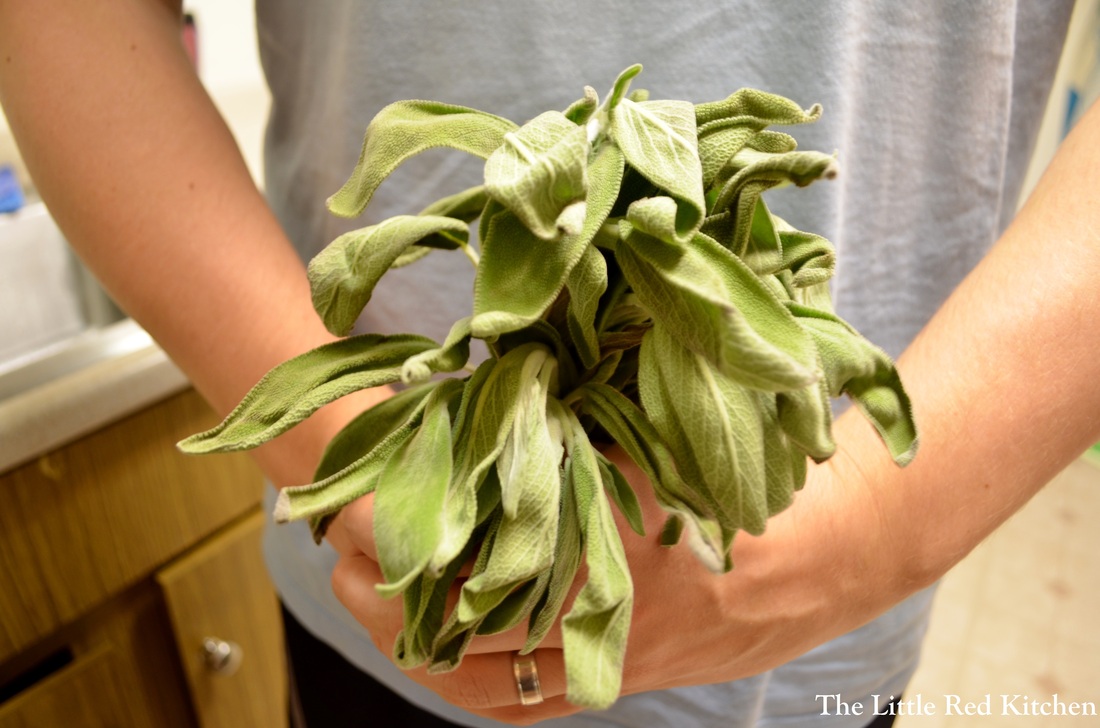 For ME? You shouldn't have <3 Step 3:
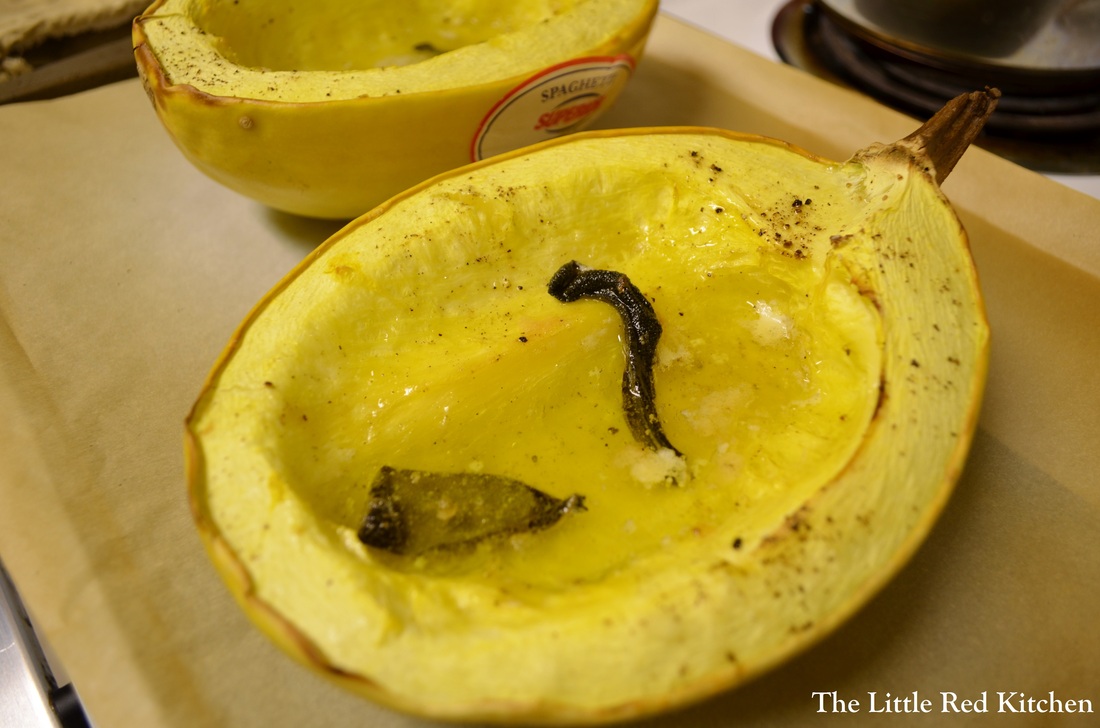
Bake the squash on the middle rack until the flesh is just soft, about 40-45 minutes. For a larger squash, this may be closer to an hour. Remove the squash from the oven and let cool until you can work comfortably with it, about 15 minutes. Step 4:
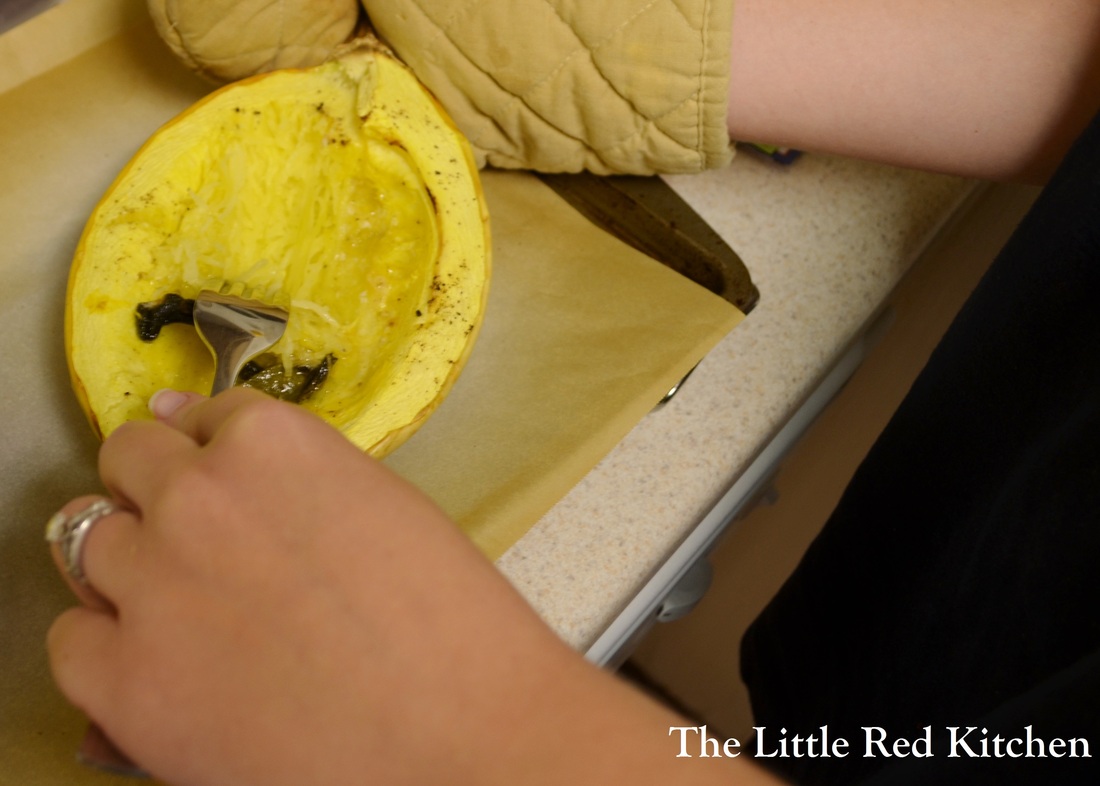
Here comes the fun part. Using a fork, simply run the prongs long-ways across the flesh, and it will form spaghetti strands. Just try to keep that lovely pool of butter in there, tossing it with the squash as you go. The squash is still plenty warm, and the sauce takes a couple minutes to throw together, so just let the squash chill out for a bit.
Step 5:
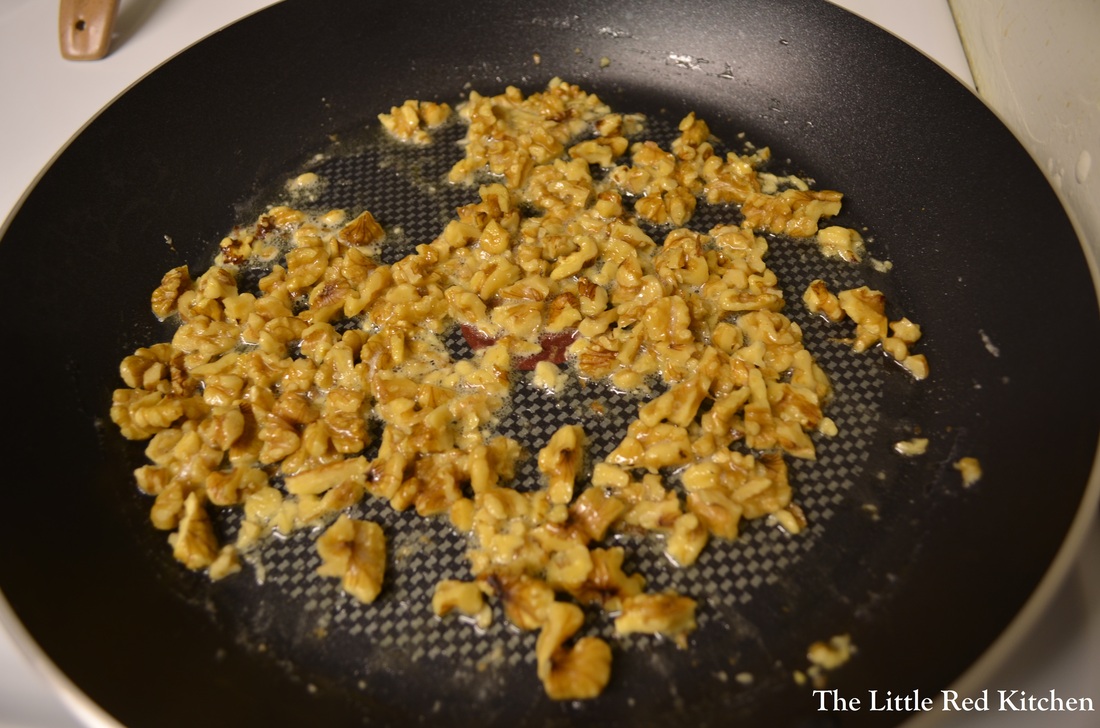
Heat the remaining butter in a large skillet over medium heat, then add the walnuts and toast for about a minute, letting the butter foam and sizzle. Then add the remaining sage leaves and stir them around for about a minute as well, until they start to crackle in the pan. Done! Add the spaghetti to the pan, toss to combine and warm through for about a minute or two. Add the rest of the salt and pepper if you need to and serve, topping with the grated cheese. Both fresh tasting and comforting, this meal will warm your belly up in the best possible way.
Spaghetti squash is a little too delicate for a hearty marinara, but a fresh chunky tomato salsa would work marvelously, as well as an herbaceous pesto, if you'd rather give those a try. Somebody was obviously playing with their food to begin with if they discovered you could turn squash into noodles. So why not play some more? :)
~Lauren
I think it's a definite staple for every home cook to know how to make their own stock. In the fall/winter, I make so much soup, stew, etc. that we literally buy cartons upon cartons of the grocery store variety. With the recent arrival of Jay's new pressure cooker (which I, of course, quickly stole and learned how to use), I figured I should probably start making my own. Armed with a couple of chicken carcasses left over from roasting, and a basic knowledge of how not to kill myself with the pressure cooker, I have to say I'm really pleased with how it turned out! Folks in the Paleo world would call this "bone broth". I had a good friend point out to me recently that this sounds disgusting. If you went to a friend's house and they offered you a mug of their "homemade bone broth", would you want to drink it? I'm going to hazard a guess here and say... no. Why call it that, though? Traditionally, stock is mildly flavored and unspiced. It's also highly filtered so it's perfectly clear. Broth is spiced, and not clear-- and it's also more likely that you'd reach for a cup of broth to sip than stock. Sooo I'm calling this chicken broth. It's delicious, seriously. (You could also use it like stock though, no problem, since the spices used are pretty universal and not overpowering.) I unfortunately don't have pictures for the beginning of the process, because I was a) sick (I really just wanted chicken soup/broth.) and b) unsure how this was going to turn out, never having done it before. Rest assured, though!! This will be great! What you'll need 2 chicken carcasses with a fair amount of meat left on the bones (I used what was left from two 4lb chickens) 2 tsp apple cider vinegar 3-4 bay leaves 1-2cups celery, roughly chopped, with leaves 1-2 cups baby carrots (or normal carrots, peeled and roughly chopped) 1 tbsp kibbled mushrooms (optional, but it gives the broth a great flavor) salt to taste (I usually use at least 1 tbsp, I love salt) freshly ground black pepper to taste filtered water to cover Step 1: Place the chicken carcasses in the bottom of a 6-quart slow cooker, and press down if necessary to keep all of the pieces-parts well below the top edge of the pot. Step 2: Splash each set of bones with a tsp or so of apple cider vinegar. This won't affect the flavor, but it will help bring out the minerals from the bones (very, very good for you!).
Step 3: Dump the remaining ingredients around the bones, and fill with enough water to just cover everything.
Step 4: Cook on low heat for 12-24 hours, depending on the kind of time you have. The benefit of a slow cooker is that you can walk away! To modify this recipe for your pressure cooker**: 1) Complete Steps #1-3 above, and be sure that the liquid level does not exceed the maximum allowed for your pressure cooker model (or really even come close to it). For example, the maximum level for my pressure cooker is 12 cups, so I only fill to 10 cups. 2) Cook on high pressure for 1 hour. How you achieve this will depend on what type/ model of pressure cooker you own. Since my pressure cooker is electric, I set it and just go about my business. With a pressure cooker, it's always best to be nearby/ in the house, though, just in case something goes wrong. (**Huge disclaimer: I only know how the settings work for MY pressure cooker, and I am not an authority on how to modify them for yours. PLEASE read your pressure cooker's instruction manual carefully, and NEVER exceed the maximum liquid level for your model. This recipe will probably need to be modified for your pressure cooker.**)
Step 5: Once the broth has finished cooking, allow to cool slightly. Carefully strain everything through a fine mesh sieve, and discard all solids (chicken, bones, vegetables, bay leaves, etc.)
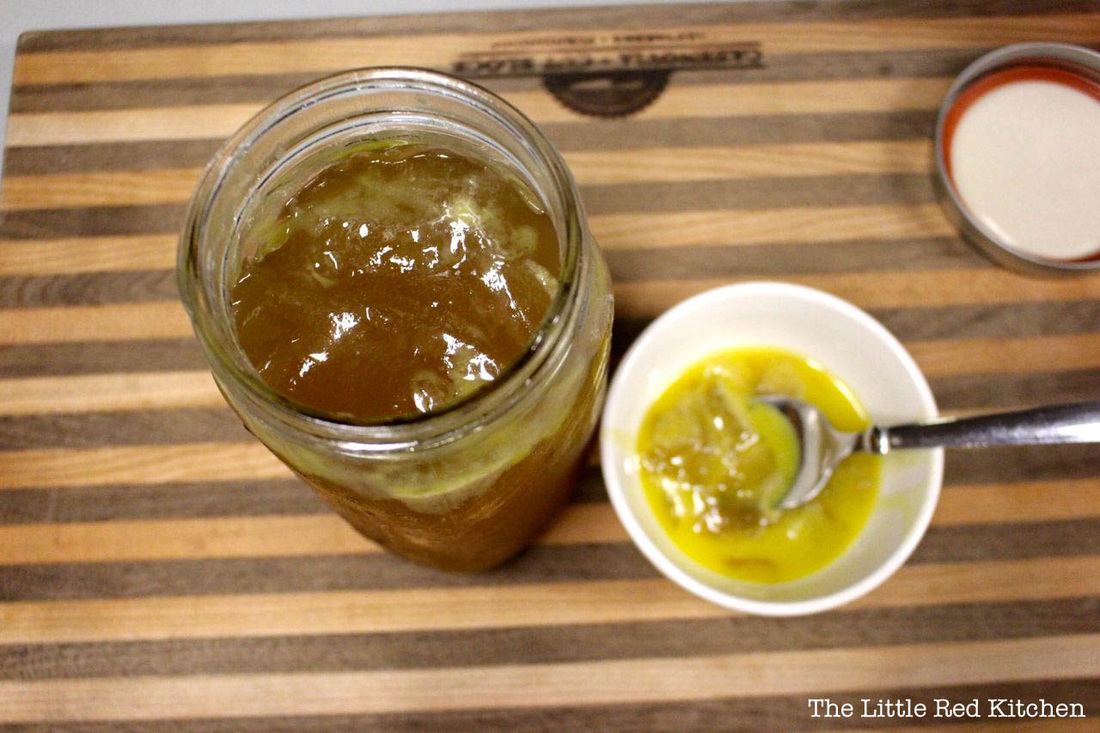
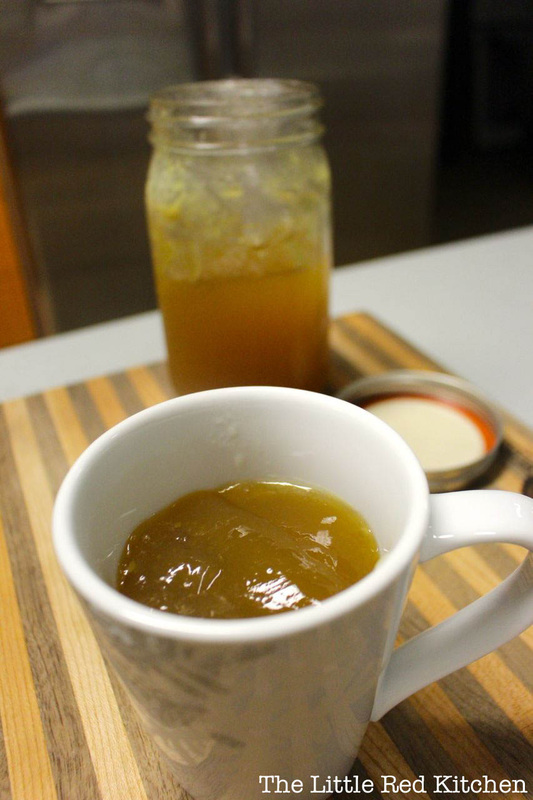
Step 6: Place in a class or ceramic container, and pop it in the fridge overnight. (I LOVE quart-sized mason jars for this, and can usually get 2.5 - 3 full jars from this recipe.)
Okay, time for pictures!
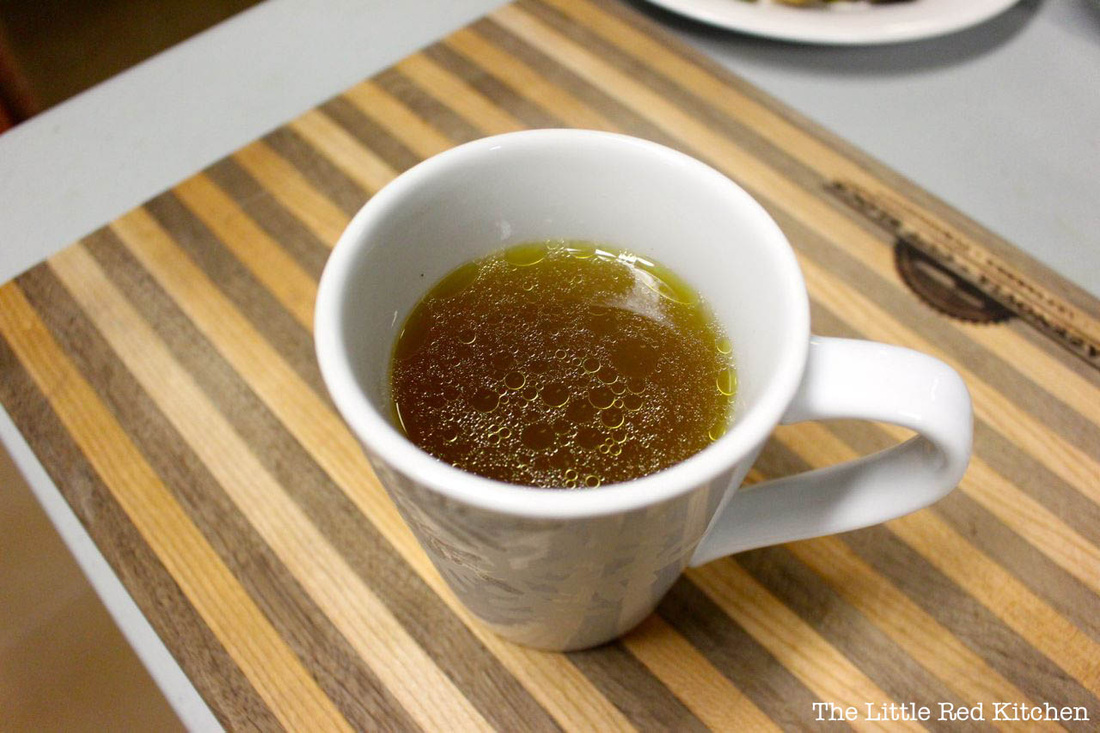
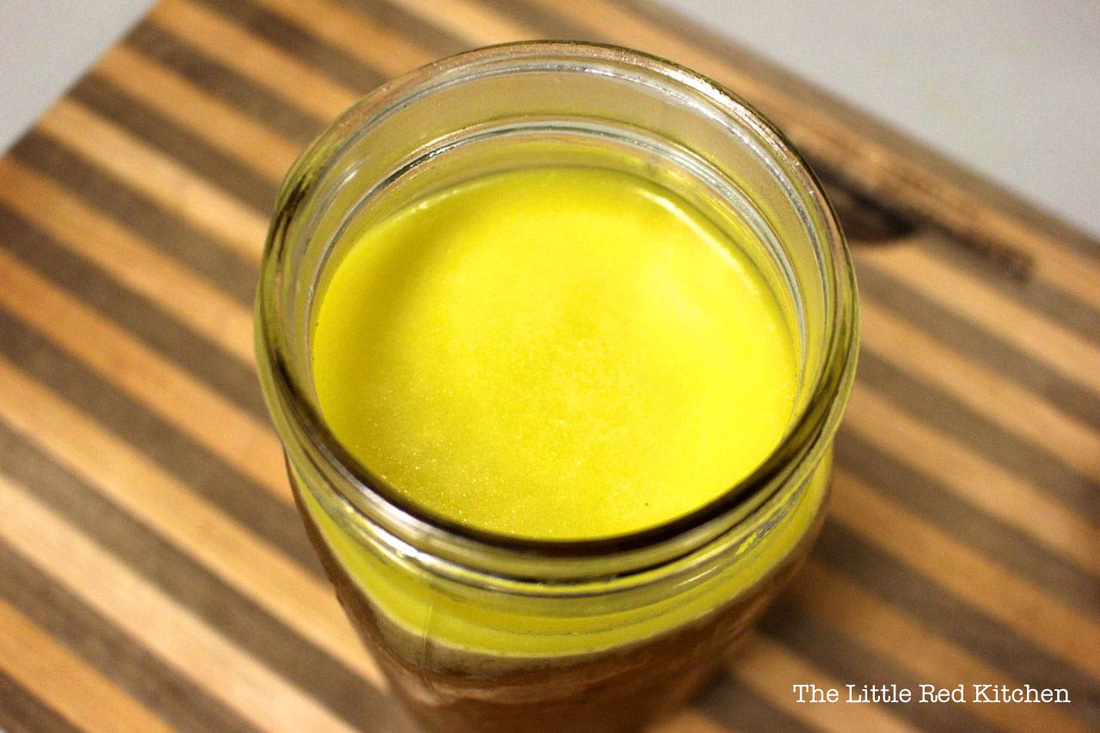
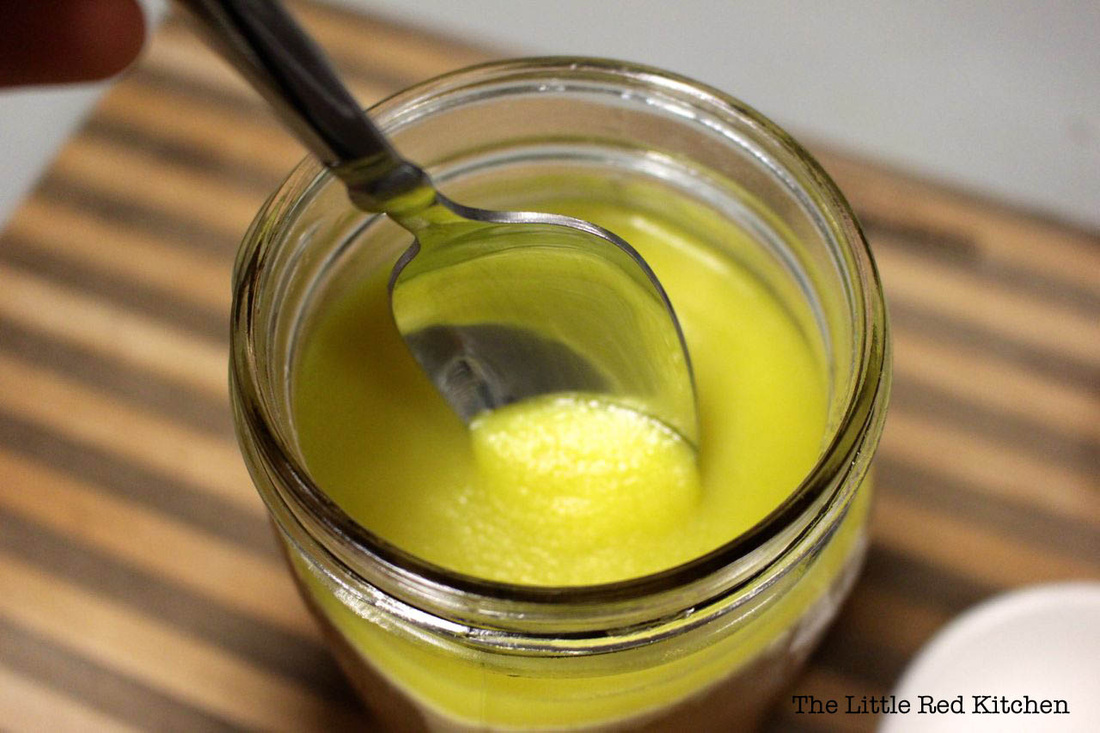
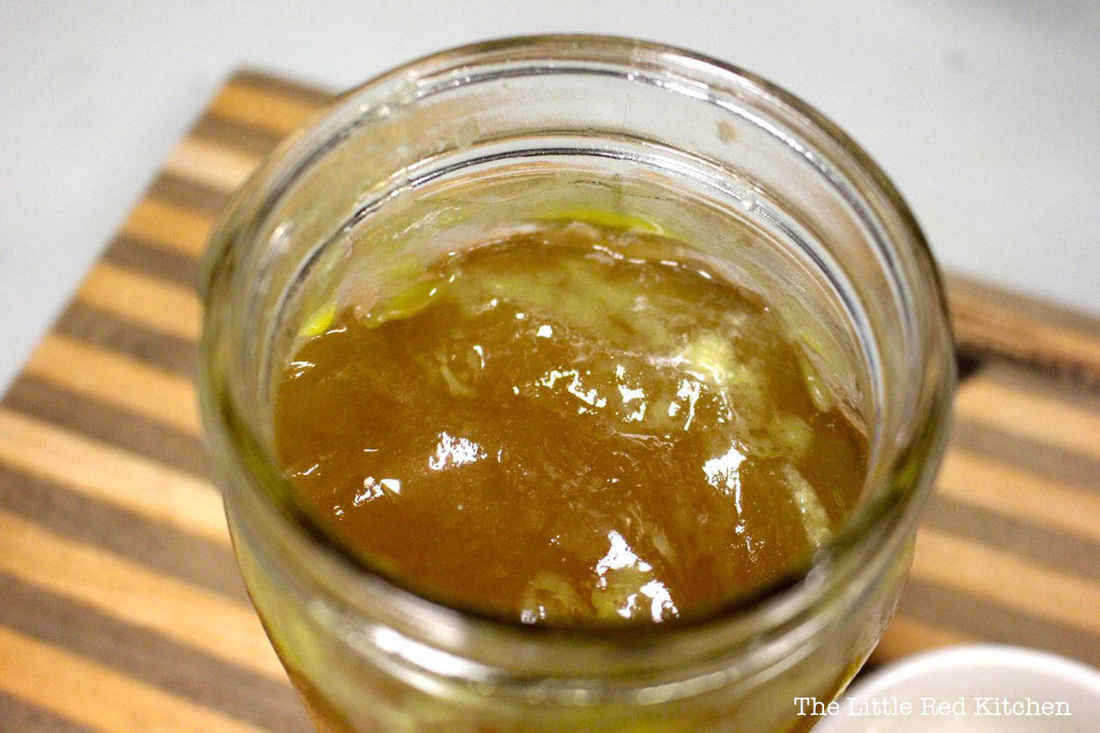
Step 7: In the morning, once the broth has cooled, you'll notice that a layer of fat has accumulated at the top of the container. This is GREAT, because you can just grab a spoon and... ...scoop it right out! You should also notice that the broth isn't really... broth, it's more like gelatin. This is also great! Did you know? The gelatin forms because the collagen from the carcasses-- a protein that makes up a significant portion of our bodies-- has cooked. This nutritional powerhouse of a drink also contains a ton of minerals that our bodies need, including calcium! You can read more about the benefits of cooking with bones here. In this case, "you are what you eat", is literal. Consuming these kinds of nutrients is great for your body, because they're what your body is made up of. Once the fat is all gone, you're left with lovely broth. Simply scoop into a mug... ...microwave, and enjoy! Thanks for reading!
- Kaitlin
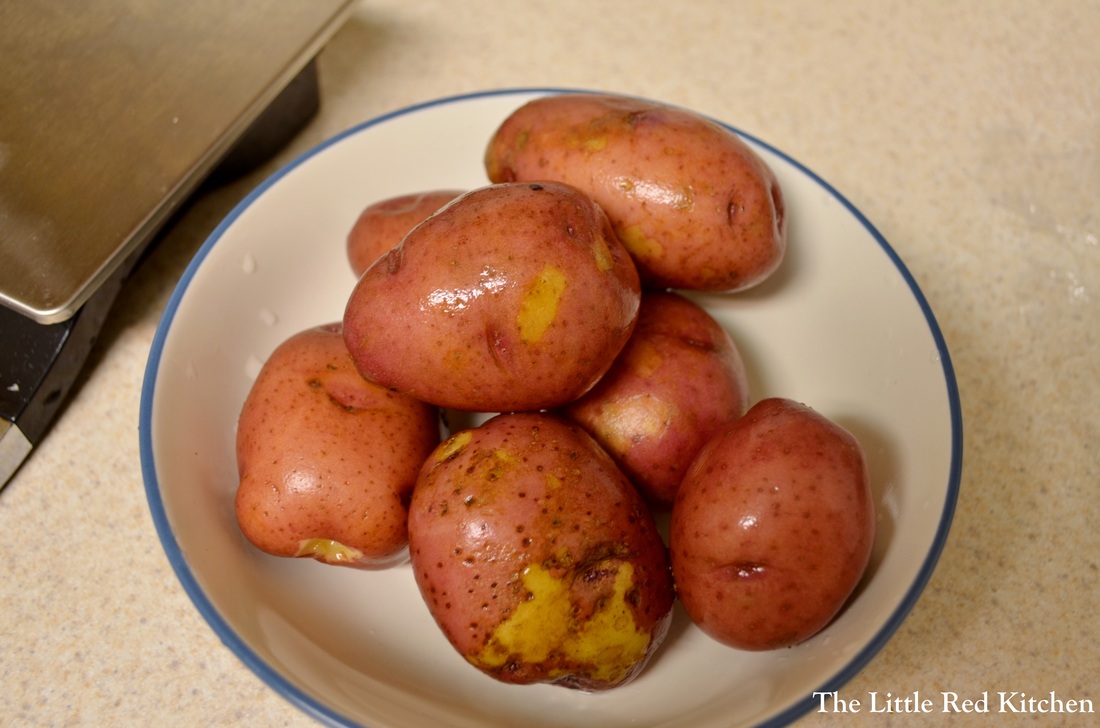
Sometimes when bags of potatoes are on sale buy-one-get-one free at the market, my husband and I have to indulge, even though it leaves us with 6-10 lbs. of potatoes on our hands. Our worst fear is that we'll decide against it, but then next week we'll need potatoes and feel like total chumps because we missed out on a free bag! However, that leaves us with a bunch of potatoes, and in need of recipes!
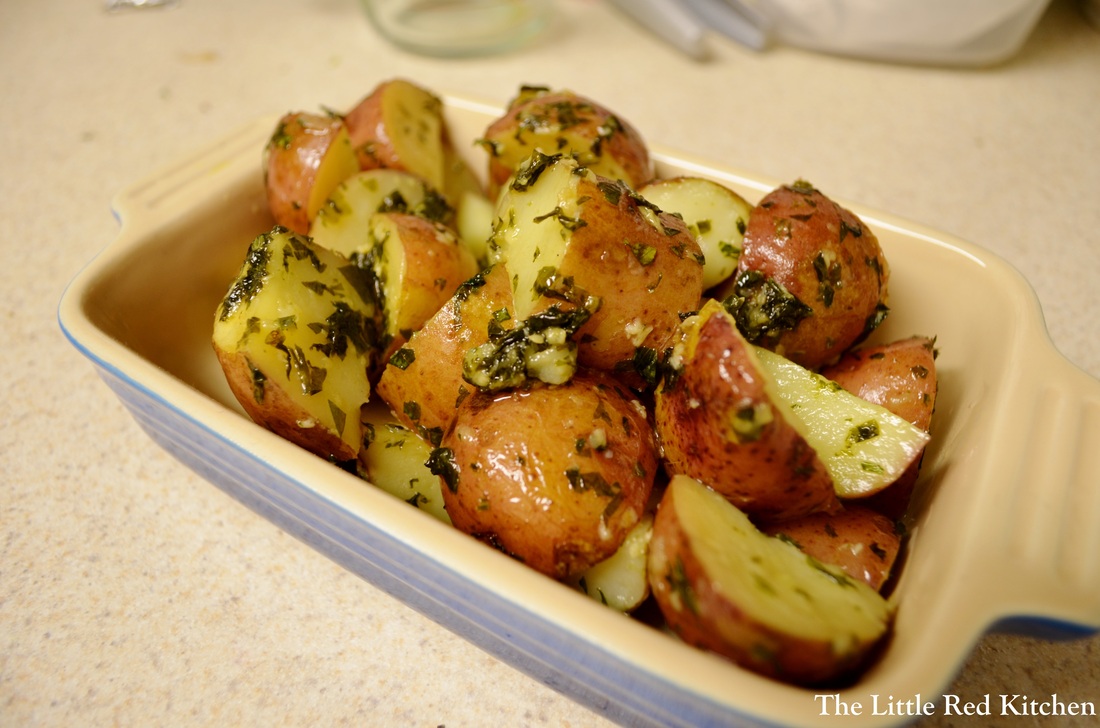
On our anniversary trip Doug and I had escargot en cocotte, which was snails cooked in a small sturdy pot with a wonderfully luscious sauce of olive oil, tons of parsley and garlic. I was not about to cook snails at home, but I had to come back to Pennsylvania and do something with that amazing sauce, and potatoes seemed like the obvious choice. But, the question in my mind was, how do I impart tons of flavor into the potatoes, but allow them to retain their great potato flavor? I decided to take a leaf out of the en cocotte book with this one.
Ingredients:
1-1.5 lbs small red potatoes, scrubbed clean with skin left on
4 cloves of garlic, minced
3 tbsp. olive oil
1/4 cup chopped parsley
1/2 tsp. kosher salt
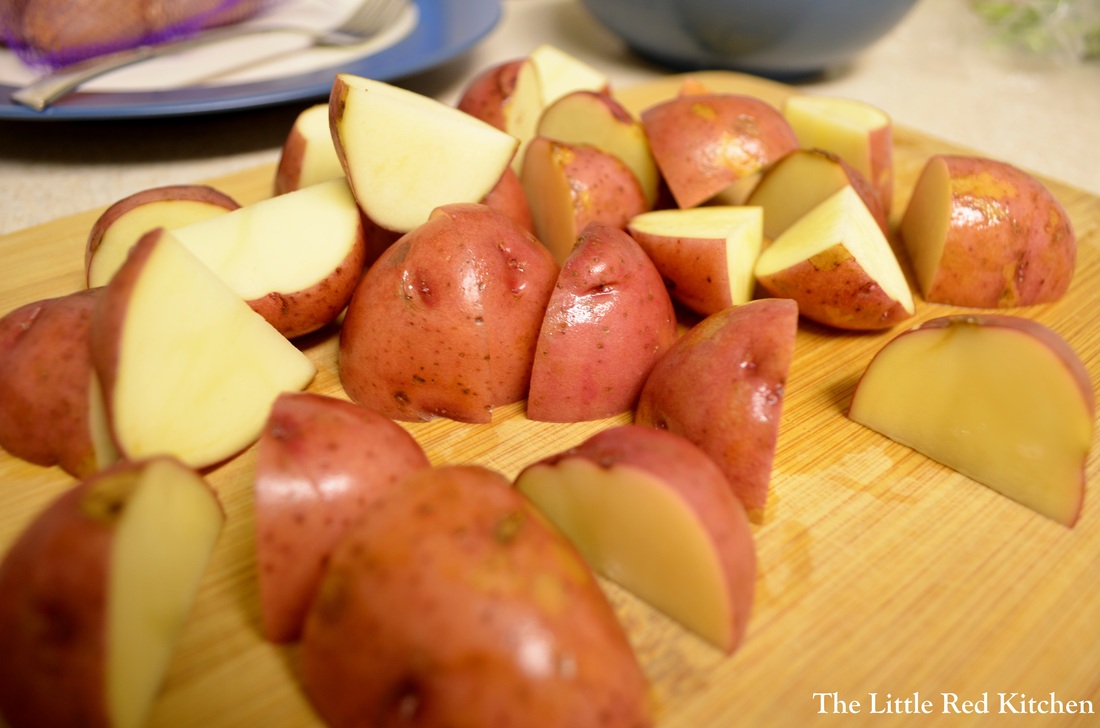
Step 1:
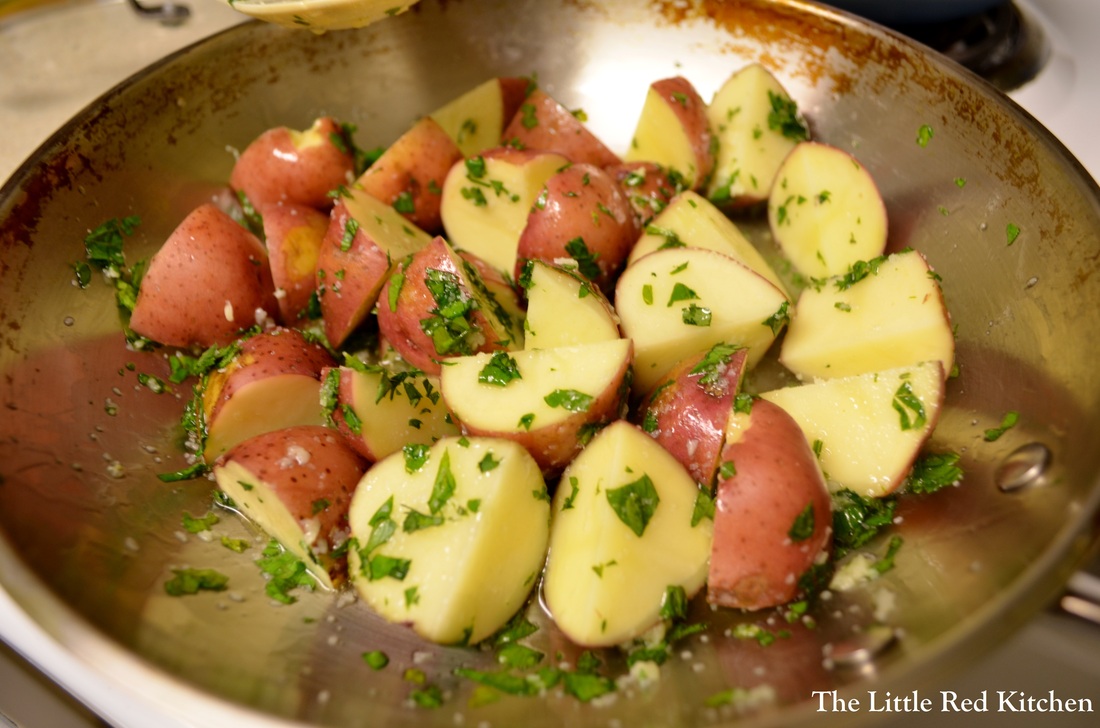
Cut the potatoes into about 1-inch pieces. Depending on the size of the potatoes this could mean halving them or quartering them. Step 2:
Add the olive oil and garlic to a cold 10-inch skillet or wide-bottomed saucepan. Heat it over medium-low heat, and when the garlic starts to sizzle, add the potatoes, parsley, salt, and a tbsp. of water. Stir to evenly coat the potatoes, cover, and cook for about 10 minutes, until the edges are starting to turn translucent. The science: One of the culprits of flavorless potatoes is water. If you overcook potatoes when you are boiling them, they get waterlogged and this flushes out all of the flavor. If you've ever had flavorless mashed potatoes, that is the culprit. By basically poaching these potatoes in olive oil and just a tiny bit of water to keep anything from burning, the only liquid they will steam in is their own juices! You will get potatoes that have tons of herb and garlic flavor, but that actually taste like potatoes.
Step 3:
After the first 10 minutes, give everything a stir, then re-cover and cook for another 10 minutes, or until the potatoes are cooked through. When you can insert a paring knife into a potato piece and it meets no resistance, you are there!
Simply pour the potatoes into a dish and serve! These yummy, luscious potatoes are the perfect side dish to just about anything from roast chicken to steak. Eat and enjoy!
~Lauren
I don't know a lot of ways to start a week off that are better than dessert! So with that, let's dive right into these Peanut Butter Crispy Bars that are making another appearance from their Dinner Party debut. Every so often when I have spare reading time (which is NEVER now that I'm in graduate school) I get a cookbook out of the library, just to peruse even while I'm watching tv. One of my favorites is the book that Food & Wine Magazine puts out every year, Best of the Best Cookbook Recipes.  courtesy of amazon.com That's right, they go through all the cookbooks that have been published that year and pull their favorites, so you don't have to buy (or borrow) them all! I usually end of scanning tons of pages full of mouth-watering dishes so I can save them once the book is back on the shelves. That's where I found this fantastic recipe.
Ingredients:
For the crispy crust:
1 3/4 cups crisped rice cereal
1/4 cup sugar
3 tbsp. light corn syrup
3 tbsp. unsalted butter, melted
For the milk chocolate peanut butter layer:
5 ounces good-quality milk chocolate, coarsely chopped (I LOVE Ghirardelli's milk chocolate chips, which I didn't chop for this recipe)
1 cup creamy peanut butter
For the dark chocolate icing (yup, it keeps getting better):
3 ounces dark chocolate (60-72% cacao), coarsely chopped
1/2 tsp. light corn syrup
4 tbsp. (1/2 stick) unsalted butter
Step 1:
Lightly spray a paper towel with nonstick cooking spray and rub the bottom and sides of an 8-inch square baking pan. Set aside. Put the cereal in a large bowl and set aside as well.
Step 2:
For the crispy crust, pour 1/4 cup of water into a small saucepan. Gently add the sugar and corn syrup, so that it doesn't get on the sides of the pan (just pour it right into the center). Stir gently with a wooden spoon until just combined. Put a candy thermometer into the saucepan, cook over medium-high heat, and bring to a boil; cook until the mixture reaches the "soft ball" stage (a candy-making term), 235 degrees.
I don't own a candy thermometer. Used to, and I broke it with my first use. Lesson learned. So I clipped my instaread thermometer to the pan and used that. Note that this will come to a boil quickly, but it takes longer to get up to the 235 degrees.
Once it does hit that temperature, remove from the heat and stir in the butter, then pour over the cereal. Combine quickly then dump into the prepared pan. Using your hands, press the mixture into the bottom (but not up the sides) of the pan. In case you hadn't guessed, you just made rice crispy treats! Let this layer cool a bit while you work on the next.
Step 3:
In a large nonreactive metal bowl, stir together the milk chocolate and peanut butter. Set this bowl over a saucepan of simmering water and stir until it melts and the mixture is smooth. Then remove from heat and continue to stir for about 30 seconds, so it cools down slightly. Pour the mixture over the crust and refrigerate for an hour, or until this middle layer has hardened.
Step 4:
Make the top layer! Create the same double boiler set-up as in step 3, this time with the dark chocolate, corn syrup, and butter. Again, stir and melt till completely smooth, and off the heat, continue to stir for 30 seconds. Pour this over the chilled milk chocolate layer. Put the pan in the fridge again and let harden for an hour, then these are ready to serve!
These are rich, so I'd cut into 9 squares, if not even smaller, depending on how stuffed everybody is from their main meal.
I can't believe that I've never had to combine milk chocolate and peanut butter in a dessert before, because it is AWESOME. These bars are amazing. The middle layer is dense and chewy, while the top dark chocolate is like a light fudge, and that intense cocoa flavor of dark chocolate is a perfect compliment. I hope you make these soon and ENJOY!
~Lauren
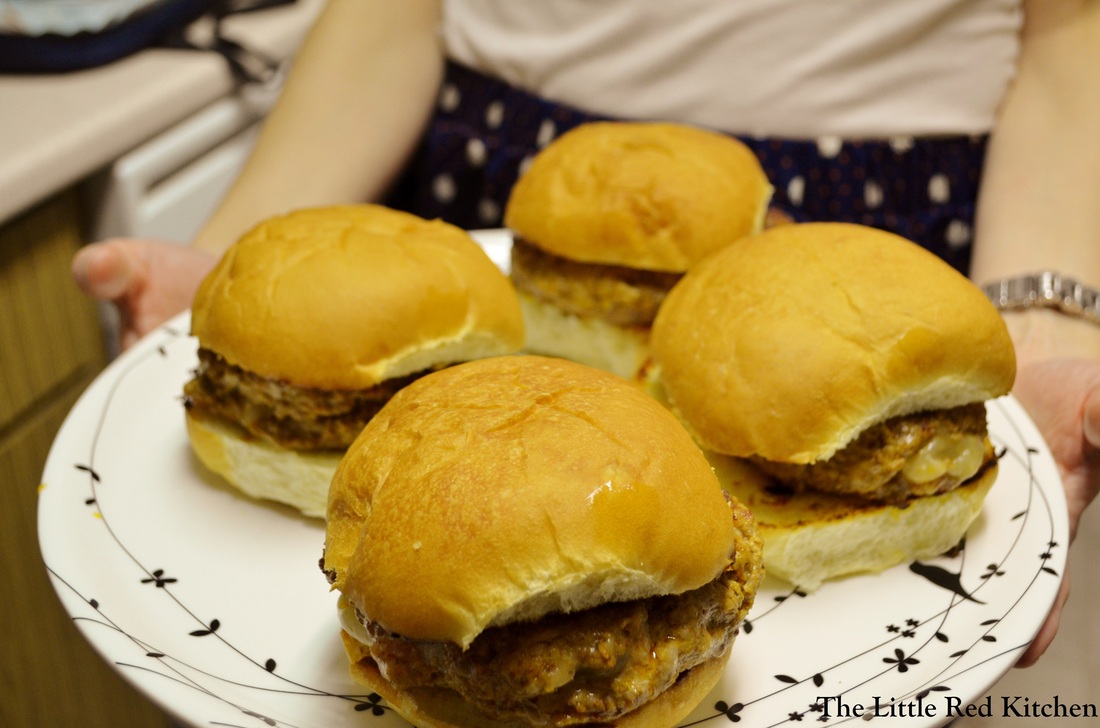
I'm going to keep this brief, mostly because I'm smack in the middle of midterms for grad school, and also mostly because I wrote up this post around 9:00 this morning and it somehow deleted itself... Anyway, let us rejoice, because it is Thursday, and Thursday is a good friend of Friday. And let us rejoice by checking out an awesome recipe for Spanish Manchego Stuffed Pork Burgers, which I made for my Dinner Party last weekend and which were requested to appear on the blog in recipe form! Ingredients: 2 tbsp. vegetable oil 1/4 cup pimiento-stuffed Spanish olives 4 cloves garlic 1 tbsp. dried oregano 1 tbsp. chili powder 2 tsp. smoked paprika 1 tsp. ground coriander 1 tsp. ground cumin 1/2 tsp. ground allspice 3 tbsp. mayonnaise 1 1/4 lb. coarsely ground pork Kosher salt and freshly ground pepper 1/4 lb. manchego cheese, shredded on the large holes of a box grater or in a food processor 4 large soft hamburger rolls, split This recipe makes 4 burgers. It comes from an old issue of Food Network Magazine. Which reminds me of another tip for entertaining; having guests over is not the time to experiment with weird foods, techniques, ingredients, etc. Stick to what you know! Your friends and family wouldn't judge you if you messed up dinner, but why even risk it when you can make something you already know will turn out wonderfully? This doesn't mean, be boring. It just means to calculate your cooking risks! Step 1: Combine the vegetable oil, garlic, olives, and all the spices (not including salt and pepper) in a food processor or mini food processor and process until smooth. Scrape into a large bowl and stir in 2 tbsp. of the mayonnaise. Step 2: Add the pork to the mixture along with salt and pepper (about 1/2 tsp. of each) and use your hands to gently combine. You want to make sure everything is evenly distributed, but try your best not to compact the meat or overwork it. Step 3: Now you have to make the patties and stuff them with the cheese. This is the best way I've found to do it. Divide the pork evenly into 4 sections. Then take one section and divide that in half. Shape one half into a burger patty, about 1/4 inch thick, then sprinkle 1/4 of the cheese on top, pressing it into the meat ever so slightly. Then, take the other half of the pork, form a similarly sized patty, and sandwich it on top of the cheese-topped patty, pinching and folding the edges shut as you go. None of the cheese escaped and burned when I used this method! Step 4: This recipe called for grilling the burgers, but that's not my M.O. so I seared them on the stove, which, to be honest, is the way I prefer my burgers. But if you want to grill these bad boys, feel free! After you have formed your 4 patties using the method in step 3, preheat a 12 inch nonstick skillet over medium-high heat for a couple minutes. Place the burgers in and cook for 5-6 minutes. Don't press on them or do anything to them! Just let them brown. Then flip and cook for another 5 minutes and remove to a plate. If you are not using a nonstick pan, brush each side of the burgers with a little vegetable oil to prevent sticking. I have also used my retro flat-top electric griddle to grill multiple burgers at once, and this works beautifully. Step 5: Almost there! Crank the heat to high on the pan and brush the remaining tbsp. mayo on the inside of the buns and place them in the pan, mayo side down, for just about a minute, so they get slightly browned and toasty. Top with the burgers and add whatever condiments you want though I promise you, these delicious things need no embellishment. Like I said in my post, since the forming and stuffing of the burgers can be finicky, I did that an hour in advance of my friends coming over, put them on a sheet tray covered with plastic wrap and left them in the fridge till I needed them. Easy! Disclaimer, burgers are literally my favorite food in the world, and I can be picky about them. I actually don't like fancy burgers; the simpler, the better, but these are the one exception to the rule. I can't get enough of that robust spice blend, the moist meat, and the amazing manchego inside, which just happens to be one of the best cheeses ever. The next time you are reaching for the ground 80/20 for burger night, consider giving these a try! ~Lauren
Talk about some comfort food!
Okay, so comfort food is something we all crave when the weather turns. I don't know if it's from childhood memories or it's more primal than that, but something in our bellies wants stick-to-your-ribs goodness this time of year. Unfortunately, that goodness comes at the price of pants buttons popping and food-induced comas. So I wondered to myself, does comfort food have to give us that feeling that we never want to even look at food again?
That being said, I decided to tackle the classic Southern American dish, chicken and dumplings, and make it a little less heavy. By creating a broth-based soup, instead of a thick gravy, and by adding tons of veggies and fresh herbs, I think I may have done just that!
Ingredients:
Stew:
2 large chicken breasts, trimmed of excess fat
kosher salt and pepper
2 tbsp. olive oil
1-1.5 cups chopped yellow onion (1 medium onion)
2 garlic cloves, minced
1 sprig of fresh thyme (substitute 1/2 tsp. dried thyme if you need to)
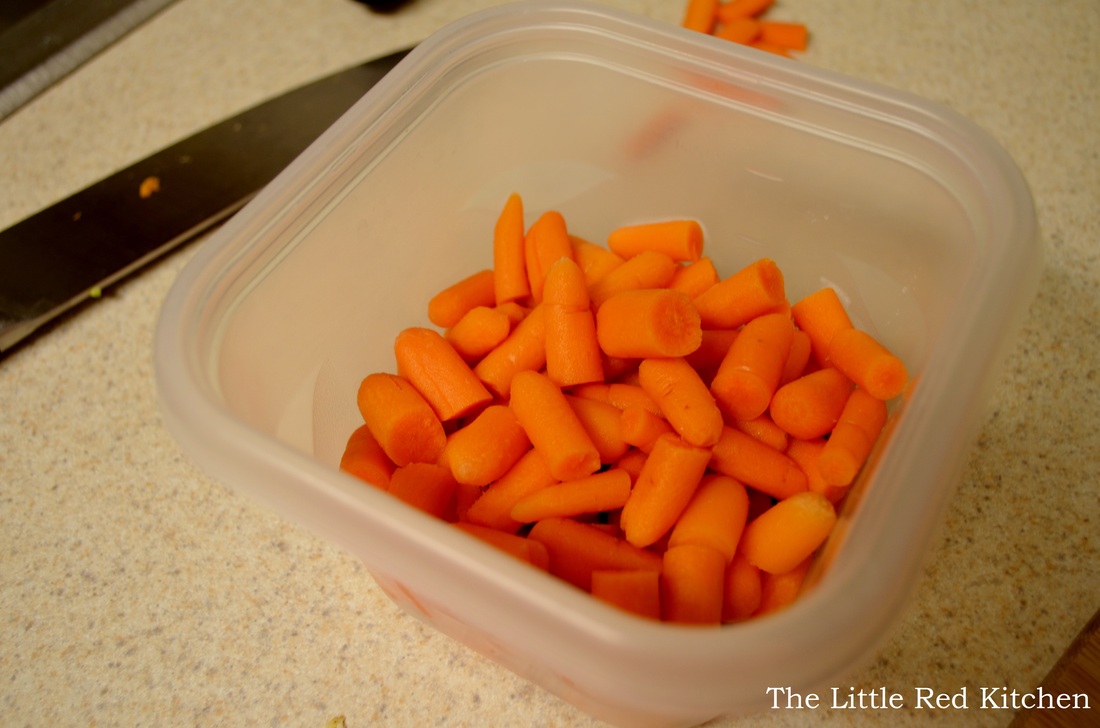
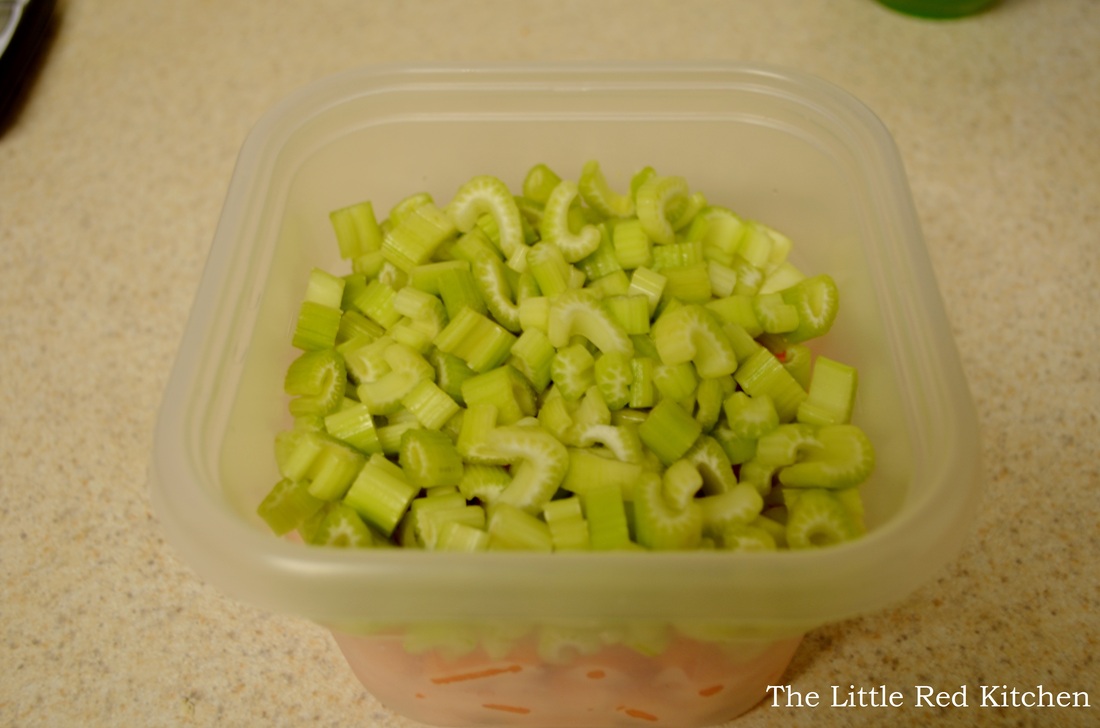
2 cups of carrots, chopped into roughly 1/2-inch pieces (believe it or not I only had baby carrots on hand so I simply cut them in half!)
1 cup of celery, stalks chopped 1/4-inch thick
1/4 cup flour
6 cups chicken stock (I don't need to tell you that homemade is better. I happened to have some in my freezer, but 90% of the time I don't, so low sodium chicken stock is A-Okay)
1 cup water
3 tbsp. chopped fresh dill, divided in half (use 1.5 tbsp. if substituting dried dill)
4 tbsp. chopped fresh parsley, divided in half (dried parsley is like rabbit food. do NOT substitute.)
Herbed dumplings:
2 cups all-purpose flour
1/2 tsp. kosher salt
1/8 tsp. ground black pepper
1 tbsp. baking powder
1/2 cup heavy cream
1/2 cup buttermilk (You may use a whole cup of heavy cream if you wish, and omit the buttermilk)
2 tbsp. butter
*I forgot to count as I was making them, but I think the dumpling batter makes about 20 dumplings, if not more. This dish will definitely serve up to 6 people.
Step 1:
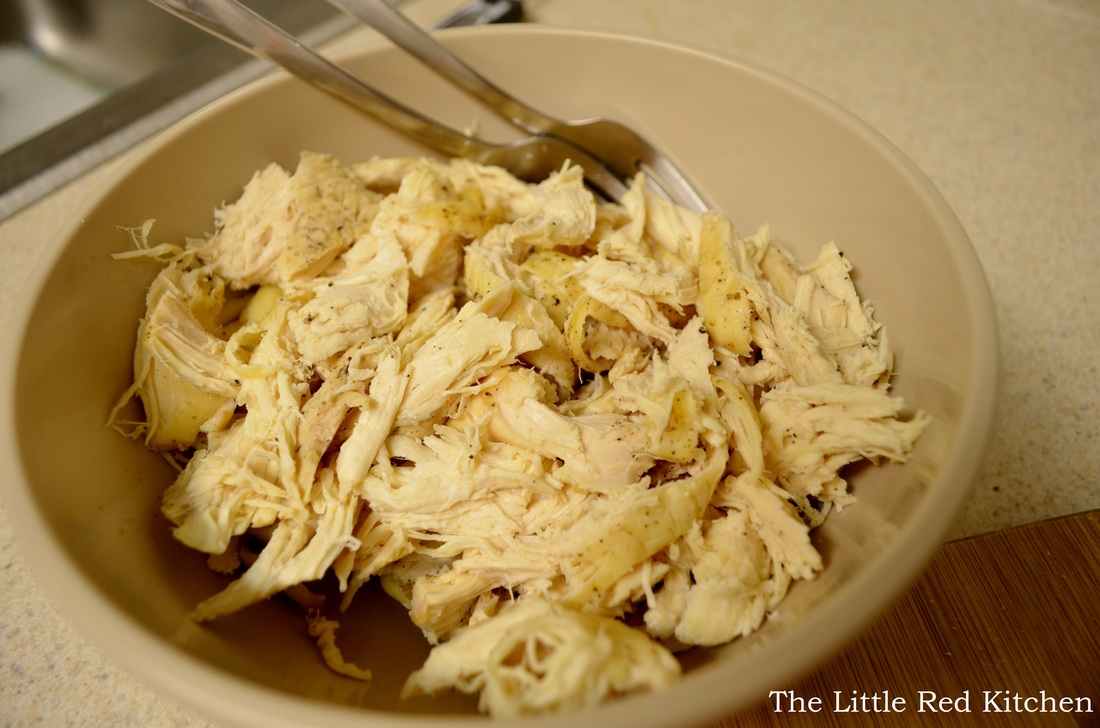
Pre-heat oven to 375 degrees. Season both sides of the chicken breasts with kosher salt and pepper and place on a rimmed baking sheet (I almost always use parchment paper because it makes clean-up a breeze.) Bake on the middle rack in the oven for 20-25 minutes, or until the chicken's internal temperature registers 160 degrees. Allow to cool, then using 2 forks, break the chicken up into large shreds. You should get 3-4 cups worth. Cover and set aside. A small note, I prepped almost everything in advance and just left it in the fridge for the afternoon. Come dinner time I just had to assemble the soup and make the dumplings, which made things so easy! Step 2:
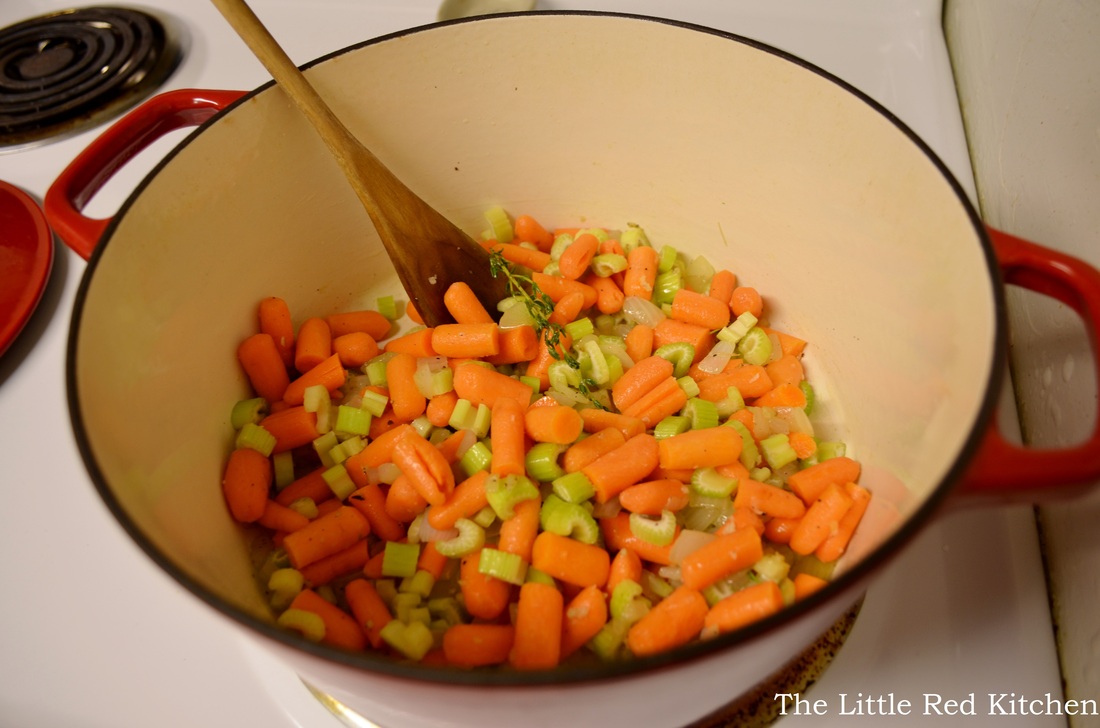
Pour the olive oil in a Dutch oven or heavy-bottomed large pot and turn on to medium-low heat. Add onion, 1/2 tsp, of kosher salt and 1/4 tsp. of black pepper. Cook until the onions are softened and slightly translucent, 5-7 minutes. (Keep the heat on medium-low, we're not looking to brown!)
Step 3:
Add the minced garlic and thyme and cook for 30 seconds, until fragrant. Then add the carrots and celery. Stir to combine. Cover and cook for about 10 minutes, until the carrots have softened slightly and the celery is turning translucent, stirring halfway through.
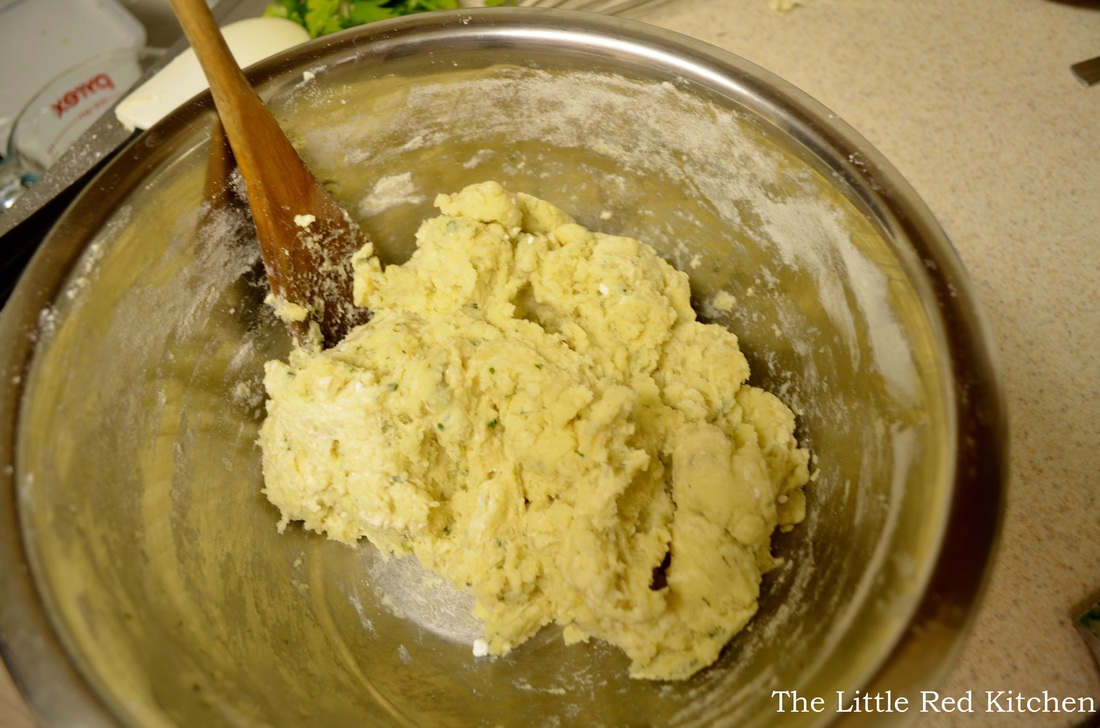
Step 4:
While the carrots and celery are cooking, it's a good time to form the dumpling dough, which doesn't take long at all. Combine the flour, salt and pepper, and baking powder in a medium-sized bowl and stir to combine. In a small saucepan, combine the heavy cream, buttermilk, butter, and half of the total dill and parsley. When it just comes to a simmer, pour it onto the flour mixture and stir just enough so that the dough comes together. I had to add a couple extra tablespoons of buttermilk, which is sometimes necessary. Just try your best not to overwork the dough. Step 5:
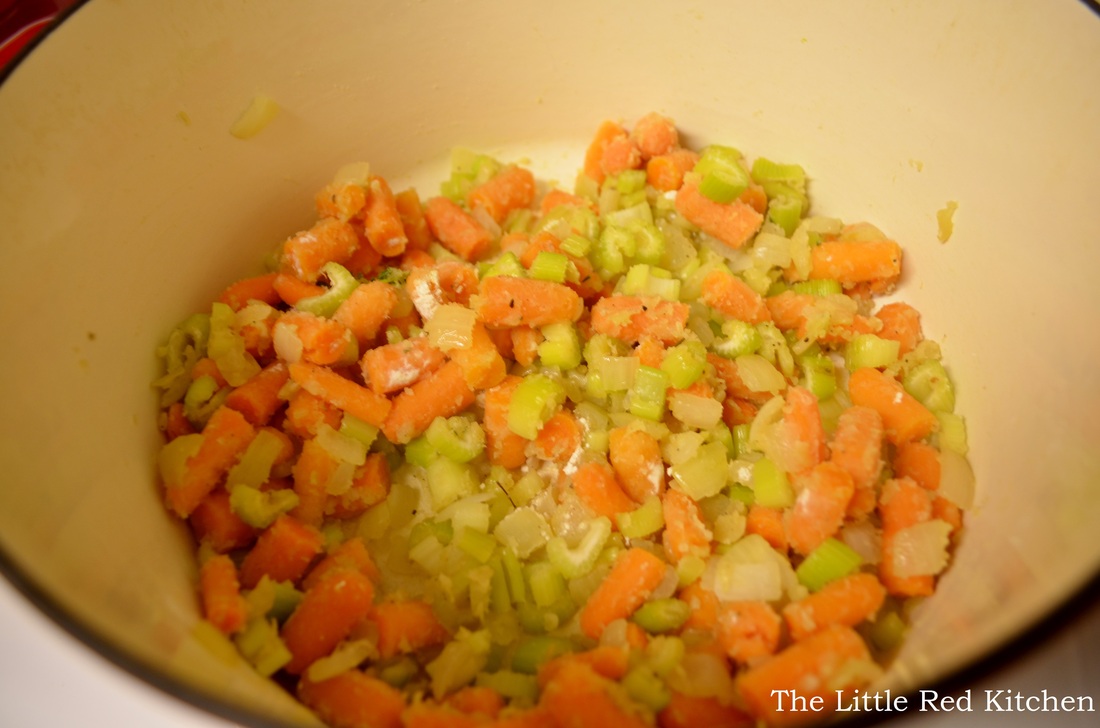
When the 10 minutes are up on the veggies, add the 1/4 cup of flour and bring to medium heat, stirring the flour in until it looks gummy and weird, about a minute. Step 6:
Pour the chicken stock and water into the pot and bring to a boil. Once the stew reaches a boil, lower it to a simmer (medium-low), fish out the thyme sprigs and start forming the dumplings and dropping them into the pot. Just grab a couple tbsp. at a time, and roll them into loose dumplings, about 1.5 to 2-inches big. Once they are all in there, place the lid on the pot and simmer gently for 25 minutes. I had a boil over. So when I say gently, I mean it. In fact, if your stew is even close to the top of the pot, leave the lid slightly off and check on it often!
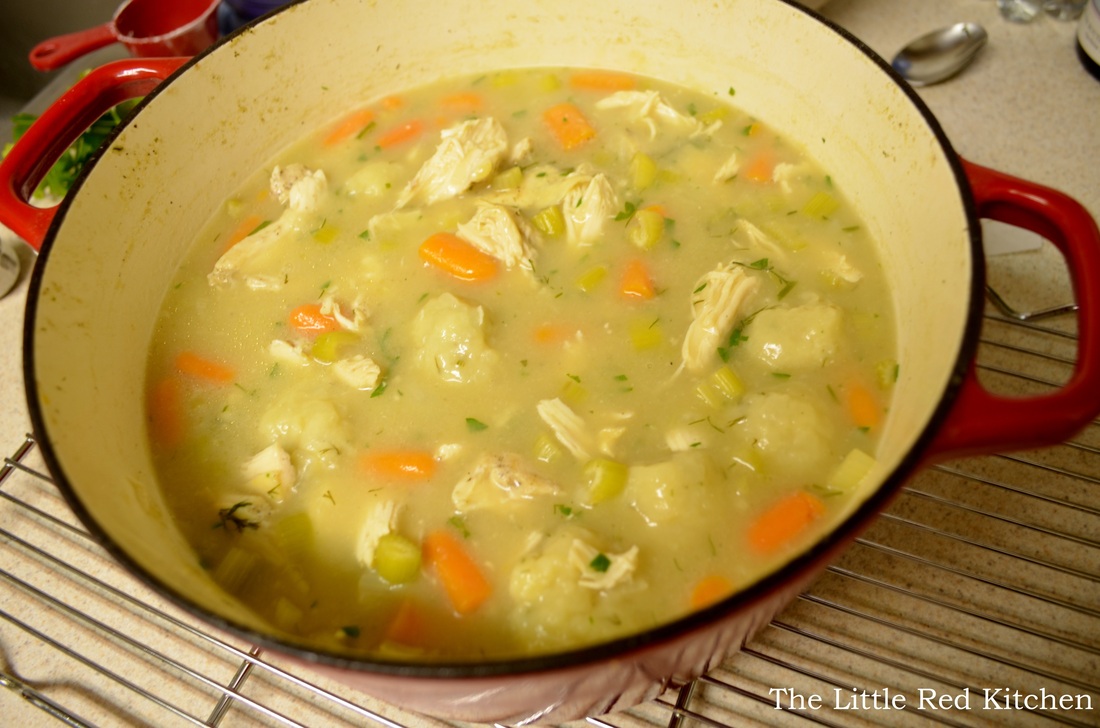
After 25 minutes, turn the heat off and take the pot off the burner. Gently stir the chicken and the remaining fresh herbs into the stew and allow to sit for 5-10 minutes. Then serve! This stew has a fantastic consistency! It's thicker than a chicken noodle, but not as heavy as a dumpling gravy. And the fresh herbs are such a welcome addition to the whole dish! I particularly love the buttery, dill-y dumplings, which are just the right size that you can eat 3 or 4...or 5, or 6...and not hate yourself for the next 2 hours. The next time you are hankering for some home-cooked comfort, consider tucking in to a steaming bowl of this. :)
~Lauren
|


 RSS Feed