Ever since I made a gigantic crock pot of mulled wine for Thanksgiving last year, I have been loving hot mulled drinks this time of year. I wanted to come up with one that didn't take hours in a slow cooker, so I whipped up this recipe for quick stovetop apple cider!
Ingredients:
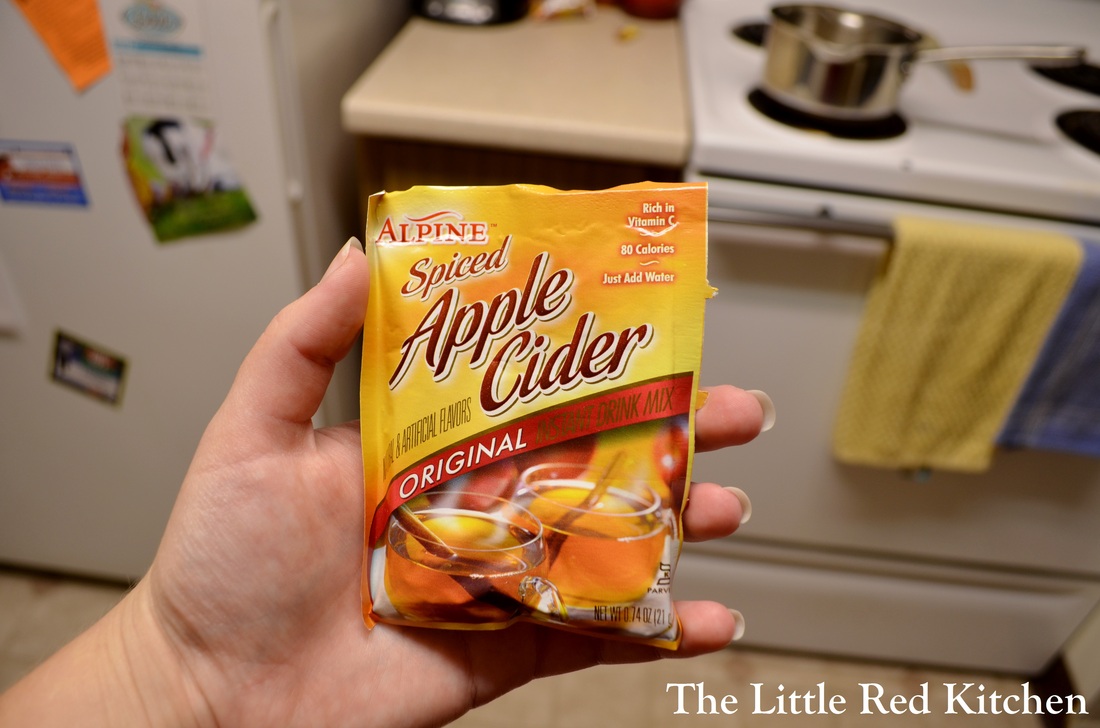
2 pouches of instant apple cider plus 14 oz. of water, or, 14 oz. of prepared apple cider
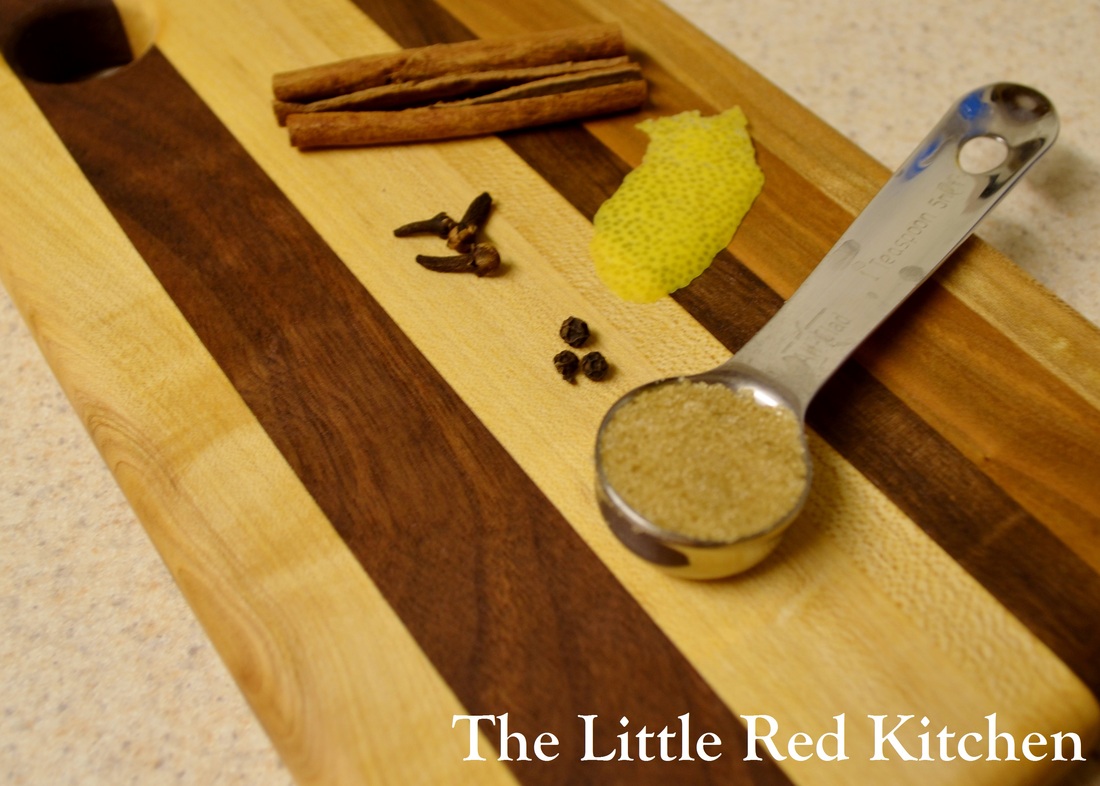
4 whole cloves
4 whole peppercorns
1 cinnamon stick, broken in half or cracked
1-inch piece of citrus zest (I used lemon, orange would work wonderfully too)
1 tsp. brown sugar
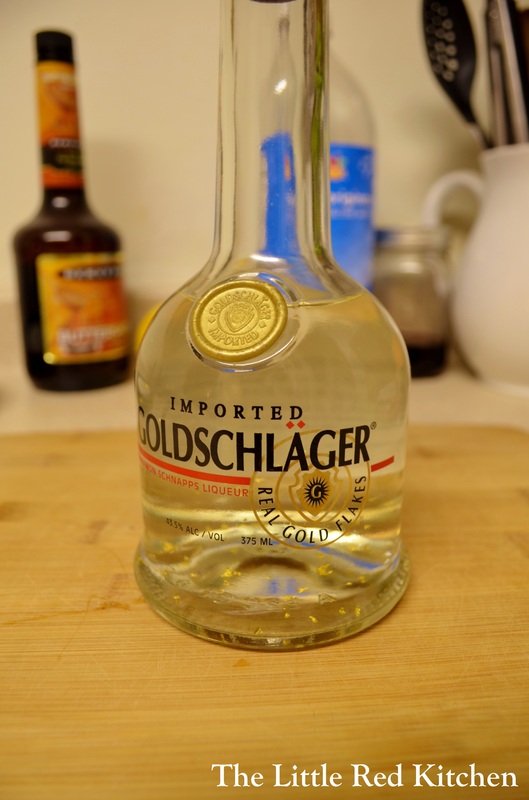
1 tbsp. plus 1 tsp. cinnamon liqueur
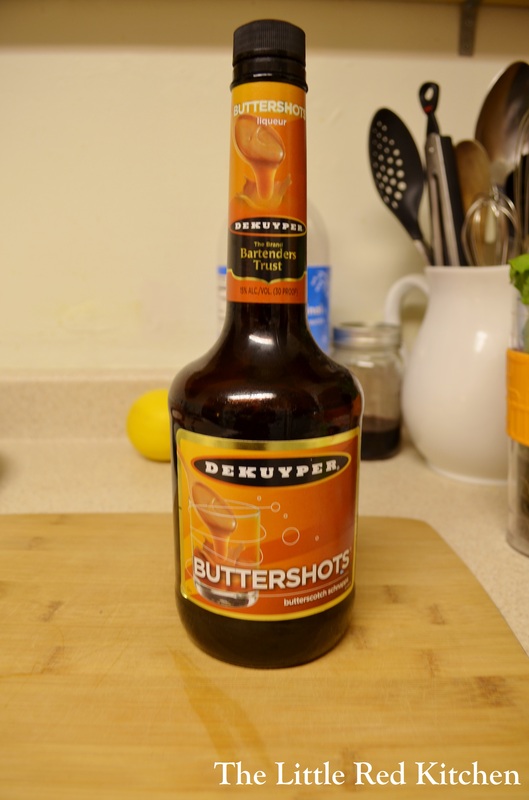
2 tsp. butterscotch schnapps (optional)
Serves 1 very large portion, or 2 regular portions. Can be easily doubled, tripled, etc. In fact, if you wanted to make a giant crock pot of this to cook on low all day, you can do that too!
This is a super easy recipe. It's really all about the ingredients. The small amount of sugar is added to cut the inherent tartness in the cider, and then the peppercorns and cloves are added to balance out that
extra sweetness from the sugar. Cooking is often a balancing act! Step 1:
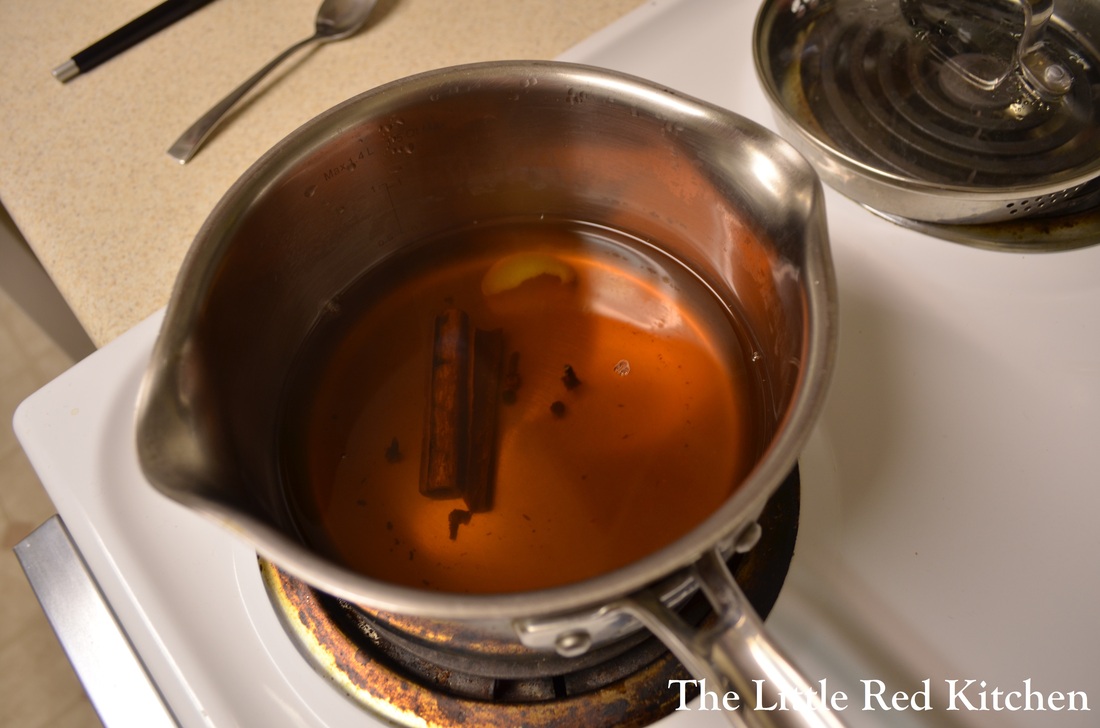
Pour the apple cider (or water and apple cider powder) into a small saucepan along with the cinnamon, cloves, peppercorns, sugar, and lemon. You can get a piece of lemon zest just using a regular vegetable peeler, but don't cut too deep and get any of the bitter white pith. Bring to a simmer over medium-high heat, which should take about 5 minutes, stirring until the sugar and powder have dissolved and the cider is clear. Cover with a lid and turn the heat down to medium-low, or whatever output allows you to keep the cider at a gentle simmer. Then just simmer away for 20 minutes! The kitchen will smell tantalizingly delicious. Imagine cooking this up before you have guests over, and they are greeted by the amazing smell of hot apples and cinnamon bubbling away on the stovetop when they walk through the door....
Step 2:
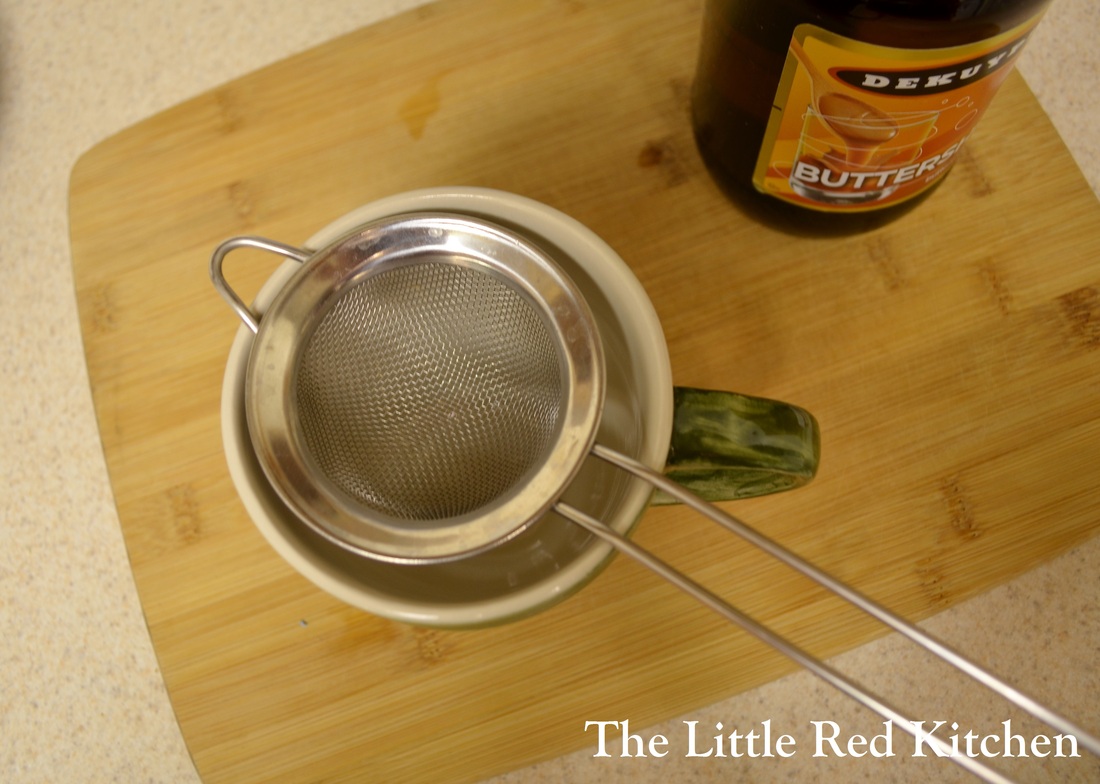
After 20 minutes, remove the pot from the burner and let it sit for a couple minutes with the lid on. Then, the best part: Pour in the cinnamon liqueur and schnapps, if using, stir to combine and briefly take the edge off the alcohol, for just a couple seconds, then serve while piping hot! I would recommend pouring through a little strainer to remove the broken bits of cinnamon stick that have probably formed. Notice how rich the color got, just in 20 minutes of stove time?
A mug of this drink will make you want to have a festive party surrounded by twinkle lights this holiday season, or snuggle up under blankets and have a movie marathon on a chilly Sunday. Both perfectly good options that we would advocate for this time of year. :) Enjoy!
~Lauren
Spaghetti squash, like eggs, is one of those foods that gets me so pumped about what food is. It's a squash like any other squash, but then you run your fork through it after baking and BAM! Perfectly formed spaghetti strands. Food can be amazing, and spaghetti squash needs no embellishment, which is why I paired mine with a simple and quick sage and walnut butter sauce. This is a classic sauce...you don't always have to reinvent the wheel in the kitchen. But it pairs so perfectly with the delicate squash, and it's so yummy to boot. Vegetarian or not, this is a fantastic Fall supper.
Ingredients:
1 spaghetti squash, about 2 lbs. (whatever size you use, you just have to adjust the cooking time; if you use a 3 lb. squash or larger, increase the butter to 5 tbsp.)
3/4 tsp. salt
1/2 tsp. coarse ground black pepper
4 tbsp. butter
10-15 fresh sage leaves
1/2 cup shelled walnuts, roughly chopped
1 tbsp. grated parmesan or pecorino cheese
Our 2 lb. squash would serve about 3 entrée sized portions. The 3 lb. (logically) would serve more!
Step 1:
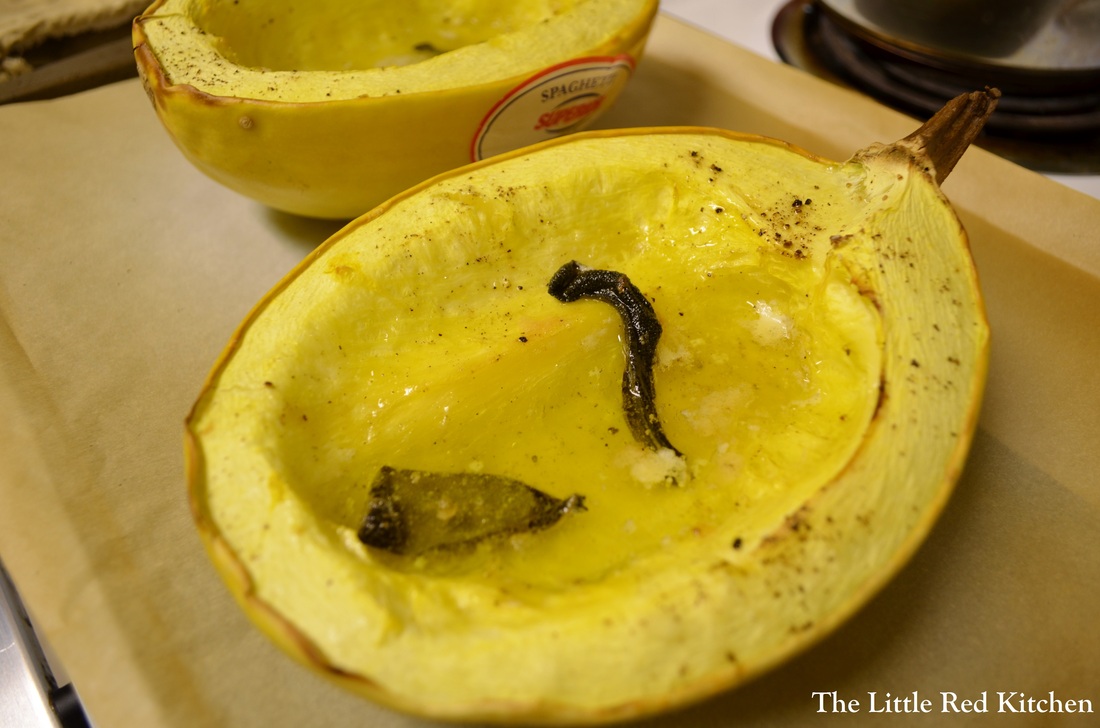
Preheat your oven to 400 degrees with the oven rack in the middle of the oven. Using a sharp knife, carefully halve your squash lengthwise and scoop out the seeds from each half.
Step 2:
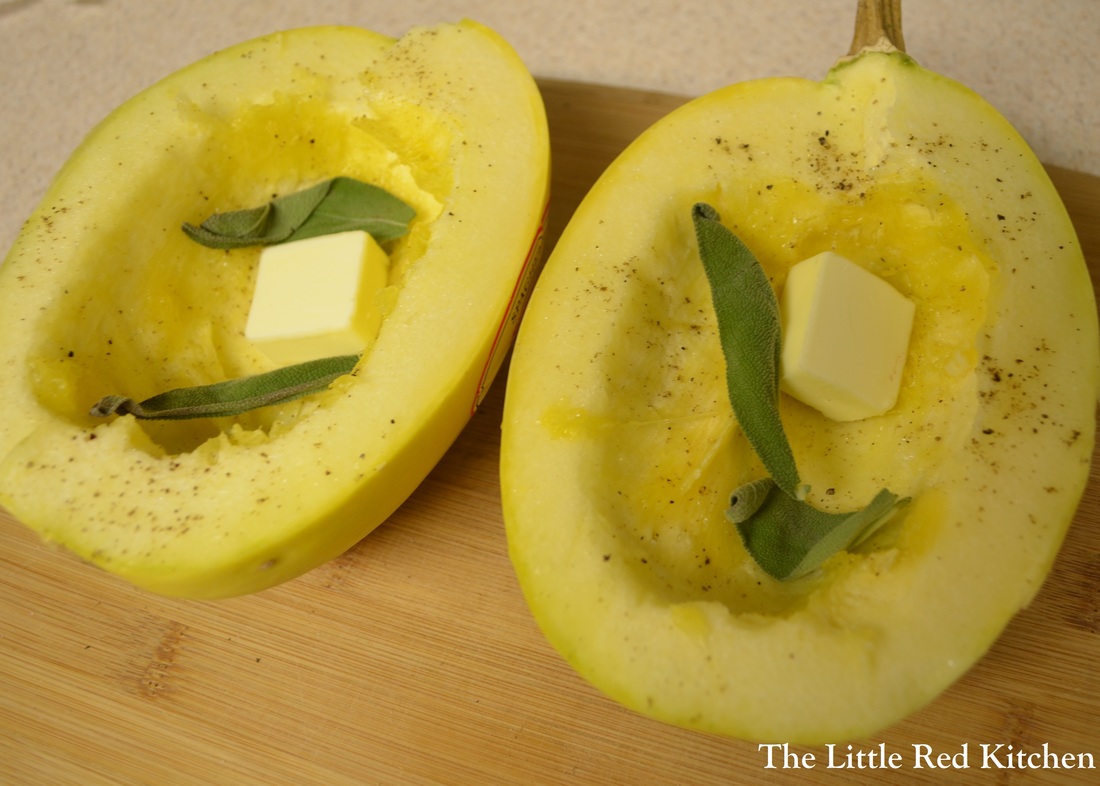
Place each half on a rimmed baking sheet, flesh side up. I put parchment down first, like always, so that in case the squash leaks or bubbles, I don't have to clean up a sticky baking sheet, I just have to throw away the parchment. Season each half with a 1/4 tsp. of the salt and pepper, then place 1 tbsp. of the butter and 2 sage leaves in the hollows of each squash half. 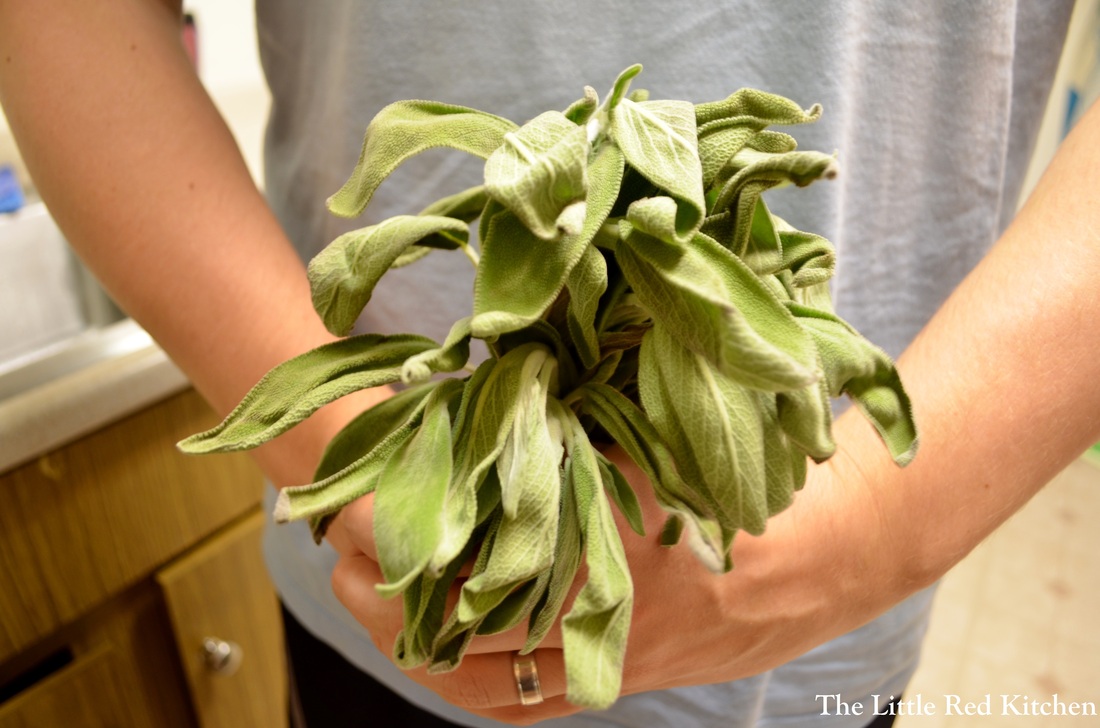 For ME? You shouldn't have <3 Step 3:
Bake the squash on the middle rack until the flesh is just soft, about 40-45 minutes. For a larger squash, this may be closer to an hour. Remove the squash from the oven and let cool until you can work comfortably with it, about 15 minutes. Step 4:
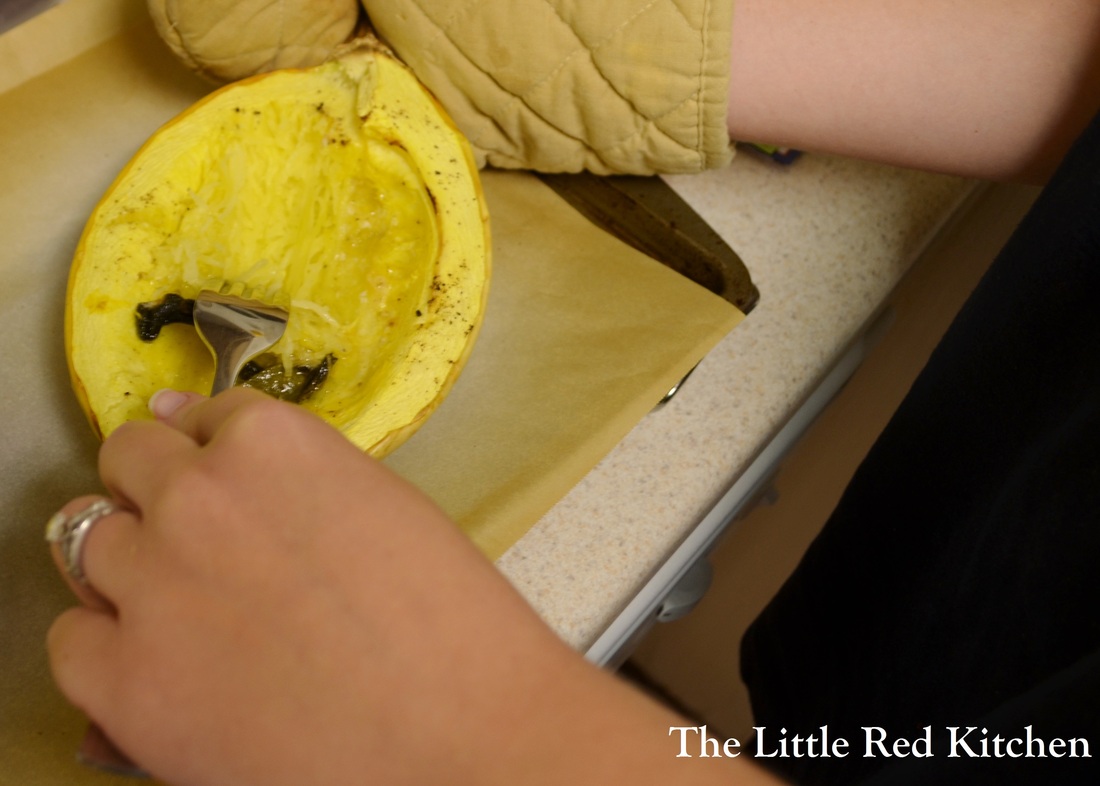
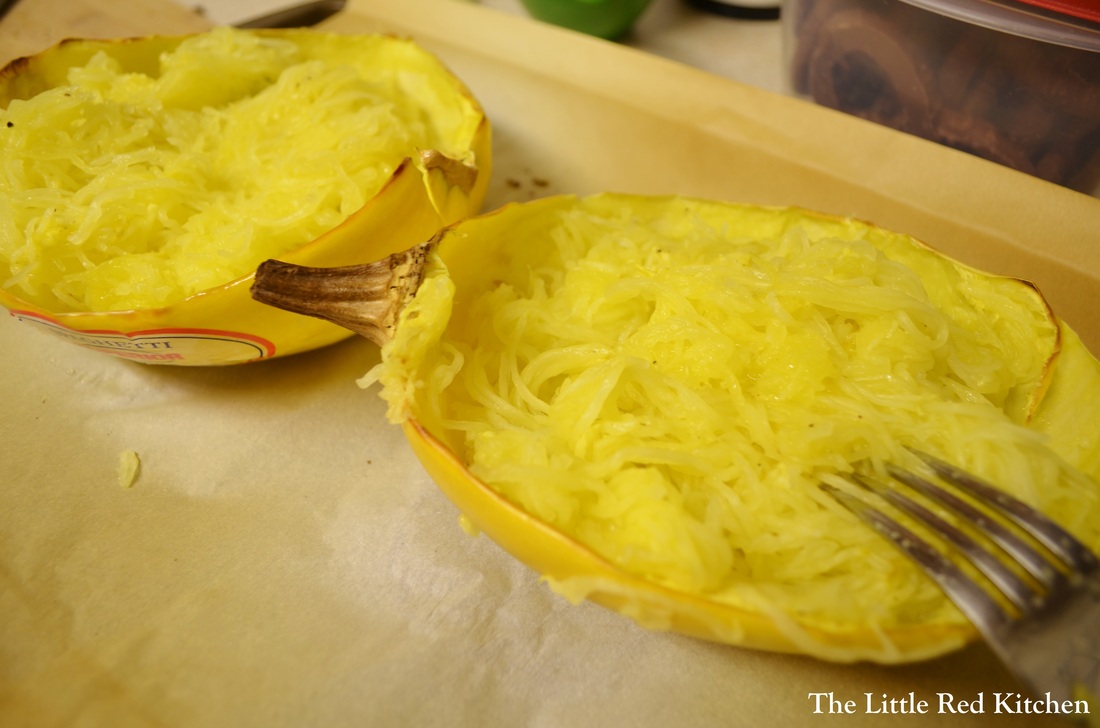
Here comes the fun part. Using a fork, simply run the prongs long-ways across the flesh, and it will form spaghetti strands. Just try to keep that lovely pool of butter in there, tossing it with the squash as you go. The squash is still plenty warm, and the sauce takes a couple minutes to throw together, so just let the squash chill out for a bit.
Step 5:
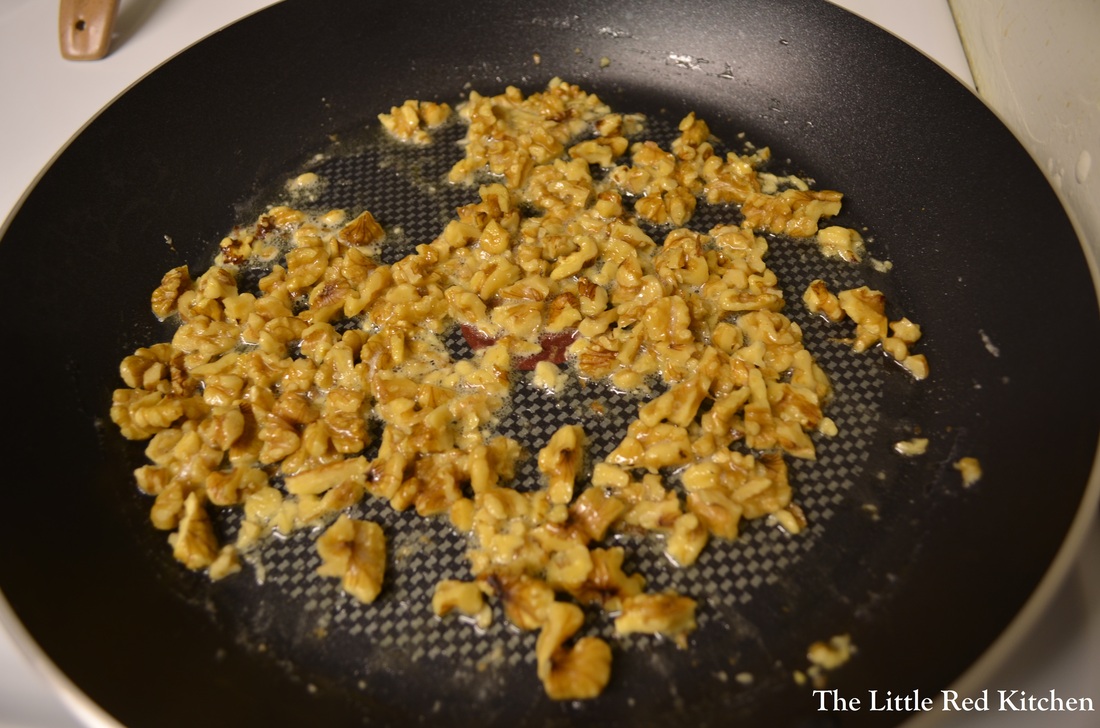
Heat the remaining butter in a large skillet over medium heat, then add the walnuts and toast for about a minute, letting the butter foam and sizzle. Then add the remaining sage leaves and stir them around for about a minute as well, until they start to crackle in the pan. Done! Add the spaghetti to the pan, toss to combine and warm through for about a minute or two. Add the rest of the salt and pepper if you need to and serve, topping with the grated cheese. Both fresh tasting and comforting, this meal will warm your belly up in the best possible way.
Spaghetti squash is a little too delicate for a hearty marinara, but a fresh chunky tomato salsa would work marvelously, as well as an herbaceous pesto, if you'd rather give those a try. Somebody was obviously playing with their food to begin with if they discovered you could turn squash into noodles. So why not play some more? :)
~Lauren
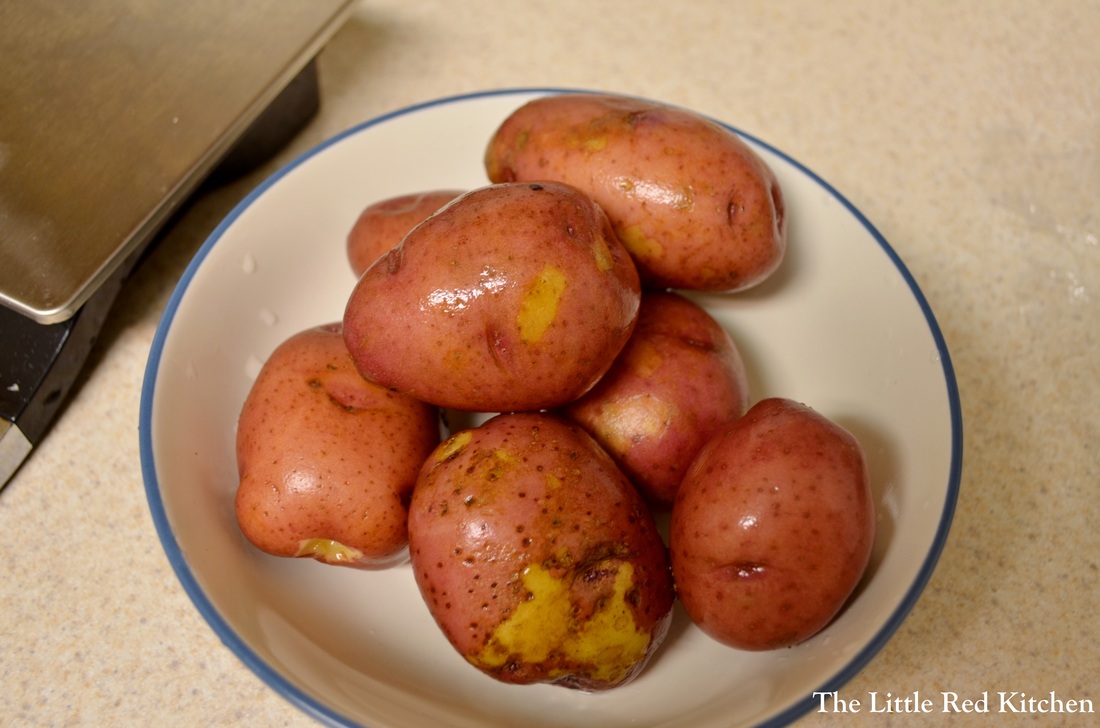
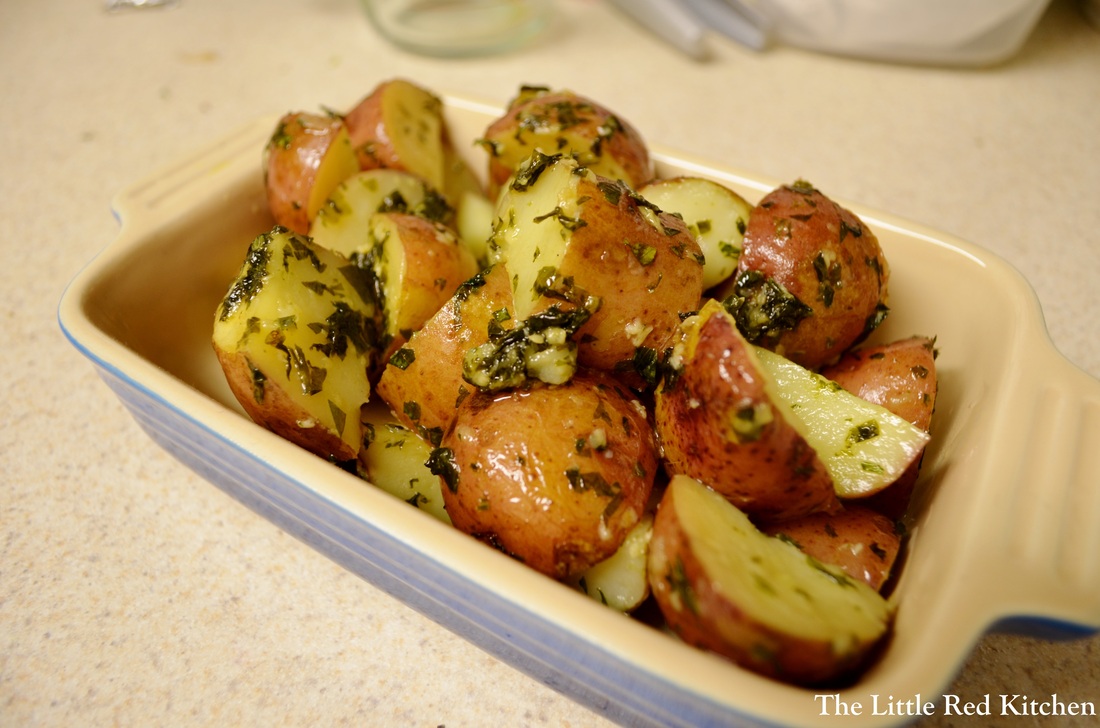
Sometimes when bags of potatoes are on sale buy-one-get-one free at the market, my husband and I have to indulge, even though it leaves us with 6-10 lbs. of potatoes on our hands. Our worst fear is that we'll decide against it, but then next week we'll need potatoes and feel like total chumps because we missed out on a free bag! However, that leaves us with a bunch of potatoes, and in need of recipes!
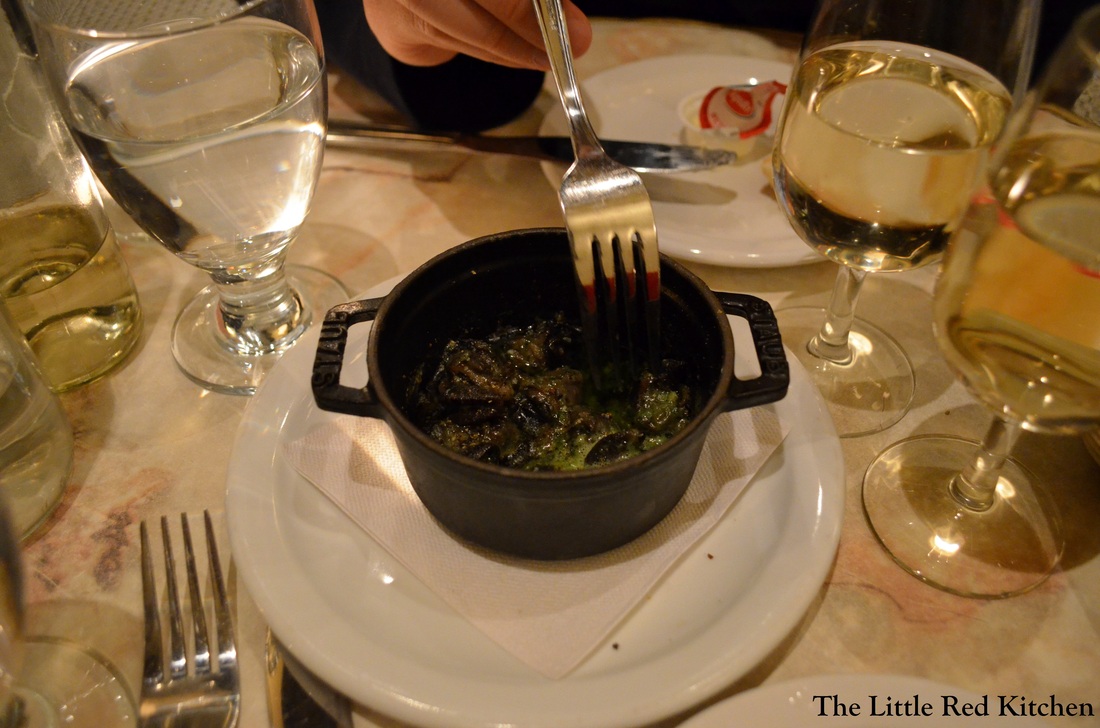
On our anniversary trip Doug and I had escargot en cocotte, which was snails cooked in a small sturdy pot with a wonderfully luscious sauce of olive oil, tons of parsley and garlic. I was not about to cook snails at home, but I had to come back to Pennsylvania and do something with that amazing sauce, and potatoes seemed like the obvious choice. But, the question in my mind was, how do I impart tons of flavor into the potatoes, but allow them to retain their great potato flavor? I decided to take a leaf out of the en cocotte book with this one.
Ingredients:
1-1.5 lbs small red potatoes, scrubbed clean with skin left on
4 cloves of garlic, minced
3 tbsp. olive oil
1/4 cup chopped parsley
1/2 tsp. kosher salt
Step 1:
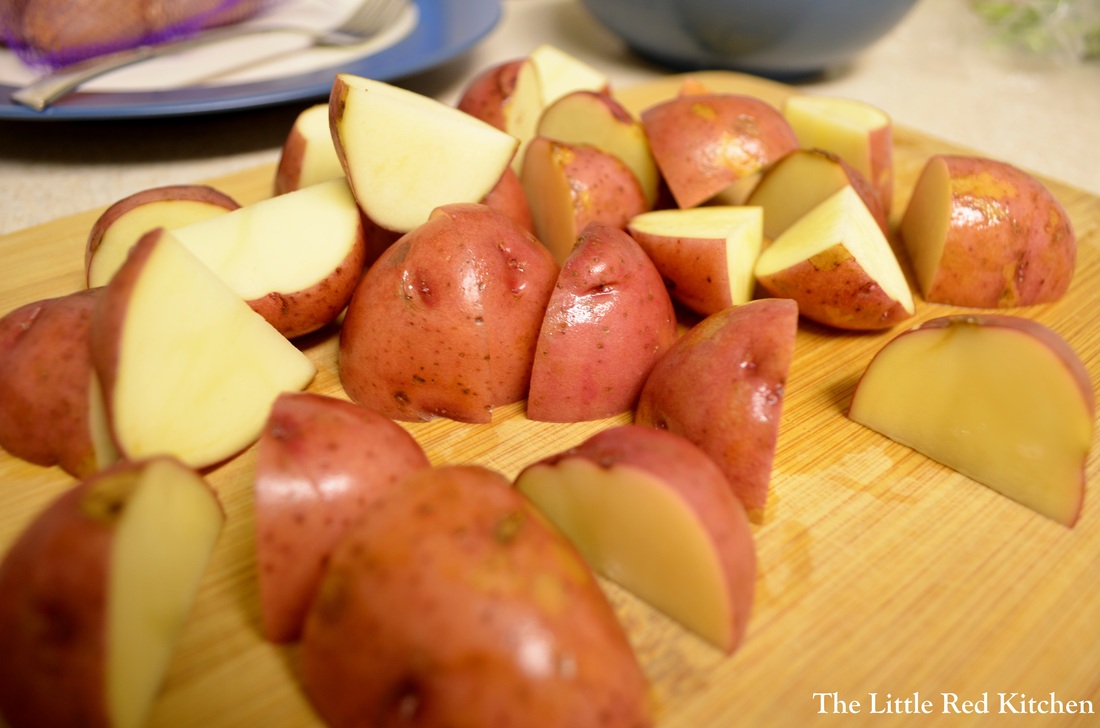
Cut the potatoes into about 1-inch pieces. Depending on the size of the potatoes this could mean halving them or quartering them. Step 2:
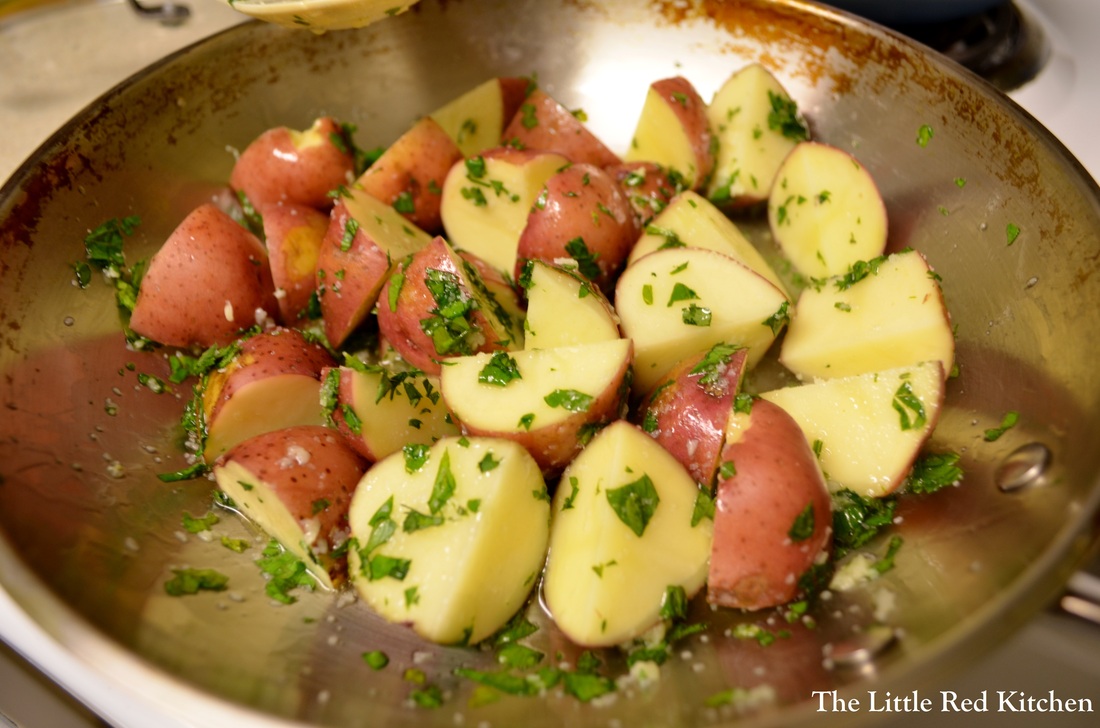
Add the olive oil and garlic to a cold 10-inch skillet or wide-bottomed saucepan. Heat it over medium-low heat, and when the garlic starts to sizzle, add the potatoes, parsley, salt, and a tbsp. of water. Stir to evenly coat the potatoes, cover, and cook for about 10 minutes, until the edges are starting to turn translucent. The science: One of the culprits of flavorless potatoes is water. If you overcook potatoes when you are boiling them, they get waterlogged and this flushes out all of the flavor. If you've ever had flavorless mashed potatoes, that is the culprit. By basically poaching these potatoes in olive oil and just a tiny bit of water to keep anything from burning, the only liquid they will steam in is their own juices! You will get potatoes that have tons of herb and garlic flavor, but that actually taste like potatoes.
Step 3:
After the first 10 minutes, give everything a stir, then re-cover and cook for another 10 minutes, or until the potatoes are cooked through. When you can insert a paring knife into a potato piece and it meets no resistance, you are there!
Simply pour the potatoes into a dish and serve! These yummy, luscious potatoes are the perfect side dish to just about anything from roast chicken to steak. Eat and enjoy!
~Lauren
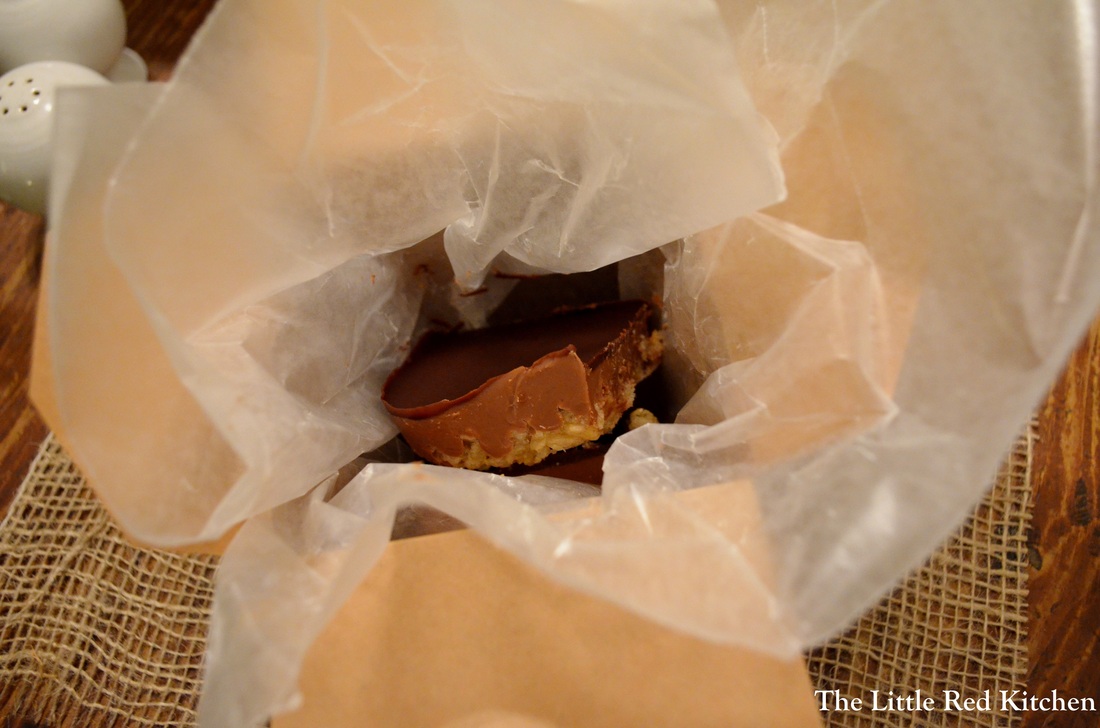
I don't know a lot of ways to start a week off that are better than dessert! So with that, let's dive right into these Peanut Butter Crispy Bars that are making another appearance from their Dinner Party debut. Every so often when I have spare reading time (which is NEVER now that I'm in graduate school) I get a cookbook out of the library, just to peruse even while I'm watching tv. One of my favorites is the book that Food & Wine Magazine puts out every year, Best of the Best Cookbook Recipes.  courtesy of amazon.com That's right, they go through all the cookbooks that have been published that year and pull their favorites, so you don't have to buy (or borrow) them all! I usually end of scanning tons of pages full of mouth-watering dishes so I can save them once the book is back on the shelves. That's where I found this fantastic recipe.
Ingredients:
For the crispy crust:
1 3/4 cups crisped rice cereal
1/4 cup sugar
3 tbsp. light corn syrup
3 tbsp. unsalted butter, melted
For the milk chocolate peanut butter layer:
5 ounces good-quality milk chocolate, coarsely chopped (I LOVE Ghirardelli's milk chocolate chips, which I didn't chop for this recipe)
1 cup creamy peanut butter
For the dark chocolate icing (yup, it keeps getting better):
3 ounces dark chocolate (60-72% cacao), coarsely chopped
1/2 tsp. light corn syrup
4 tbsp. (1/2 stick) unsalted butter
Step 1:
Lightly spray a paper towel with nonstick cooking spray and rub the bottom and sides of an 8-inch square baking pan. Set aside. Put the cereal in a large bowl and set aside as well.
Step 2:
For the crispy crust, pour 1/4 cup of water into a small saucepan. Gently add the sugar and corn syrup, so that it doesn't get on the sides of the pan (just pour it right into the center). Stir gently with a wooden spoon until just combined. Put a candy thermometer into the saucepan, cook over medium-high heat, and bring to a boil; cook until the mixture reaches the "soft ball" stage (a candy-making term), 235 degrees.
I don't own a candy thermometer. Used to, and I broke it with my first use. Lesson learned. So I clipped my instaread thermometer to the pan and used that. Note that this will come to a boil quickly, but it takes longer to get up to the 235 degrees.
Once it does hit that temperature, remove from the heat and stir in the butter, then pour over the cereal. Combine quickly then dump into the prepared pan. Using your hands, press the mixture into the bottom (but not up the sides) of the pan. In case you hadn't guessed, you just made rice crispy treats! Let this layer cool a bit while you work on the next.
Step 3:
In a large nonreactive metal bowl, stir together the milk chocolate and peanut butter. Set this bowl over a saucepan of simmering water and stir until it melts and the mixture is smooth. Then remove from heat and continue to stir for about 30 seconds, so it cools down slightly. Pour the mixture over the crust and refrigerate for an hour, or until this middle layer has hardened.
Step 4:
Make the top layer! Create the same double boiler set-up as in step 3, this time with the dark chocolate, corn syrup, and butter. Again, stir and melt till completely smooth, and off the heat, continue to stir for 30 seconds. Pour this over the chilled milk chocolate layer. Put the pan in the fridge again and let harden for an hour, then these are ready to serve!
These are rich, so I'd cut into 9 squares, if not even smaller, depending on how stuffed everybody is from their main meal.
I can't believe that I've never had to combine milk chocolate and peanut butter in a dessert before, because it is AWESOME. These bars are amazing. The middle layer is dense and chewy, while the top dark chocolate is like a light fudge, and that intense cocoa flavor of dark chocolate is a perfect compliment. I hope you make these soon and ENJOY!
~Lauren
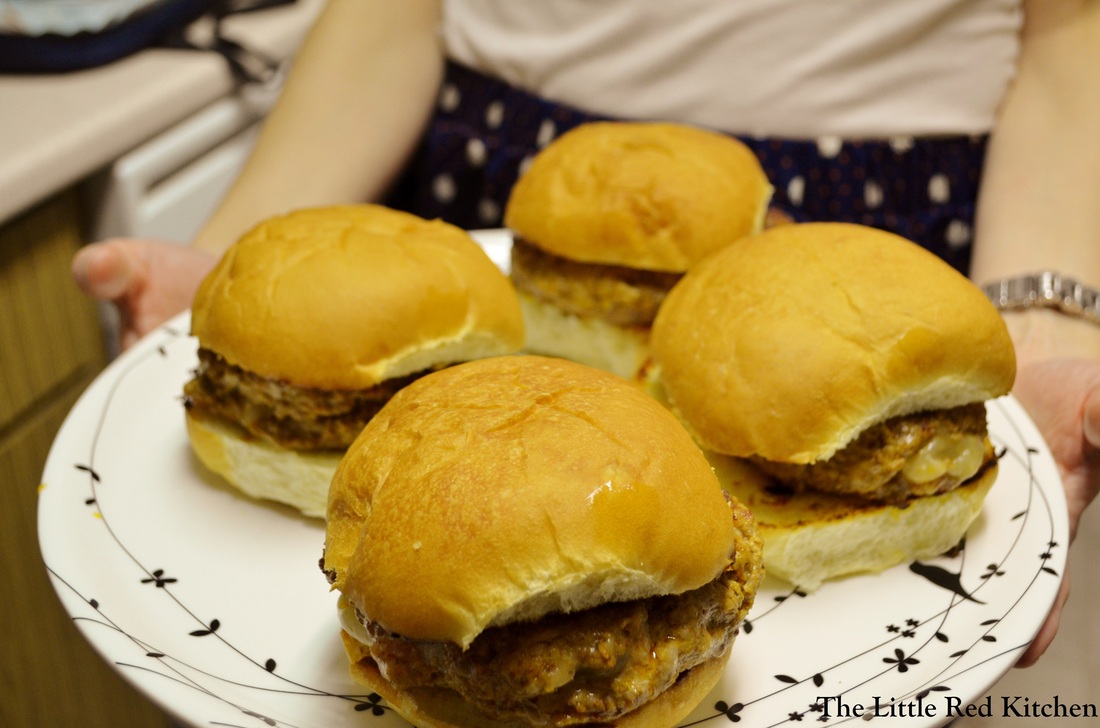
I'm going to keep this brief, mostly because I'm smack in the middle of midterms for grad school, and also mostly because I wrote up this post around 9:00 this morning and it somehow deleted itself... Anyway, let us rejoice, because it is Thursday, and Thursday is a good friend of Friday. And let us rejoice by checking out an awesome recipe for Spanish Manchego Stuffed Pork Burgers, which I made for my Dinner Party last weekend and which were requested to appear on the blog in recipe form! Ingredients: 2 tbsp. vegetable oil 1/4 cup pimiento-stuffed Spanish olives 4 cloves garlic 1 tbsp. dried oregano 1 tbsp. chili powder 2 tsp. smoked paprika 1 tsp. ground coriander 1 tsp. ground cumin 1/2 tsp. ground allspice 3 tbsp. mayonnaise 1 1/4 lb. coarsely ground pork Kosher salt and freshly ground pepper 1/4 lb. manchego cheese, shredded on the large holes of a box grater or in a food processor 4 large soft hamburger rolls, split This recipe makes 4 burgers. It comes from an old issue of Food Network Magazine. Which reminds me of another tip for entertaining; having guests over is not the time to experiment with weird foods, techniques, ingredients, etc. Stick to what you know! Your friends and family wouldn't judge you if you messed up dinner, but why even risk it when you can make something you already know will turn out wonderfully? This doesn't mean, be boring. It just means to calculate your cooking risks! Step 1: Combine the vegetable oil, garlic, olives, and all the spices (not including salt and pepper) in a food processor or mini food processor and process until smooth. Scrape into a large bowl and stir in 2 tbsp. of the mayonnaise. Step 2: Add the pork to the mixture along with salt and pepper (about 1/2 tsp. of each) and use your hands to gently combine. You want to make sure everything is evenly distributed, but try your best not to compact the meat or overwork it. Step 3: Now you have to make the patties and stuff them with the cheese. This is the best way I've found to do it. Divide the pork evenly into 4 sections. Then take one section and divide that in half. Shape one half into a burger patty, about 1/4 inch thick, then sprinkle 1/4 of the cheese on top, pressing it into the meat ever so slightly. Then, take the other half of the pork, form a similarly sized patty, and sandwich it on top of the cheese-topped patty, pinching and folding the edges shut as you go. None of the cheese escaped and burned when I used this method! Step 4: This recipe called for grilling the burgers, but that's not my M.O. so I seared them on the stove, which, to be honest, is the way I prefer my burgers. But if you want to grill these bad boys, feel free! After you have formed your 4 patties using the method in step 3, preheat a 12 inch nonstick skillet over medium-high heat for a couple minutes. Place the burgers in and cook for 5-6 minutes. Don't press on them or do anything to them! Just let them brown. Then flip and cook for another 5 minutes and remove to a plate. If you are not using a nonstick pan, brush each side of the burgers with a little vegetable oil to prevent sticking. I have also used my retro flat-top electric griddle to grill multiple burgers at once, and this works beautifully. Step 5: Almost there! Crank the heat to high on the pan and brush the remaining tbsp. mayo on the inside of the buns and place them in the pan, mayo side down, for just about a minute, so they get slightly browned and toasty. Top with the burgers and add whatever condiments you want though I promise you, these delicious things need no embellishment. Like I said in my post, since the forming and stuffing of the burgers can be finicky, I did that an hour in advance of my friends coming over, put them on a sheet tray covered with plastic wrap and left them in the fridge till I needed them. Easy! Disclaimer, burgers are literally my favorite food in the world, and I can be picky about them. I actually don't like fancy burgers; the simpler, the better, but these are the one exception to the rule. I can't get enough of that robust spice blend, the moist meat, and the amazing manchego inside, which just happens to be one of the best cheeses ever. The next time you are reaching for the ground 80/20 for burger night, consider giving these a try! ~Lauren
Talk about some comfort food!
Okay, so comfort food is something we all crave when the weather turns. I don't know if it's from childhood memories or it's more primal than that, but something in our bellies wants stick-to-your-ribs goodness this time of year. Unfortunately, that goodness comes at the price of pants buttons popping and food-induced comas. So I wondered to myself, does comfort food have to give us that feeling that we never want to even look at food again?
That being said, I decided to tackle the classic Southern American dish, chicken and dumplings, and make it a little less heavy. By creating a broth-based soup, instead of a thick gravy, and by adding tons of veggies and fresh herbs, I think I may have done just that!
Ingredients:
Stew:
2 large chicken breasts, trimmed of excess fat
kosher salt and pepper
2 tbsp. olive oil
1-1.5 cups chopped yellow onion (1 medium onion)
2 garlic cloves, minced
1 sprig of fresh thyme (substitute 1/2 tsp. dried thyme if you need to)
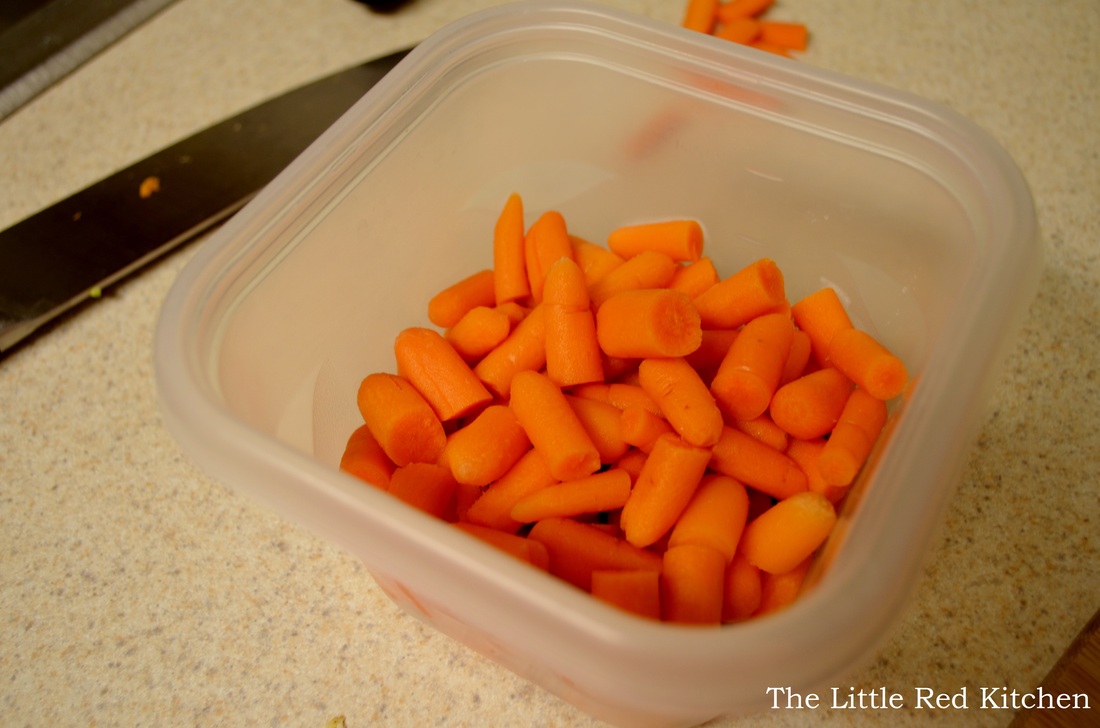
2 cups of carrots, chopped into roughly 1/2-inch pieces (believe it or not I only had baby carrots on hand so I simply cut them in half!)
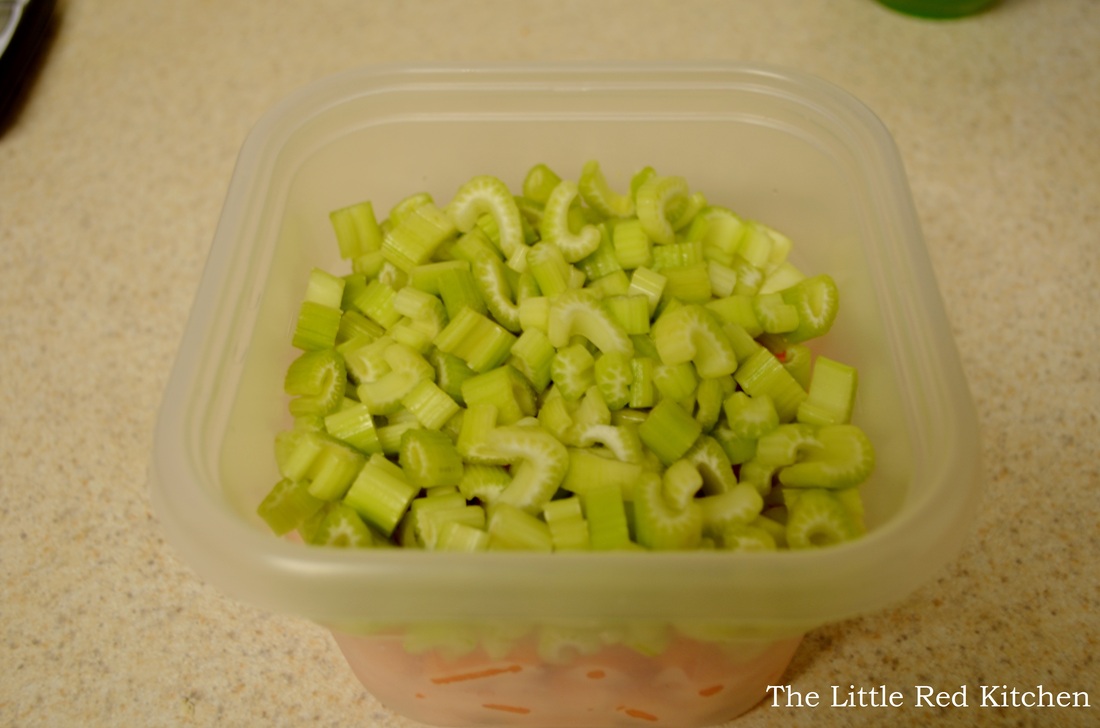
1 cup of celery, stalks chopped 1/4-inch thick
1/4 cup flour
6 cups chicken stock (I don't need to tell you that homemade is better. I happened to have some in my freezer, but 90% of the time I don't, so low sodium chicken stock is A-Okay)
1 cup water
3 tbsp. chopped fresh dill, divided in half (use 1.5 tbsp. if substituting dried dill)
4 tbsp. chopped fresh parsley, divided in half (dried parsley is like rabbit food. do NOT substitute.)
Herbed dumplings:
2 cups all-purpose flour
1/2 tsp. kosher salt
1/8 tsp. ground black pepper
1 tbsp. baking powder
1/2 cup heavy cream
1/2 cup buttermilk (You may use a whole cup of heavy cream if you wish, and omit the buttermilk)
2 tbsp. butter
*I forgot to count as I was making them, but I think the dumpling batter makes about 20 dumplings, if not more. This dish will definitely serve up to 6 people.
Step 1:
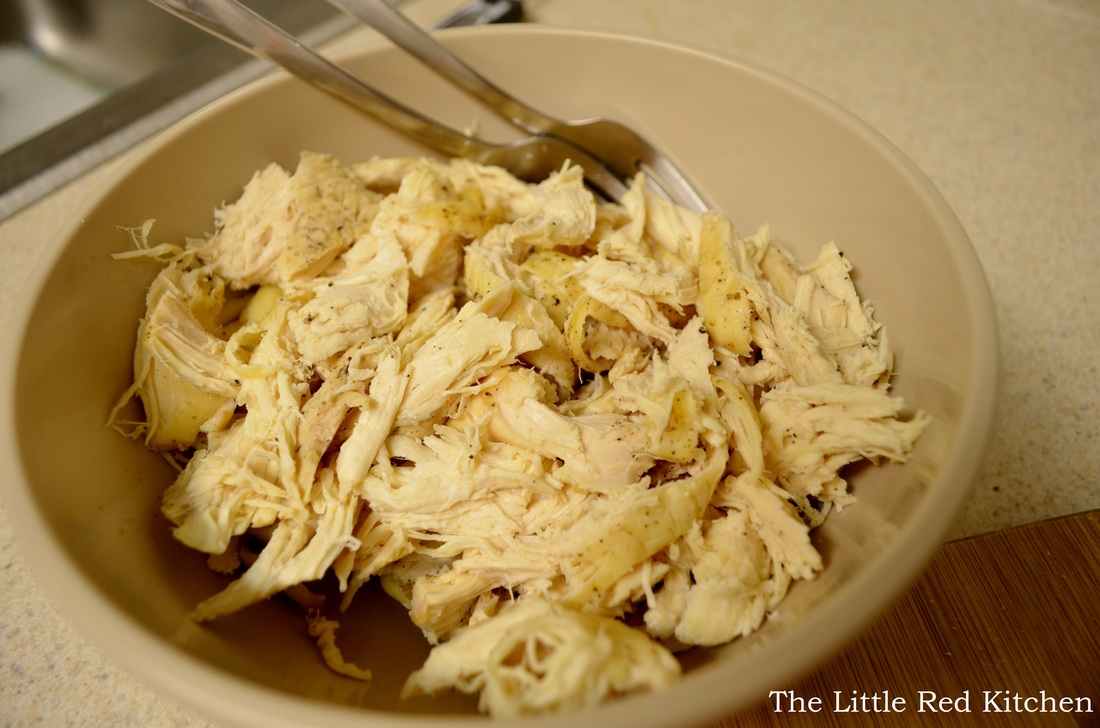
Pre-heat oven to 375 degrees. Season both sides of the chicken breasts with kosher salt and pepper and place on a rimmed baking sheet (I almost always use parchment paper because it makes clean-up a breeze.) Bake on the middle rack in the oven for 20-25 minutes, or until the chicken's internal temperature registers 160 degrees. Allow to cool, then using 2 forks, break the chicken up into large shreds. You should get 3-4 cups worth. Cover and set aside. A small note, I prepped almost everything in advance and just left it in the fridge for the afternoon. Come dinner time I just had to assemble the soup and make the dumplings, which made things so easy! Step 2:
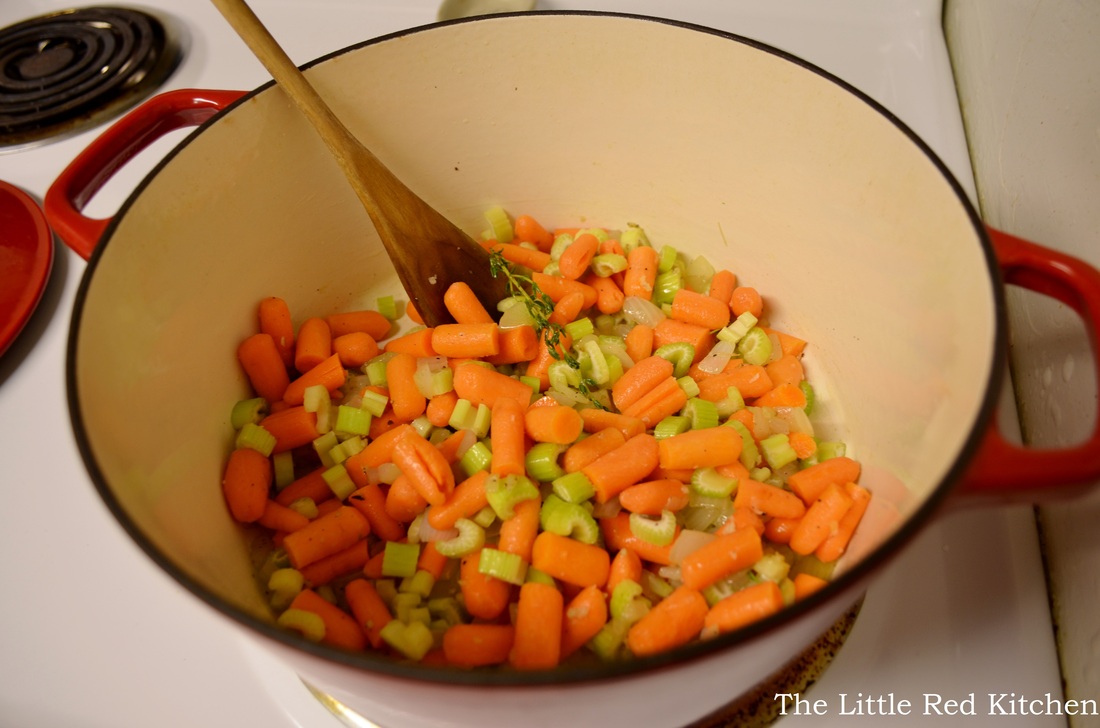
Pour the olive oil in a Dutch oven or heavy-bottomed large pot and turn on to medium-low heat. Add onion, 1/2 tsp, of kosher salt and 1/4 tsp. of black pepper. Cook until the onions are softened and slightly translucent, 5-7 minutes. (Keep the heat on medium-low, we're not looking to brown!)
Step 3:
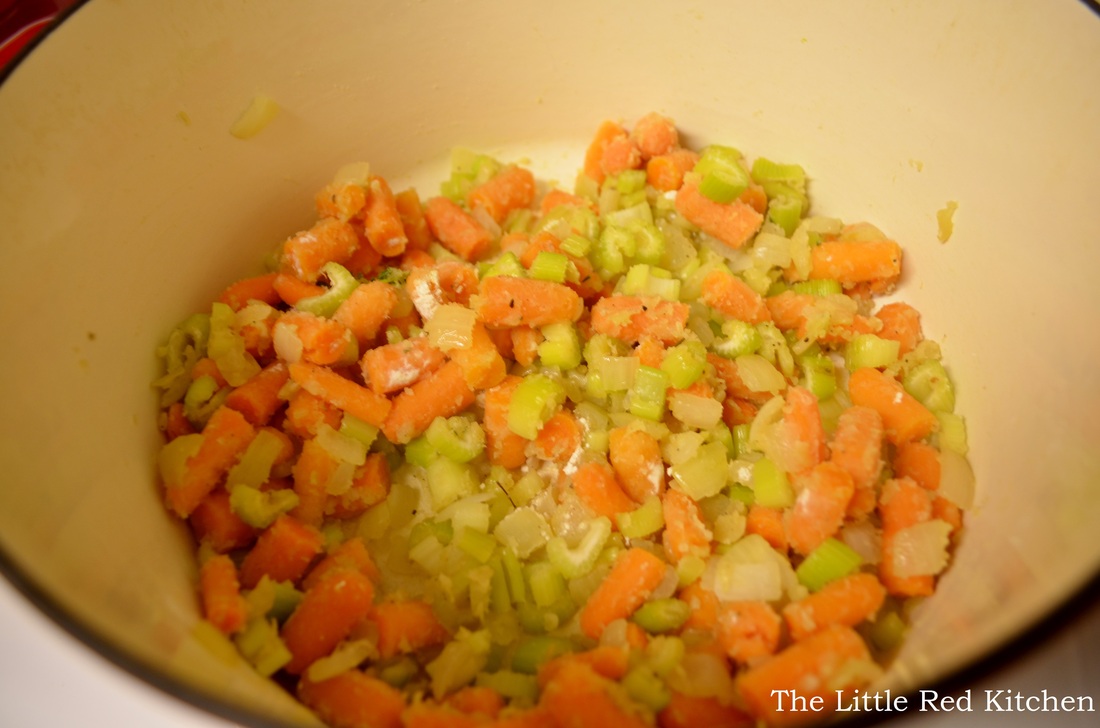
Add the minced garlic and thyme and cook for 30 seconds, until fragrant. Then add the carrots and celery. Stir to combine. Cover and cook for about 10 minutes, until the carrots have softened slightly and the celery is turning translucent, stirring halfway through.
Step 4:
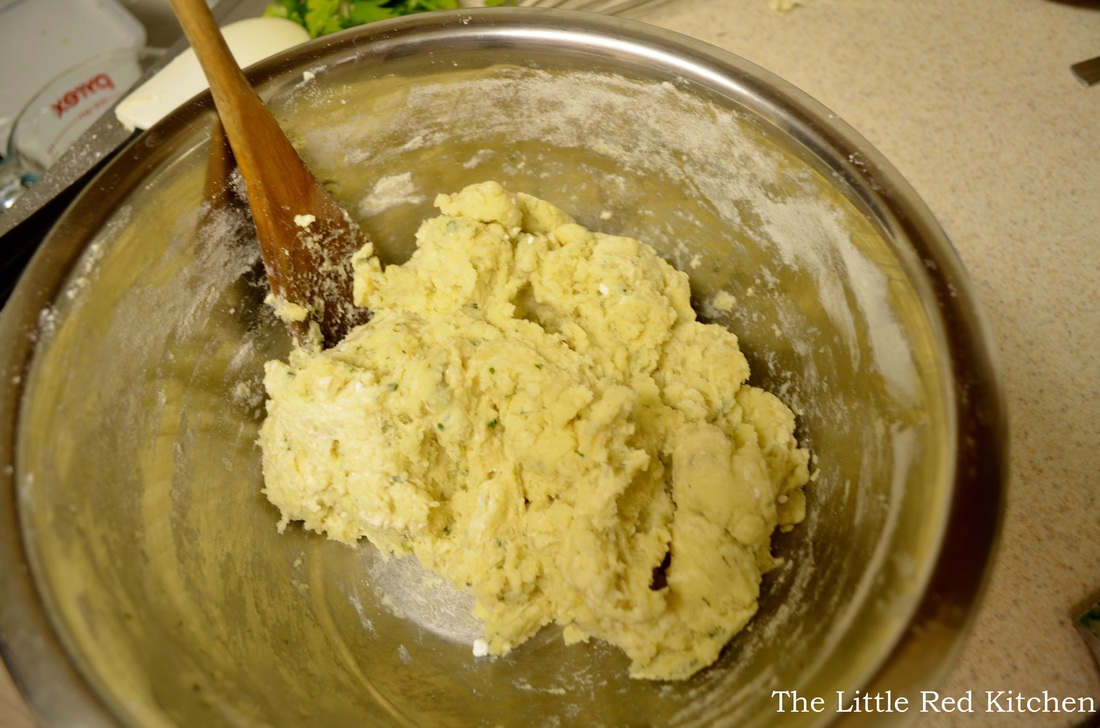
While the carrots and celery are cooking, it's a good time to form the dumpling dough, which doesn't take long at all. Combine the flour, salt and pepper, and baking powder in a medium-sized bowl and stir to combine. In a small saucepan, combine the heavy cream, buttermilk, butter, and half of the total dill and parsley. When it just comes to a simmer, pour it onto the flour mixture and stir just enough so that the dough comes together. I had to add a couple extra tablespoons of buttermilk, which is sometimes necessary. Just try your best not to overwork the dough. Step 5:
When the 10 minutes are up on the veggies, add the 1/4 cup of flour and bring to medium heat, stirring the flour in until it looks gummy and weird, about a minute. Step 6:
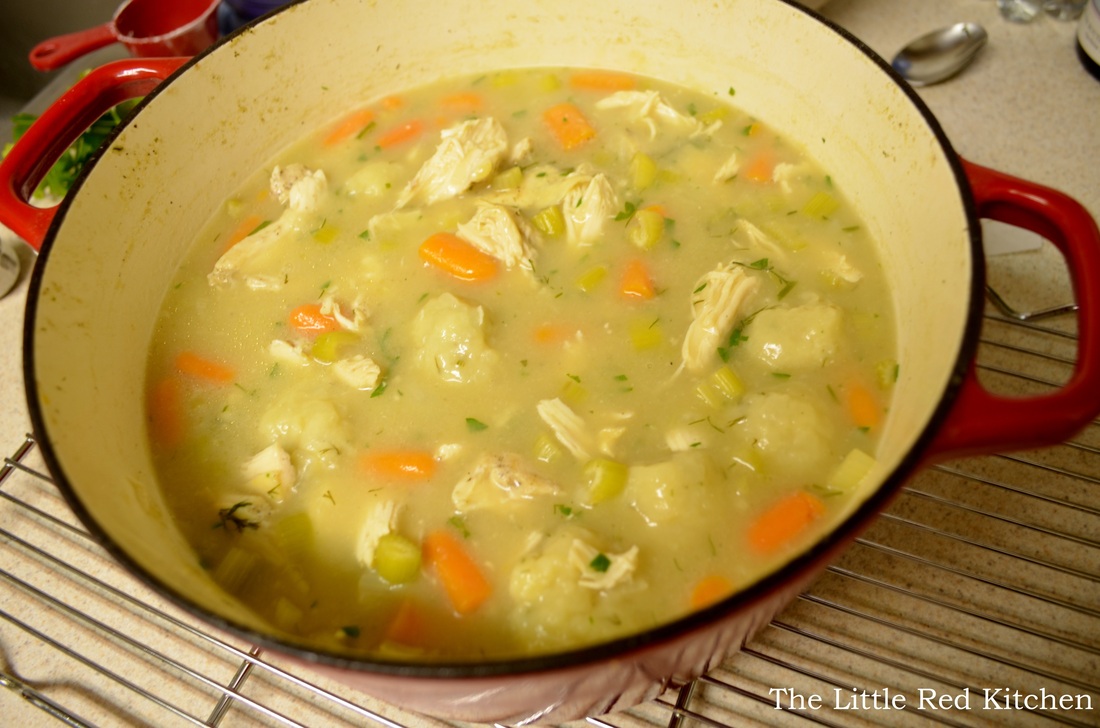
Pour the chicken stock and water into the pot and bring to a boil. Once the stew reaches a boil, lower it to a simmer (medium-low), fish out the thyme sprigs and start forming the dumplings and dropping them into the pot. Just grab a couple tbsp. at a time, and roll them into loose dumplings, about 1.5 to 2-inches big. Once they are all in there, place the lid on the pot and simmer gently for 25 minutes. I had a boil over. So when I say gently, I mean it. In fact, if your stew is even close to the top of the pot, leave the lid slightly off and check on it often!
After 25 minutes, turn the heat off and take the pot off the burner. Gently stir the chicken and the remaining fresh herbs into the stew and allow to sit for 5-10 minutes. Then serve! This stew has a fantastic consistency! It's thicker than a chicken noodle, but not as heavy as a dumpling gravy. And the fresh herbs are such a welcome addition to the whole dish! I particularly love the buttery, dill-y dumplings, which are just the right size that you can eat 3 or 4...or 5, or 6...and not hate yourself for the next 2 hours. The next time you are hankering for some home-cooked comfort, consider tucking in to a steaming bowl of this. :)
~Lauren
My husband and I recently spent a long weekend in Quebec, and of course a lot of their food is French-inspired. We didn't have a meal that wasn't completely delicious while we were there (but that's a different blog post!) and as soon as we returned home I was hankering to bring French cuisine into my kitchen. Which brings me to the French bacon and onion tart. The savory, mouth-watering, transcendant, tart... This dish is honestly one of the best I've cooked in a while. It is absolutely fantastic, and while it does take a little time, you will be HIGHLY rewarded for your efforts! This recipe is brought to you, via me, via America's Test Kitchen. Ingredients:
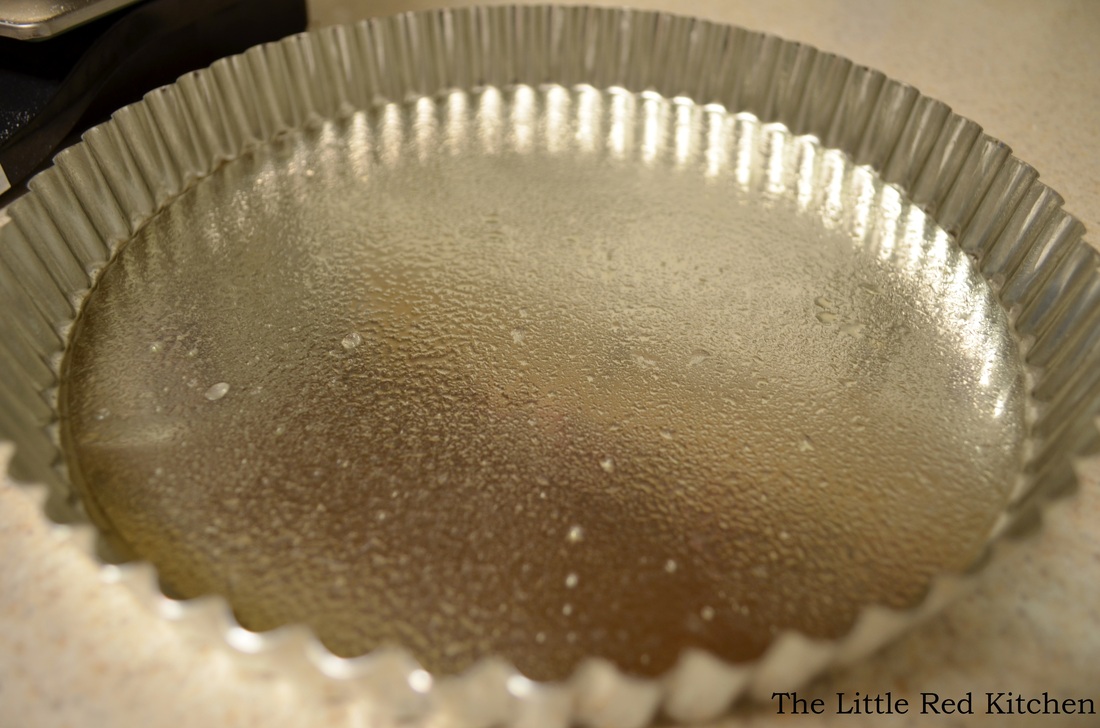
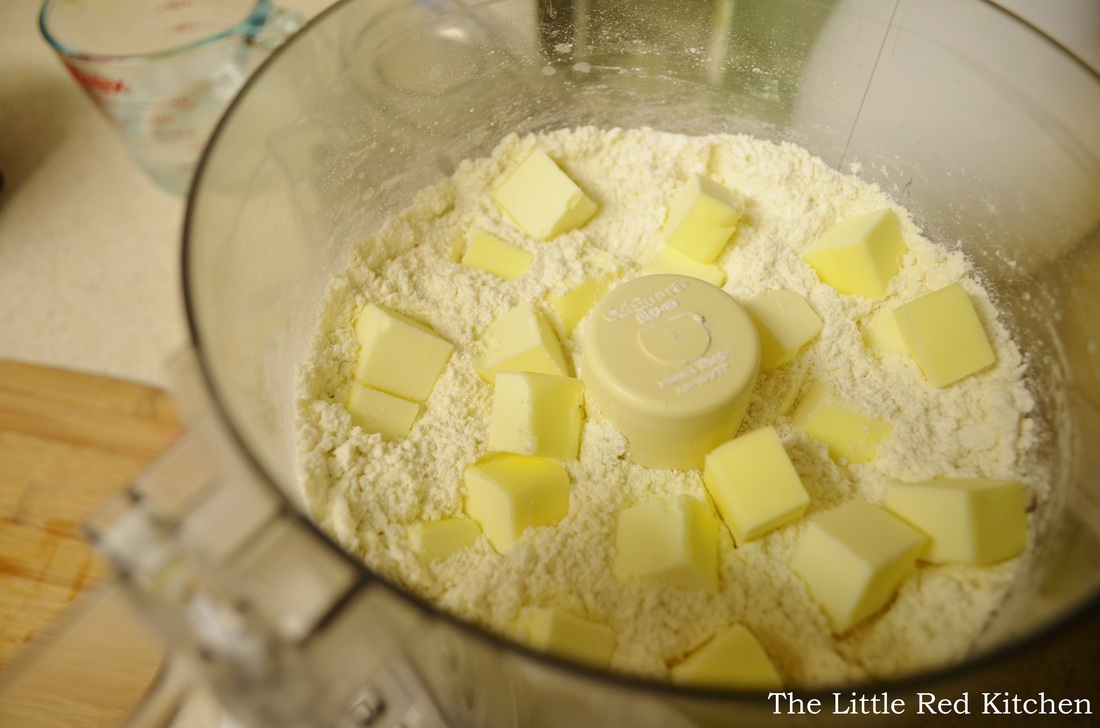
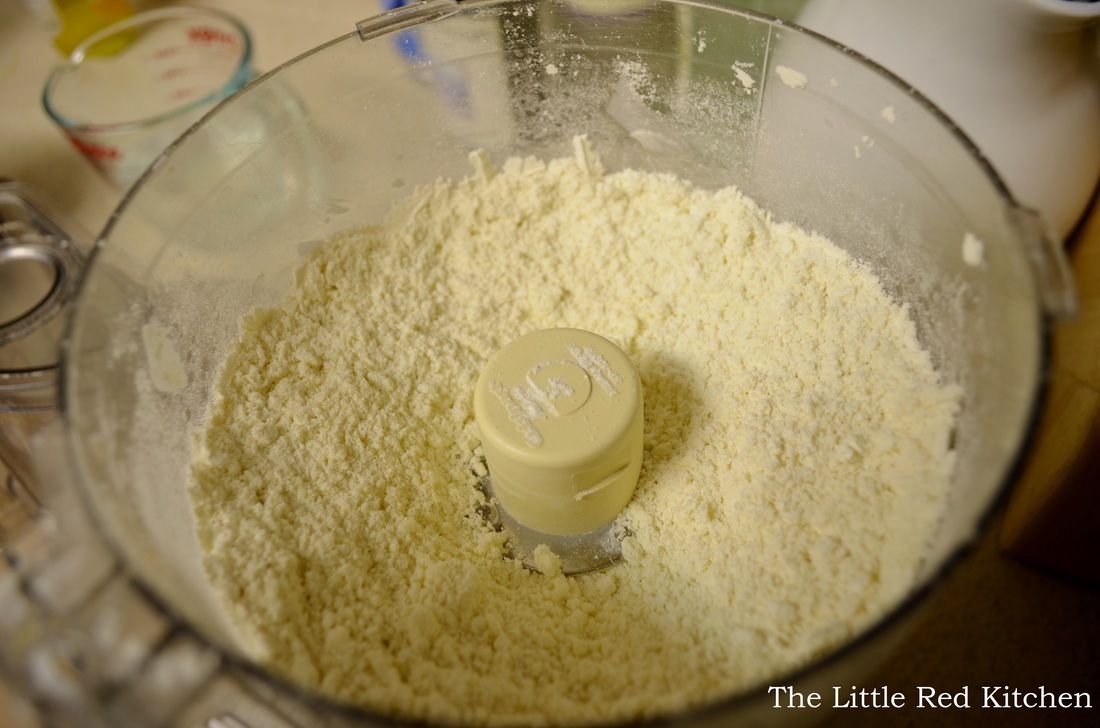
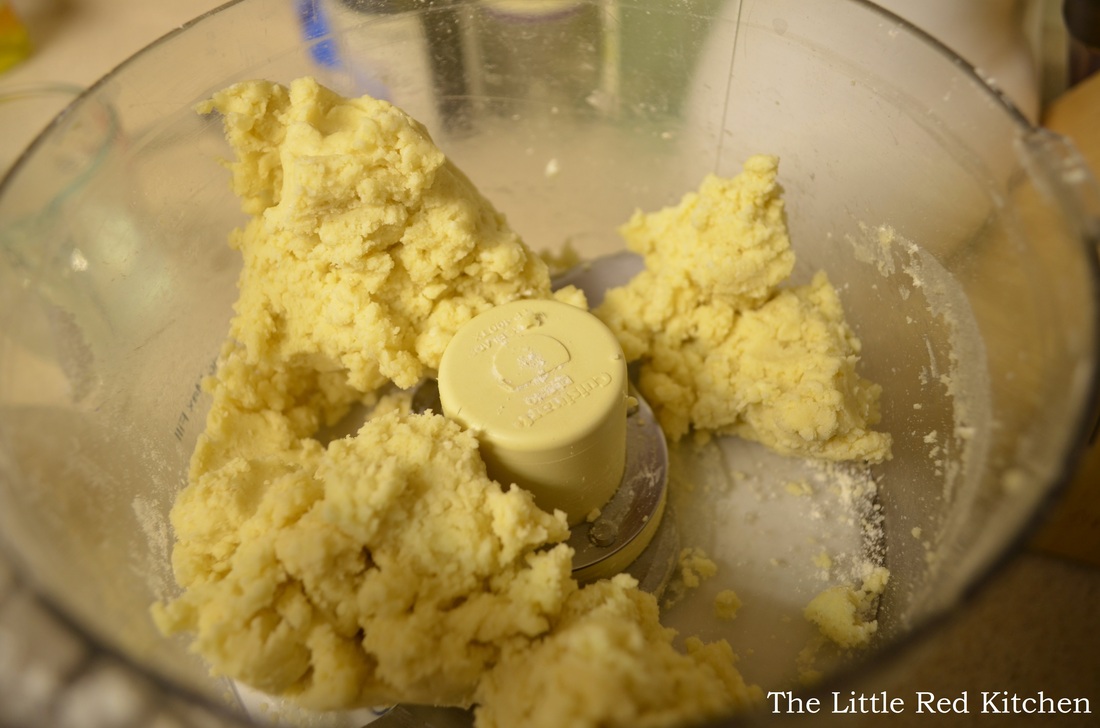
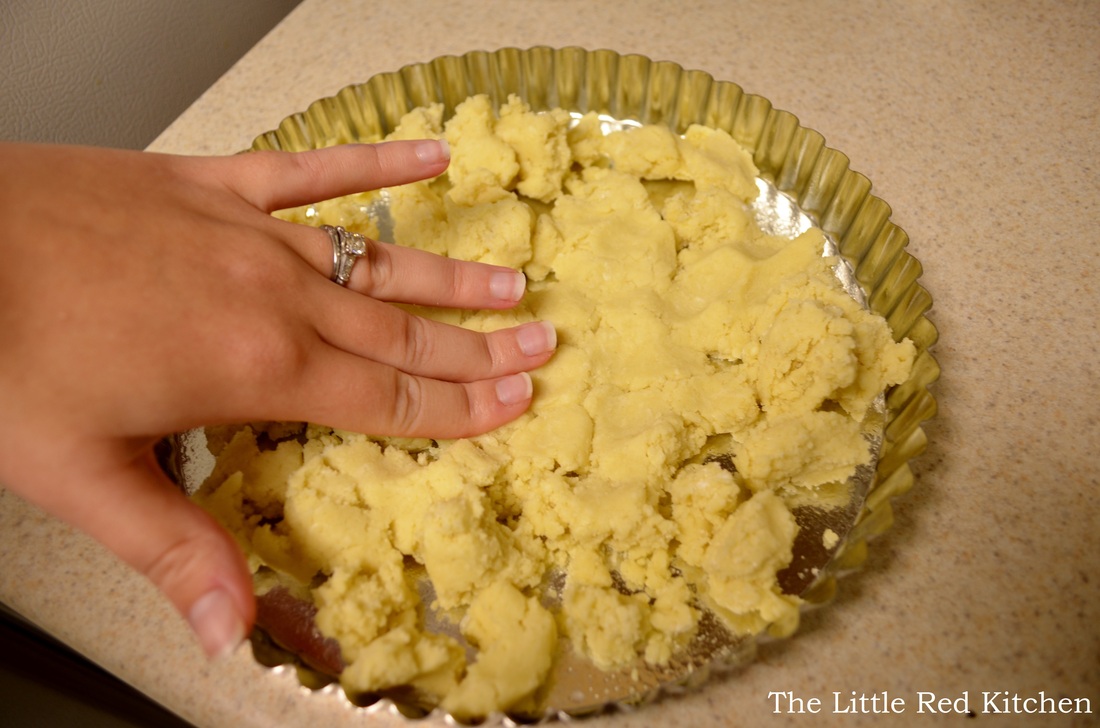
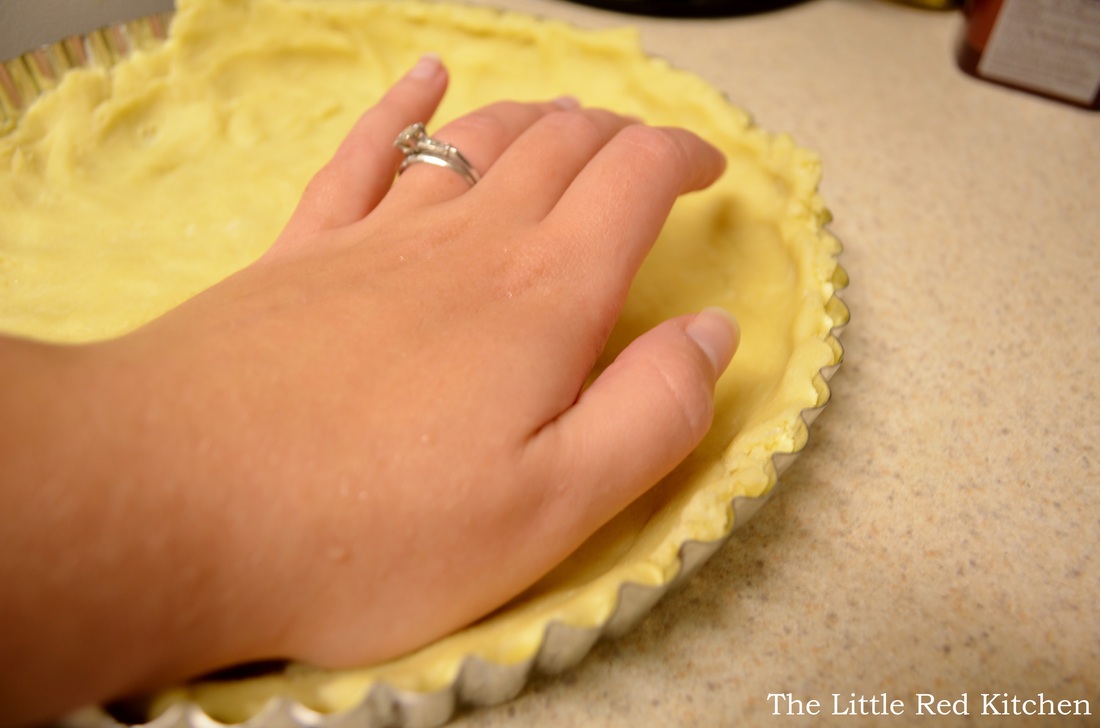
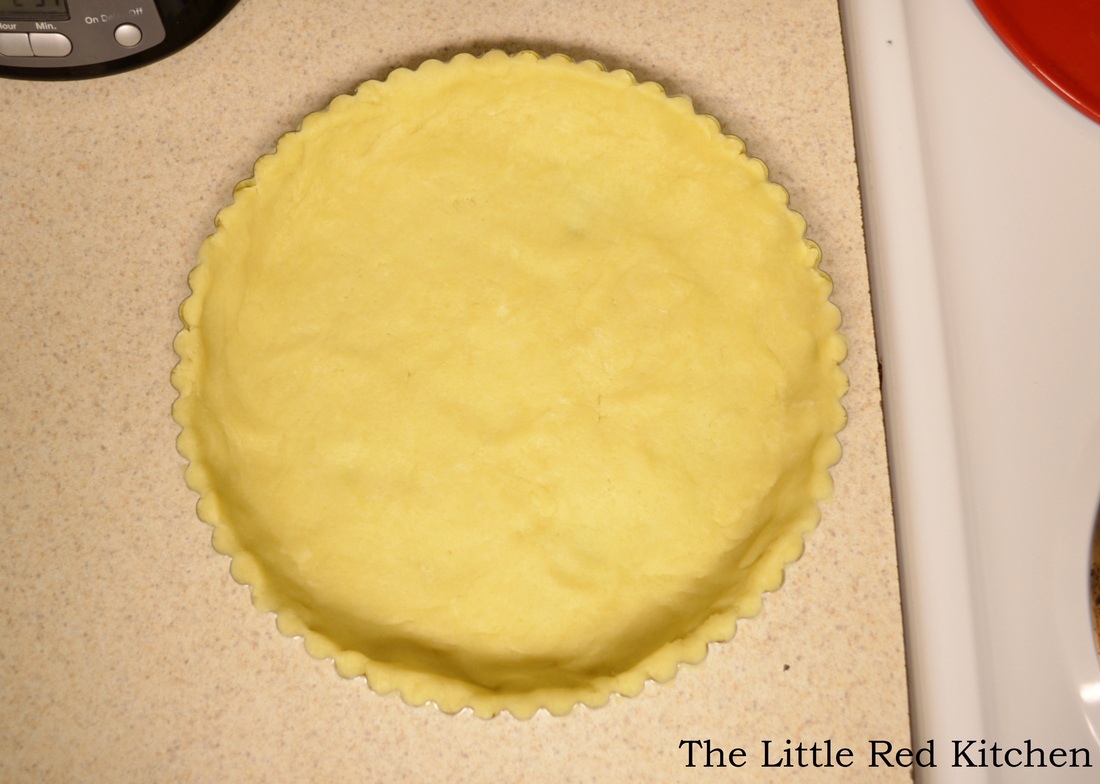
Tart Shell: 1 1/4 cups all-purpose flour (6 1/4 ounces for those of you weighing) 1 tbsp. sugar 1/2 tsp. salt 8 tbsp. (1 stick) unsalted butter, cut into 1/2-inch cubes and kept well chilled 2-3 tbsp. ice water Filling: 4 slices of bacon, sliced long ways and then cut into 1/4-inch pieces 1.5 lbs. yellow onions, halved and cut into 1/4-inch slices *See photos below 1 sprig fresh thyme 3/4 tsp. salt 2 large eggs 1/2 cup of half and half 1/4 tsp. ground black pepper You need a 9 or 10-inch tinned-steel tart pan with a removable bottom, like the one shown below. It needs to be sprayed with nonstick cooking spray. This may seem like a silly piece of hardware to have, but think of all the tarts (savory AND dessert) you can make with it! I got mine from Williams-Sonoma for $12, and it's beautiful, and made by a French company that's been in the bakeware business since the 1800s! It's the perfect tart pan, but the bottom line is, you need a tart pan. Step 1--Create the tart shell: For the tart shell, place the flour, salt, and sugar into your food processor fitted with the steel blade and pulse just a few times to combine. Then place the butter pieces on top and process until the mixture resembles course sand, about 15 1-second pulses. Pour in 2 tbsp. of ice water and process until the dough starts to come together into clumps and there is no dry flour left in the bowl. If this hasn't happened after about 5-10 seconds, add the other tbsp. of water. Dump this mixture into your greased tart shell, breaking it up into large, walnut-sized pieces. then begin patting them out in the pan, working from the center out. This dough is really easy to work with, just take your time. Once you've reached the edge of the pan, use the heel of your hand to start smoothing out the surface, and pushing the dough up the edges of the pan, into the fluted walls. As you can see in the above picture, you'll have some places where the dough sticks up over the top. Use your thumb or fingers to level it off, then use that extra dough to patch up any spots that seem thin.
Like I said, this is easy, but it takes patience. And actually, this was my first time ever fitting a pressed dough into a tart shell, so if I can do it, you definitely can. :) Cover the tart shell with plastic wrap, put it on a plate, and place in the freezer for 30 minutes.
Step 2--Prep:
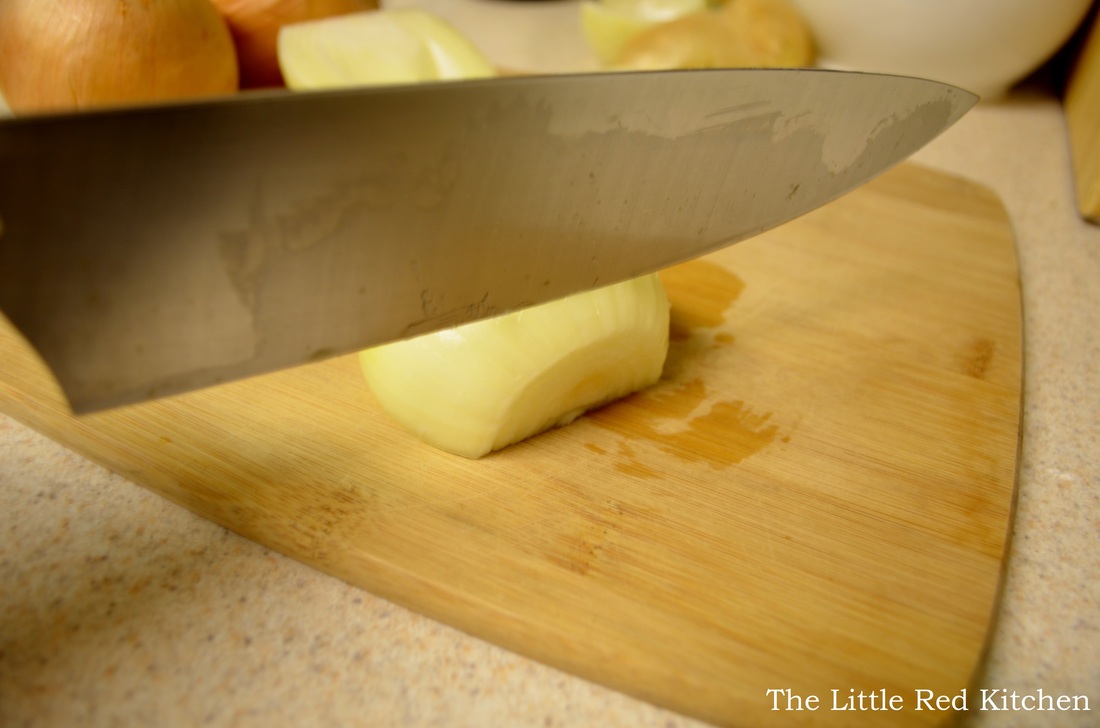
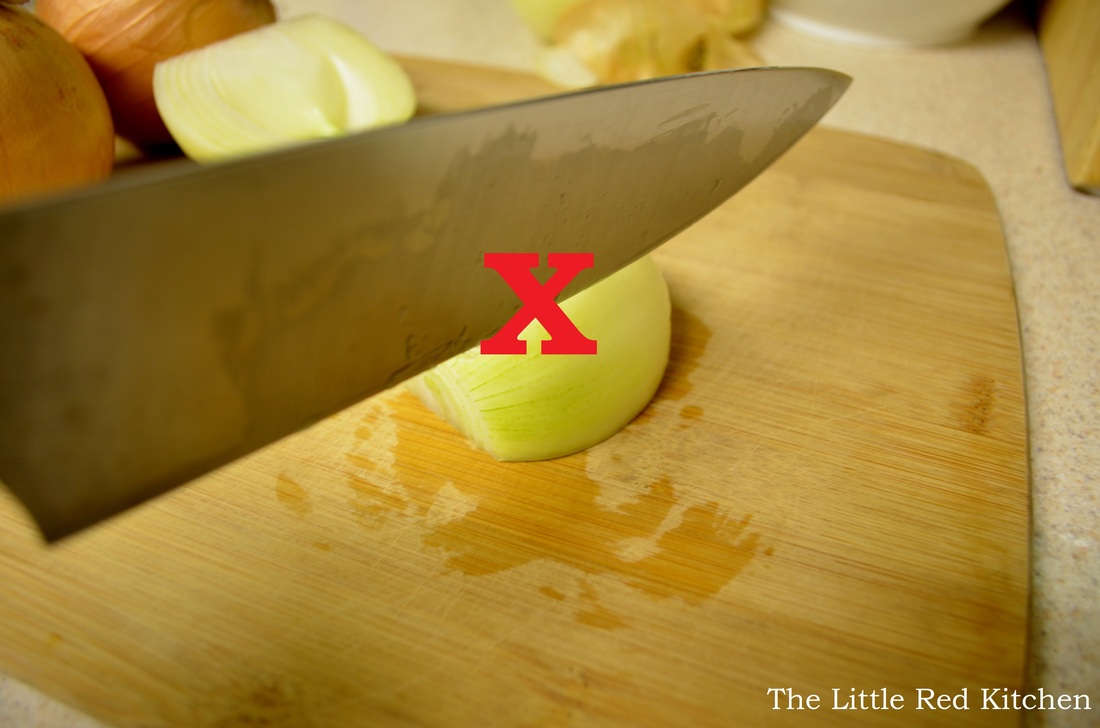
While the tart shell is hanging out in there is a good time to prep the bacon and onions. You want to make sure you cut the onions across the sliced ends like this: NOT pole to pole, like this: Step 3--Pre-bake the tart shell:
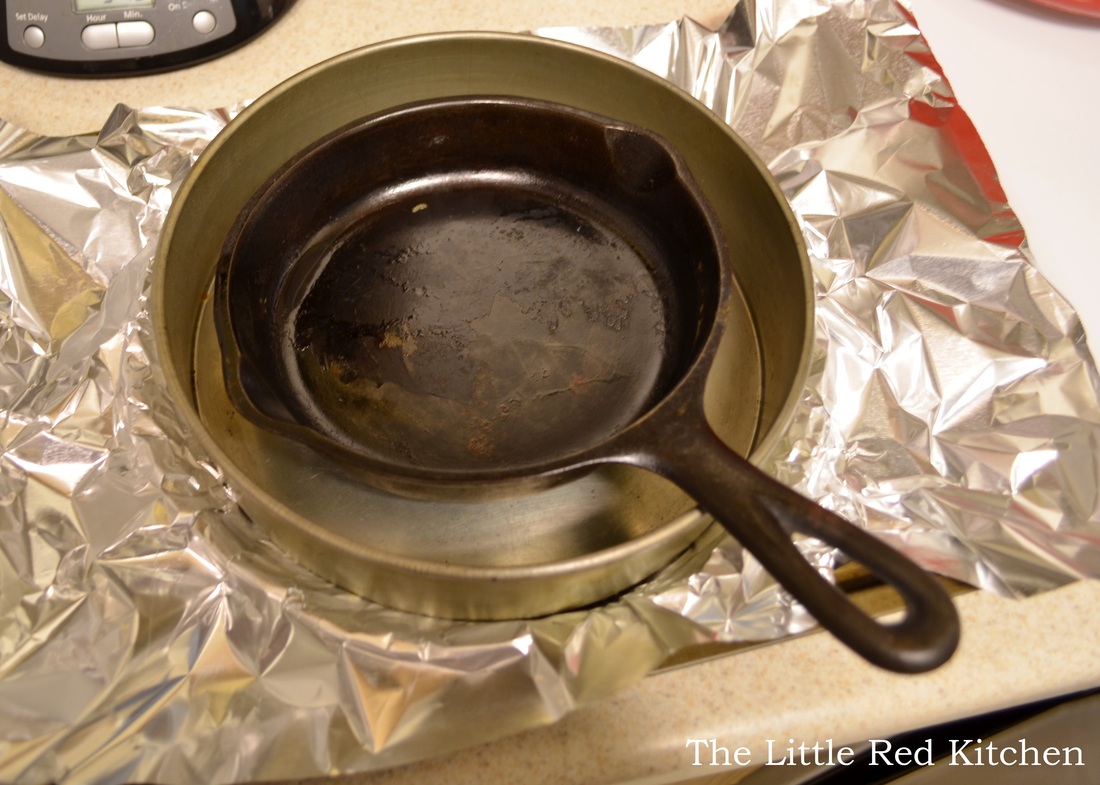
After you have finished prepping, pre-heat the oven to 375 degrees, with the oven rack in the middle of the oven. When the tart shell's 30 minutes are up in the freezer, take it out, remove the plastic wrap, and place it on a baking sheet. Spray a large piece of aluminum foil with cooking spray and fit it onto the tart shell. Fill the shell with pie weights.
Oh, you don't have pie weights? Me either! Instead, I used a mini cast-iron skillet inside a cake pan. Use whatever you have that is oven safe and will weigh between 2 and 3 pounds. Bake for about 30 minutes; the shell should have started to brown slightly, and the bottom should no longer look wet. Remove the foil and weight that you used and continue to bake for 5-10 minutes until nicely browned all over. Then just set on a wire rack and let it wait for that wonderful filling!
Step 4--the filling:
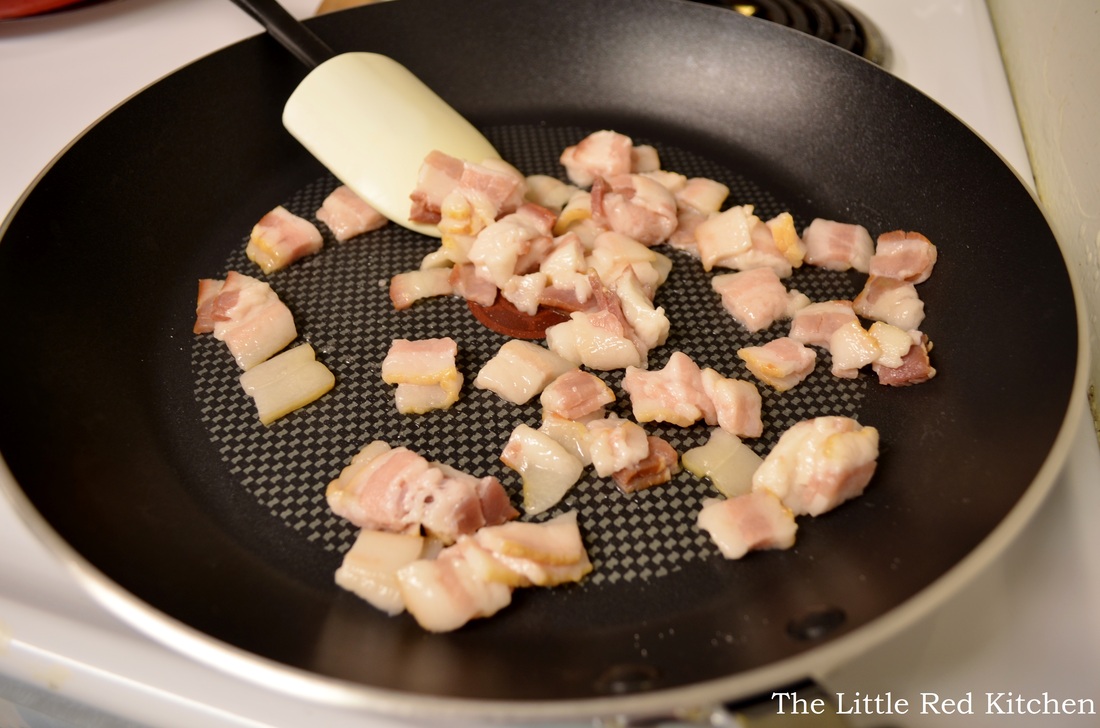
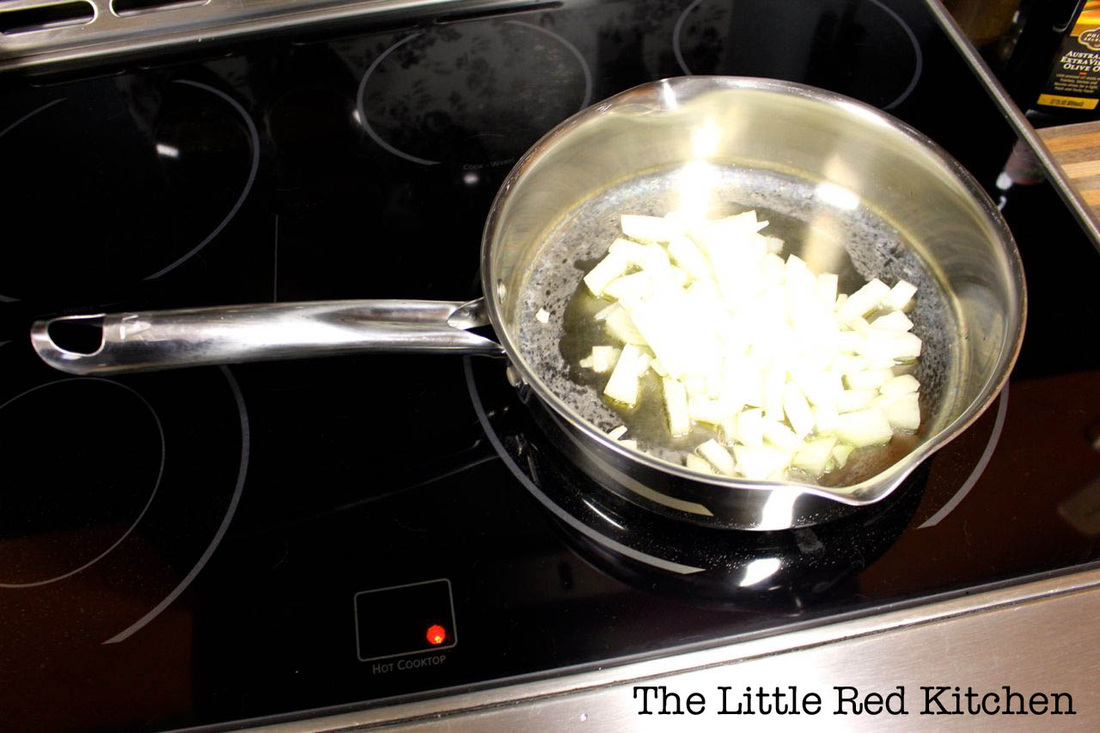
While the tart shell is in the oven, place the bacon in a 12-inch nonstick sauté pan and cook over medium heat for 8-10 minutes, until browned and the fat has rendered. Drain the bacon through a mesh strainer, catching the fat in a small bowl. Put 2 tbsp. of said fat back into the pan and add the onions, salt, and thyme sprig. Cover with a lid and cook over medium heat for 10 minutes until the onions have released some of their liquid, wilted, and started to brown. Turn the heat down to low, replace the lid, and cook for 15 minutes; the onions should get really brown and caramelized, aka vegetable candy. Remove the lid and continue to cook for another 5 minutes, so any excess liquid can cook off. Remove the thyme sprig and let sit off the heat for 5 minutes. Now, you are almost there! While the onions are cooling down, in a large bowl combine the eggs, half and half, and pepper. Then dump the onions in and stir to combine, and pour into the tart shell. Sprinkle the bacon on top. Look how good that looks, and it's still raw!
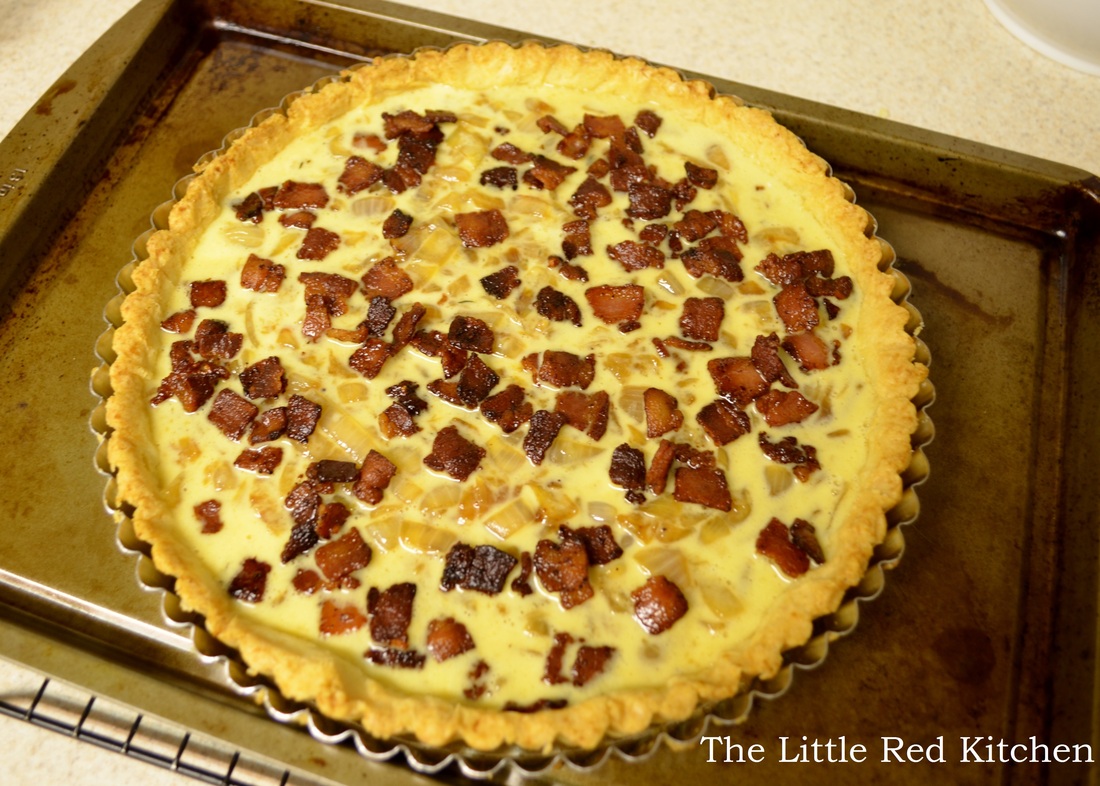
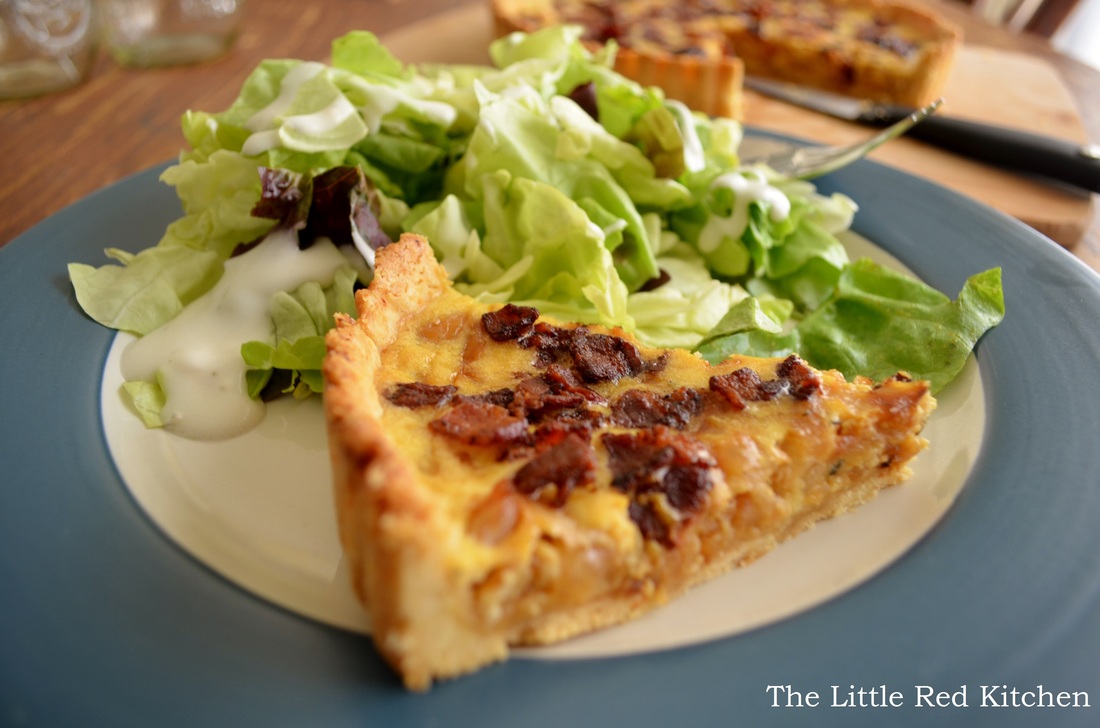
Bake for 20-25 minutes, until the center of the tart is firmly set. Cool on a wire rack for 10 minutes. When ready to serve, remove the tart pan ring...there is no easy or masterful way to do this, just get it off there! Then I placed the whole tart on a cutting board and used a spatula to slide it off the bottom of the tart pan. Cut into wedges and serve! Sure, this recipe takes a long time to make. But the good news is, there is never more than 1 active thing going on; while the tart is freezing or baking, you are working on prepping and cooking the filling. And just look at that beauty. This tart is much lighter than a traditional quiche, which can use anywhere from 6-12 eggs, and almost always uses heavy cream. The bulk of the filling here is those creamy, caramelized onions; so mild, so sweet, and so perfectly contrasted with the crunchy, salty bacon. The shell turned out outstanding, and remember, it was my first time making one too! Moist but not soggy, crumbly but not dry, and that edge has THE perfect crunch! This tart is somehow both elegant and completely satisfying. Serve it up with a salad for brunch, lunch, or dinner, and you will have nothing but happy diners on your hands.
~Lauren
This is an easy, filling recipe that has been a go-to for Jay and myself for the past few years. It's also a great meatless meal or side, depending on what you need!
I'm not feeling super great today, so instead of rambling on, I'm going to go ahead and jump right into the recipe. Enjoy!
Ingredients
1 large yellow onion, diced
2-3 garlic cloves, minced
1 tbsp extra virgin olive oil
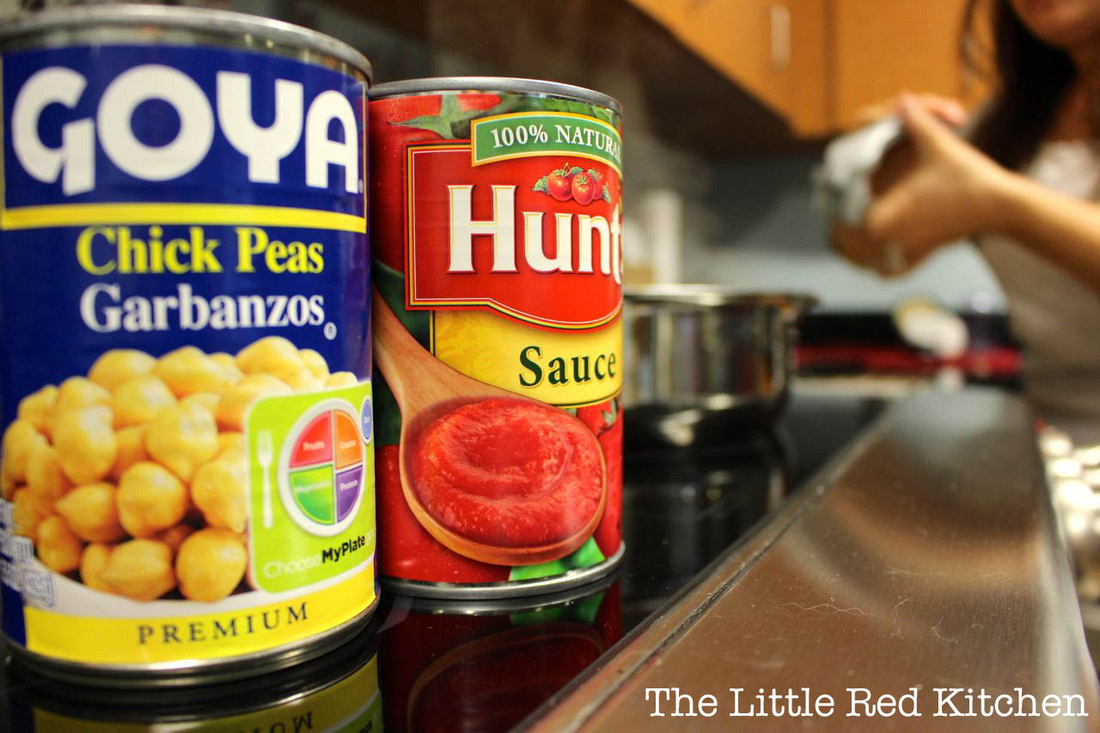
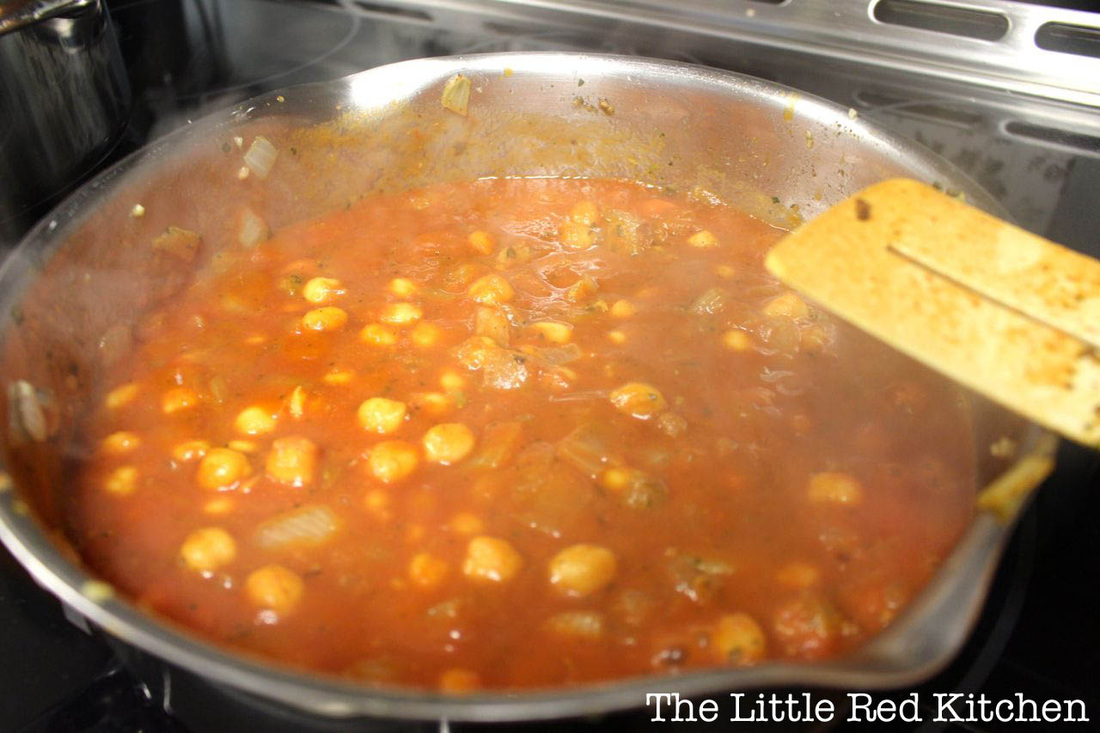
1 can Hunt's tomato sauce
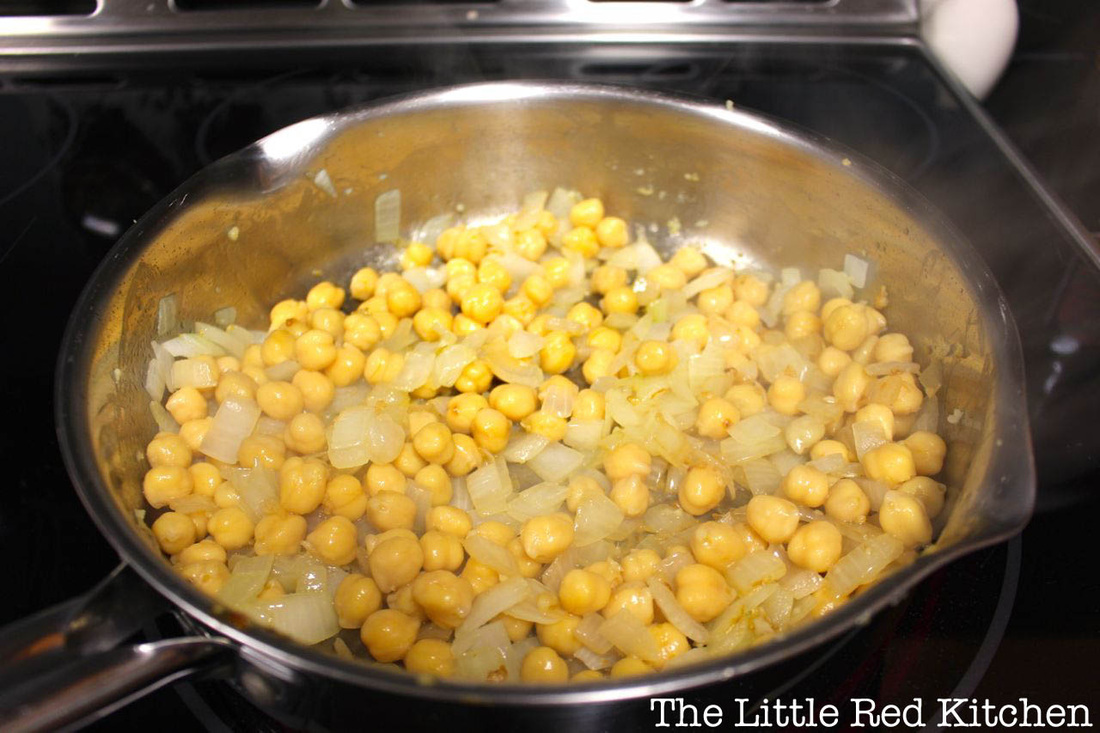
1 can chickpeas, drained and rinsed well
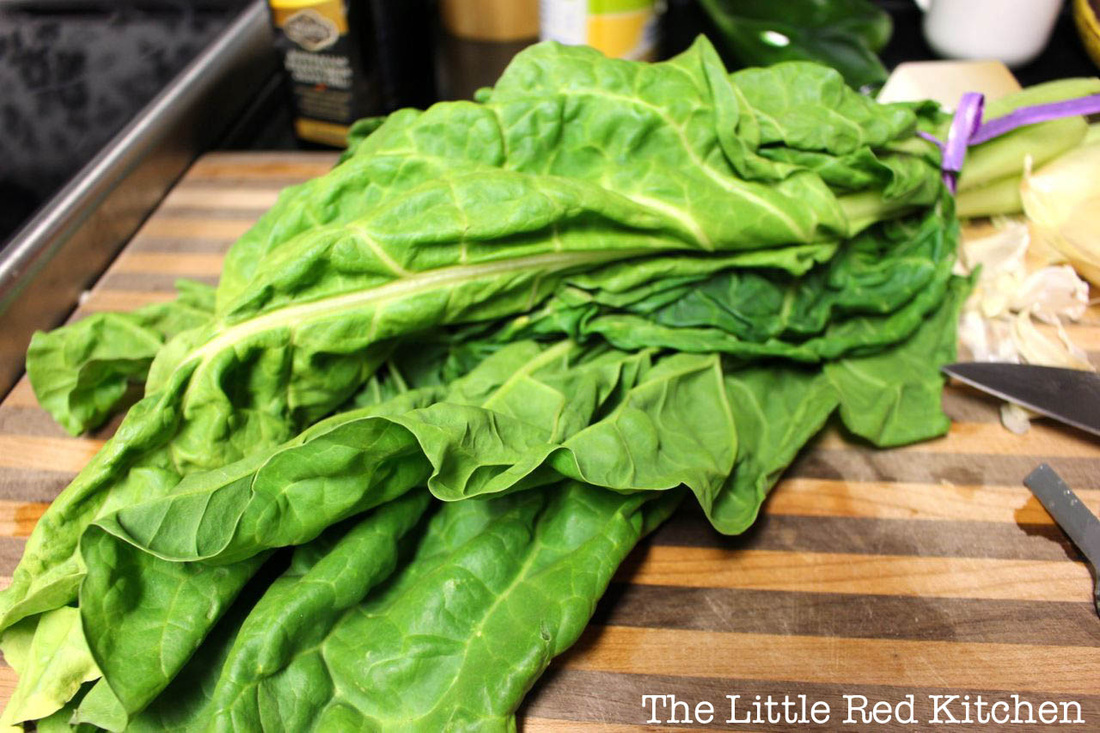
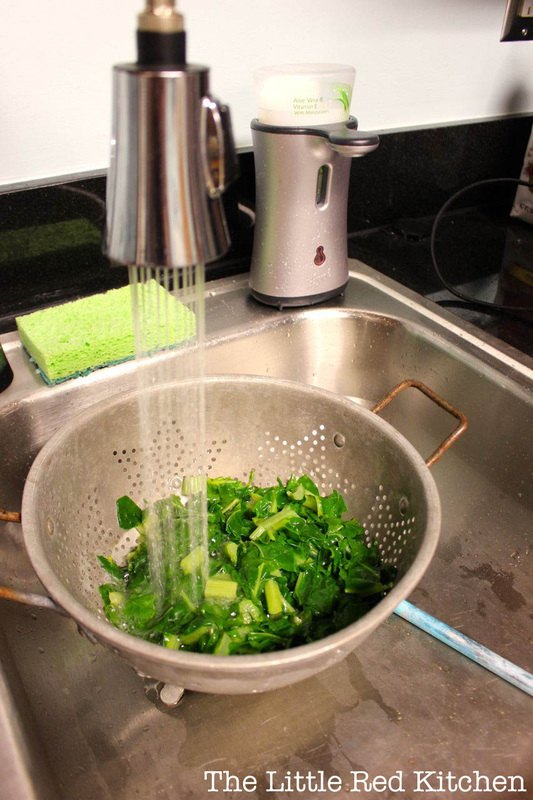
1 large bunch swiss chard
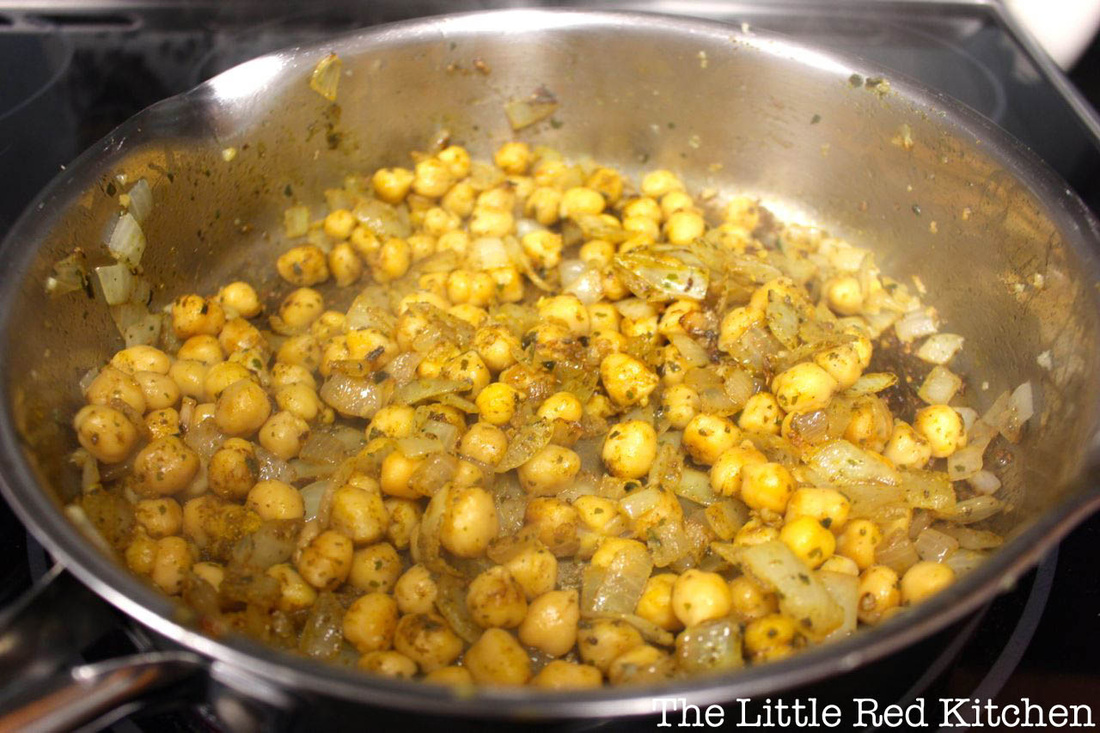
2 tsp yellow curry powder
1 tsp cilantro
1 tsp cumin
salt and pepper to taste
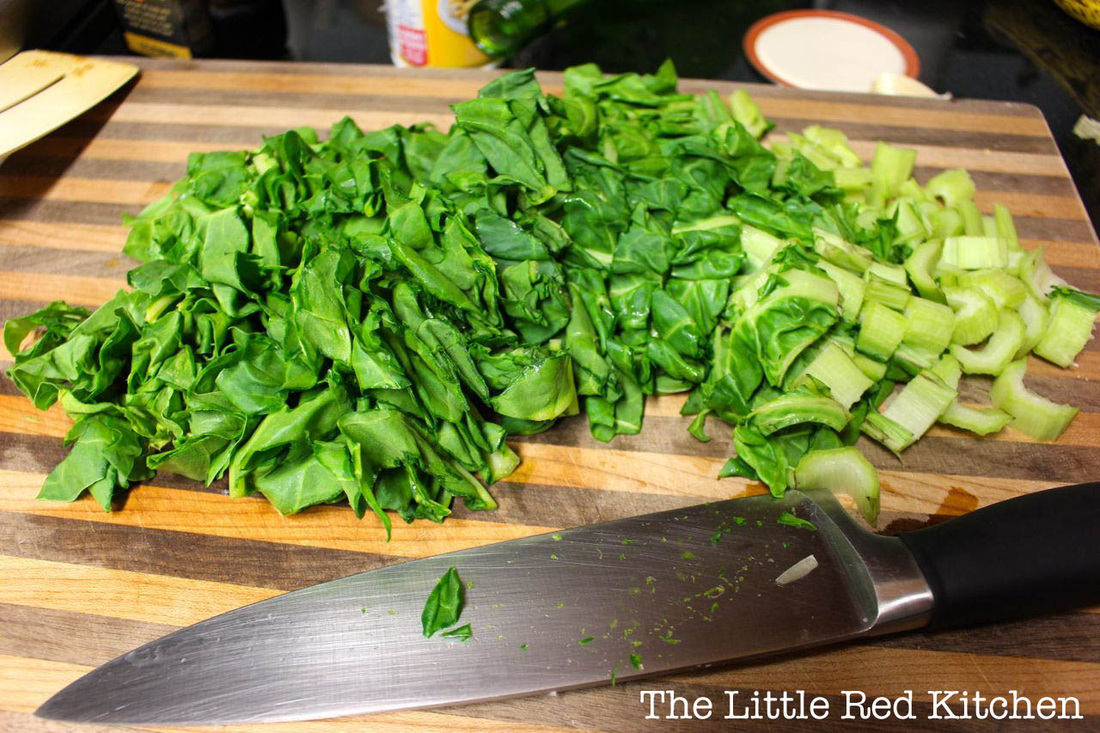
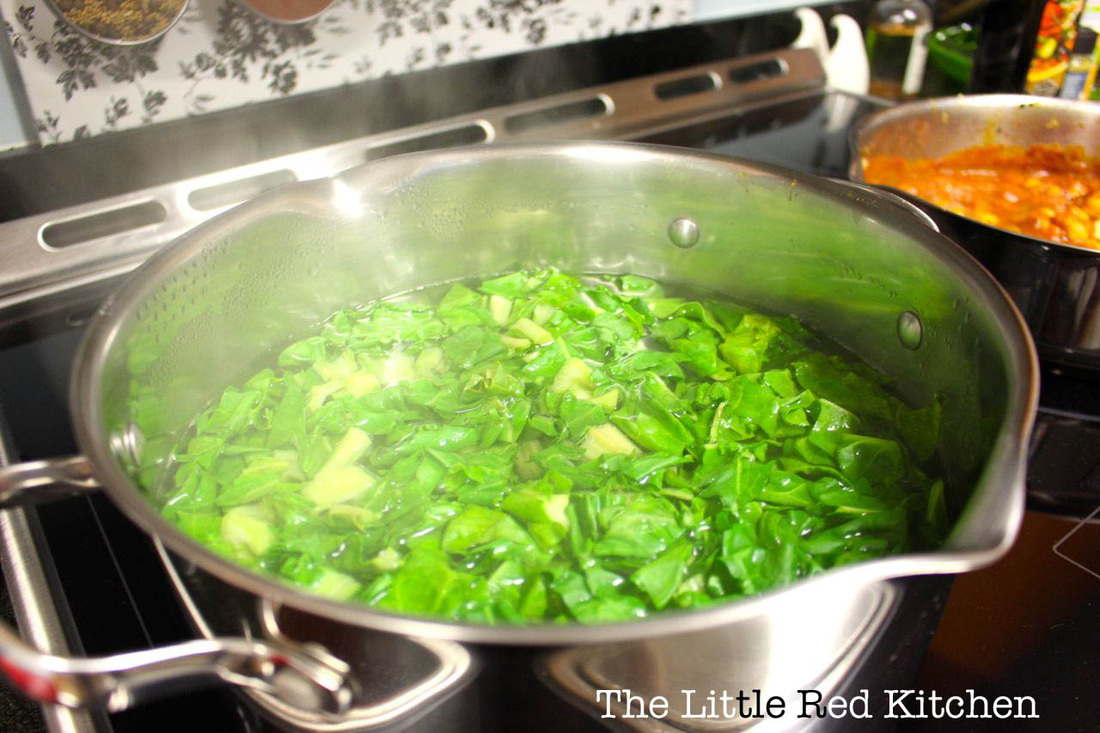
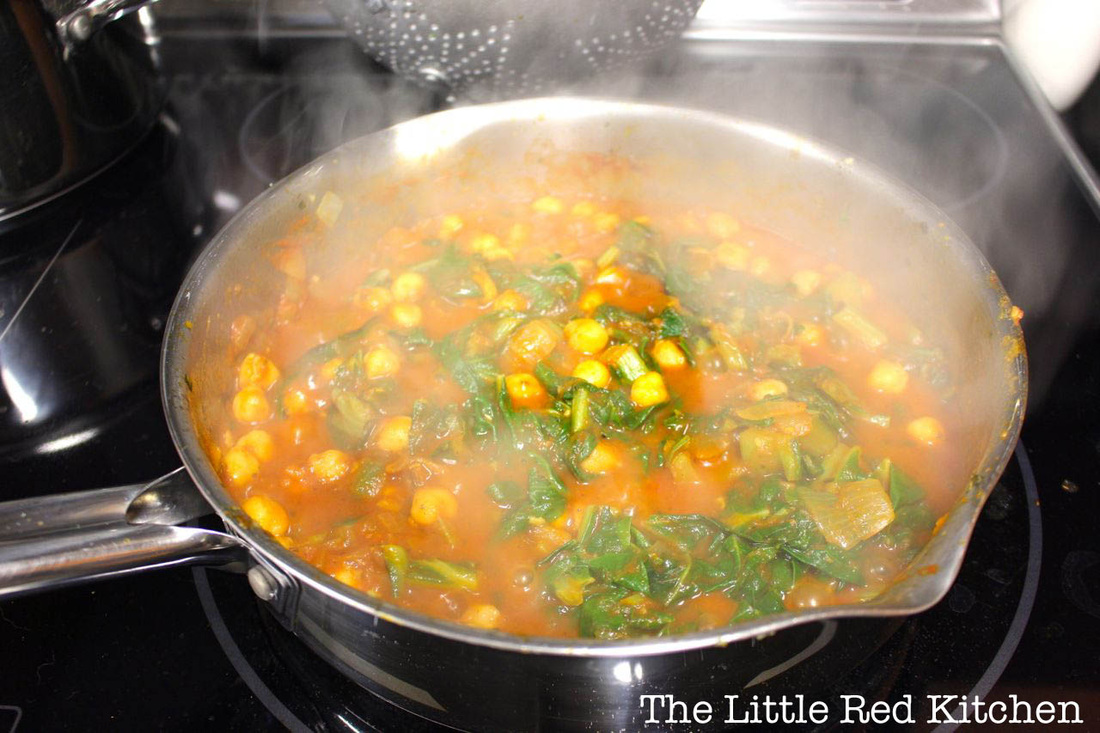
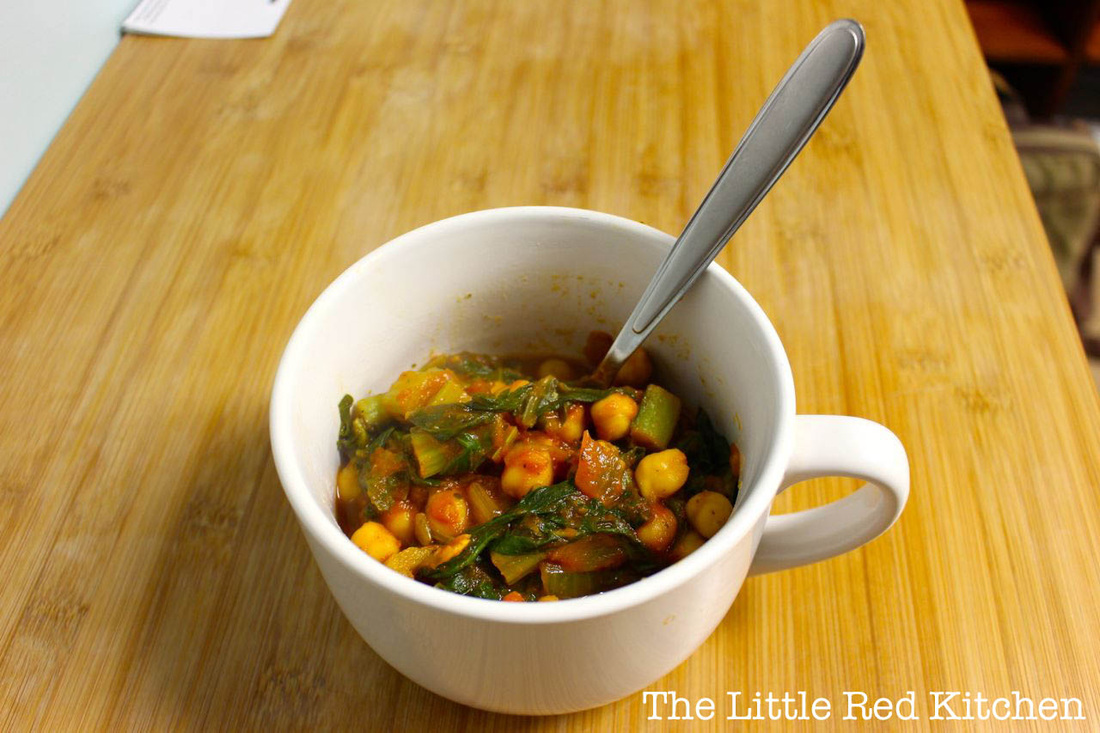
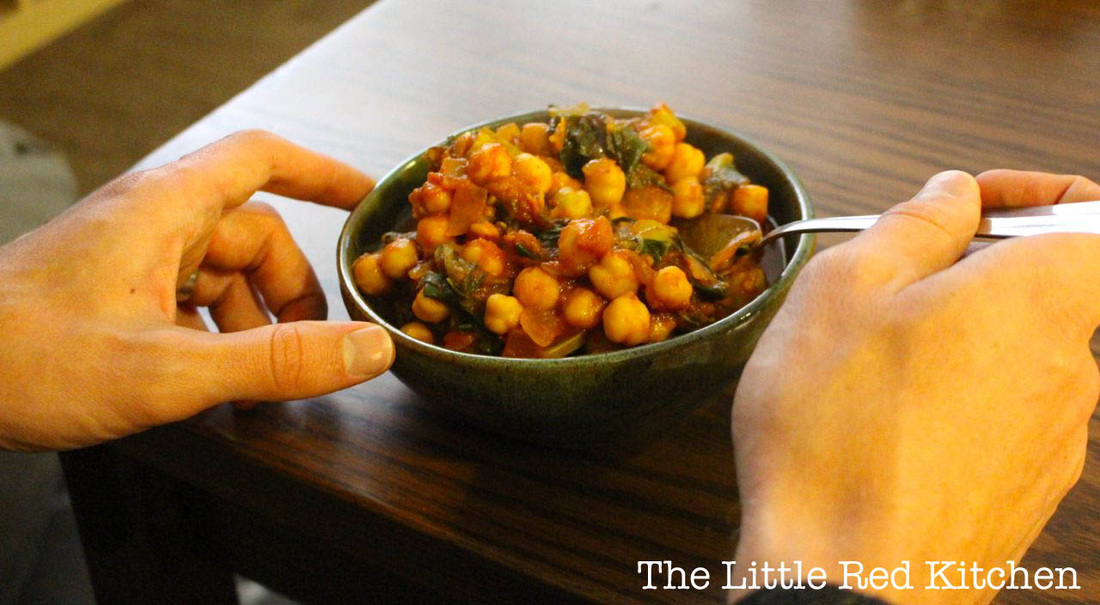
Step 1. Warm a medium pot or large sauce sauce pan over medium-high eat, then toss in the garlic and onions. Saute until the garlic is fragrant and the onions are translucent. Step 2: While the onions and garlic saute, dice and blanch your swiss chard by dropping the greens into boiling water for 2 minutes, then cooling immediately (either in ice water, or by running under very cold tap). This will soften the chard and remove some of the bitterness without eliminating all of the awesome vitamins it carries. Step 3: Once the onions are ready, toss in the chickpeas and the spices, stirring to combine. Saute for a few minutes to allow the flavors to marry. Step 4: Then, add in the tomato sauce and (drained) swiss chard, again stirring to combine. Saute for 10-15 minutes, taking care to keep the heat low enough that the tomato sauce doesn't splatter everywhere. This will allow the flavors to blend, and the swiss chard to soften further. Cooking this dish uncovered also means that the tomato sauce reduces, and you end up with a stew-like consistency in the end. Yum!! Enjoy!
- Kaitlin
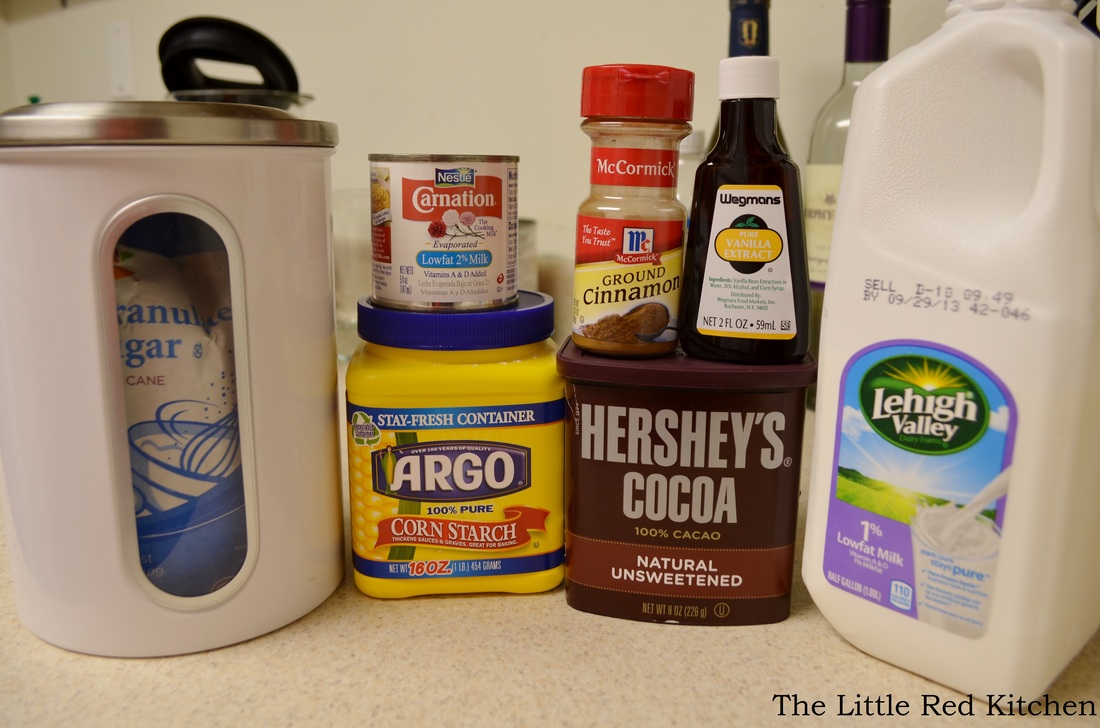
Let's just get one thing straight: I'm a fan of Swiss Miss hot chocolate. I am, and I've had those more "gourmet" brands that come in their individual pouches and cost probably much more than a cup of hot cocoa ever should...but, when I came across this recipe 2 years ago that promised super thick and creamy hot chocolate, and it was right in the middle of a cold and bleak Pennsylvania February, I knew I had to try it. And I'm so glad I did because it. is. unbelievable. Give this recipe a try once. Like I said, I've saved this cut-out from a magazine for 2 years, and it's not going anywhere anytime soon.
Ingredients:
1.5 cups of milk (if you want to be decadent you can use whole milk but I use 1% because that's what we always buy)
5 oz. evaporated milk (The full contents of 1 of those mini cans)
1/4 tsp. vanilla extract
1/8 cup cocoa powder
1/8 cup sugar
1 tbsp. cornstarch
1/4 tsp. ground cinnamon
pinch of salt
This recipe will make 2 drinks and can double easily to make 4. I know, that seems like a lot of ingredients for a couple cups of cocoa. But, level with me here, because it only takes about 5 minutes to whip up.
Step 1:
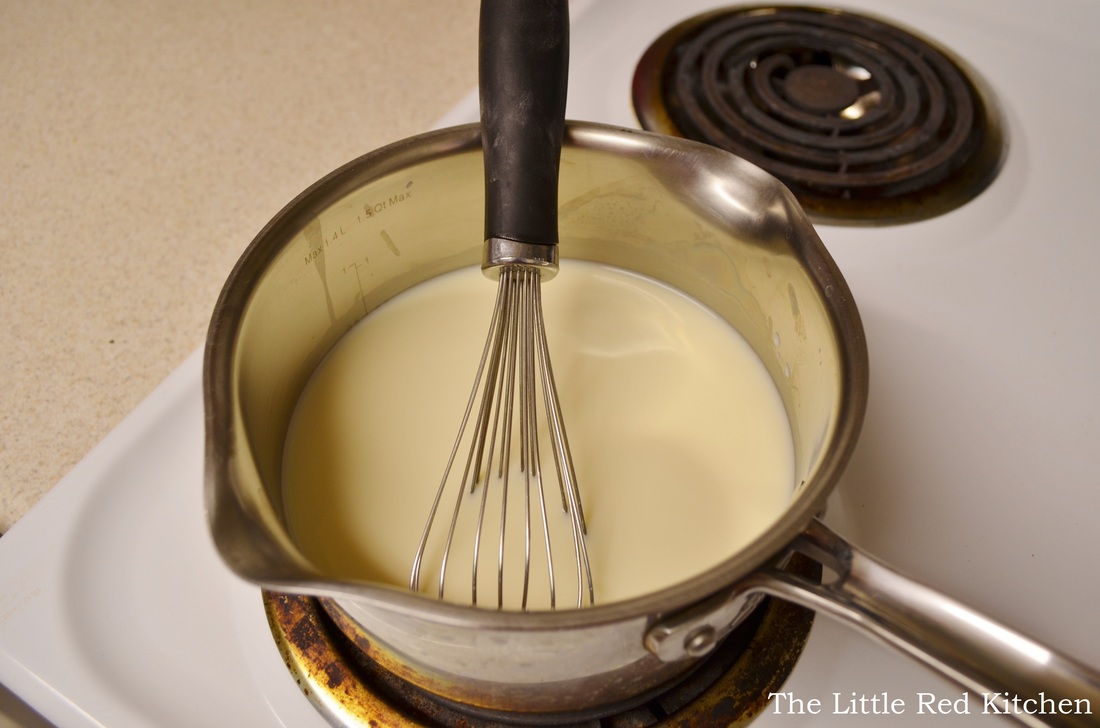
Combine the milk, evaporated milk, and vanilla in a small saucepan and warm up over low heat on the stove.
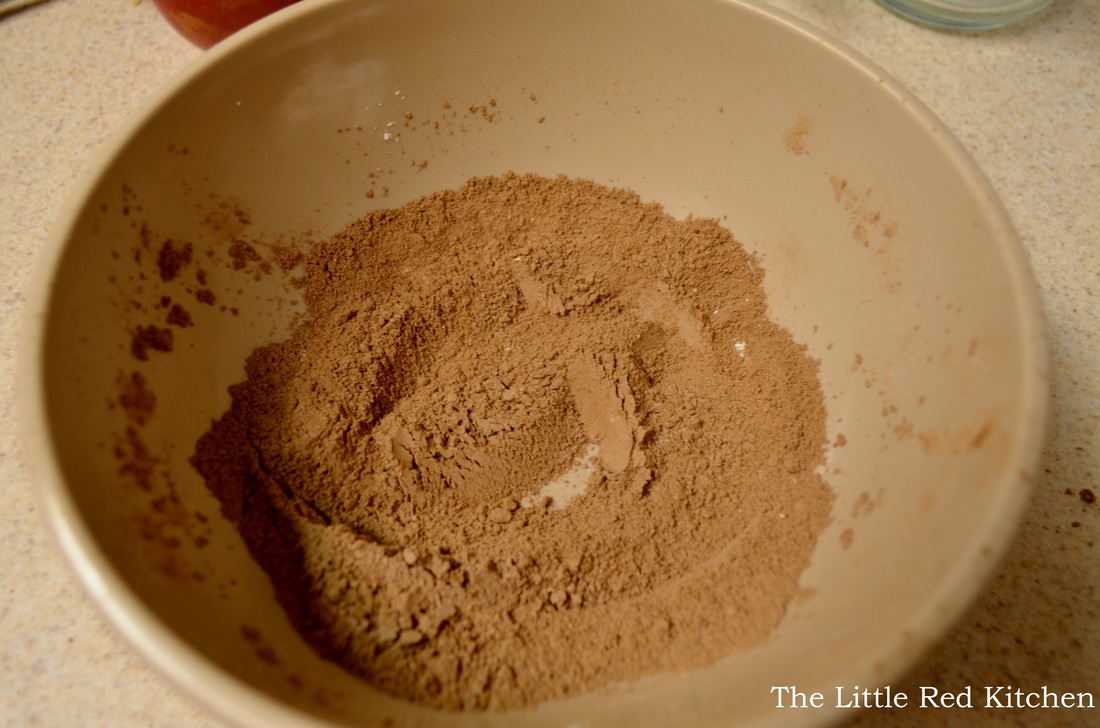
Step 2:
Meanwhile, in a small bowl combine the cocoa powder, sugar, cornstarch, cinnamon, and salt. Step 3:
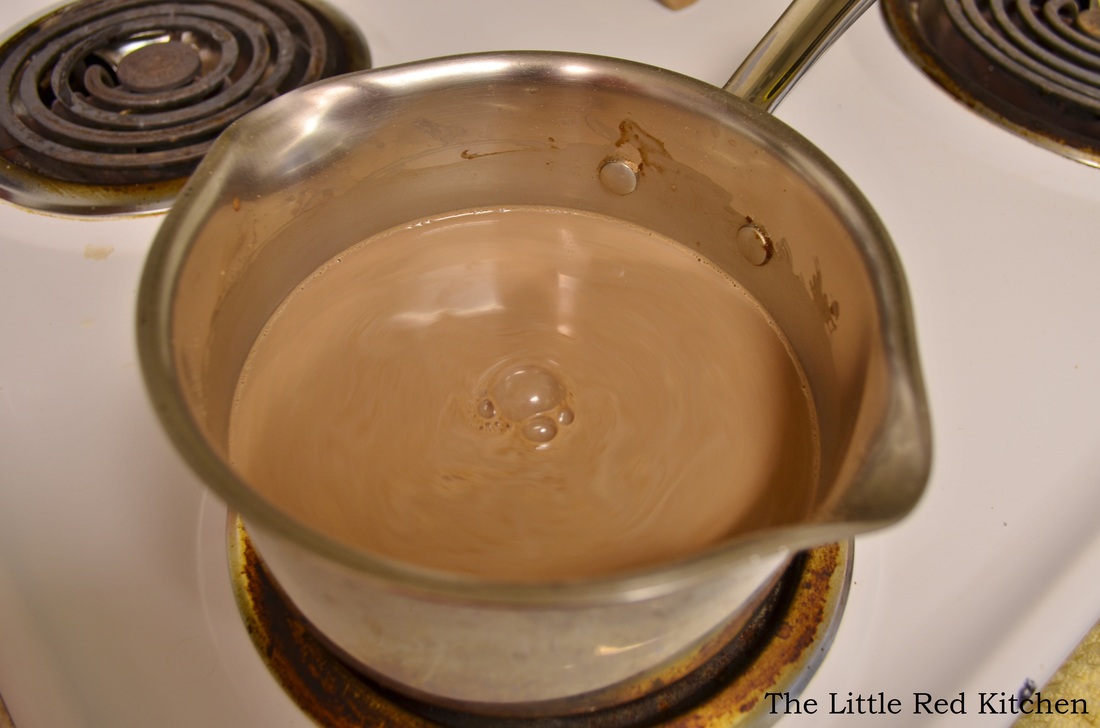
Whisk the cocoa mixture into the milk mixture until smooth. Bring to a boil, whisking a LOT to keep anything from burning on the bottom of the pan. This should take a couple minutes. Once it comes to a boil, remove from heat and serve! The hot cocoa will be super thick, and it will have excellent chocolate flavor, better flavor than you've ever gotten out of a pouch in your life. Note, if you don't drink the cocoa and let it sit around, it might form a thin "skin" on the top from the cornstarch. It's no big deal at all, just give it a stir when ready to serve. And be glad, because it's doing that because it doesn't contain any preservatives or artificial ingredients!
This cocoa really doesn't need any embellishment, but if you feel so inclined, especially if you are having friends or family over for dinner and want to serve something special with dessert:
~add a pinch more cinnamon and a pinch of cayenne to make Mexican hot chocolate
~add instant coffee for that smooth mocha flavor
~make it more "adult" and add peppermint schnapps; um, can you imagine drinking that on a cold December night? Heaven on earth!
I actually keep a couple mini cans of evaporated milk in my pantry for whenever I feel inclined to make this wonderful treat. I hope you'll do the same, and I hope you'll give this deliciously decadent beverage a try!
~Lauren
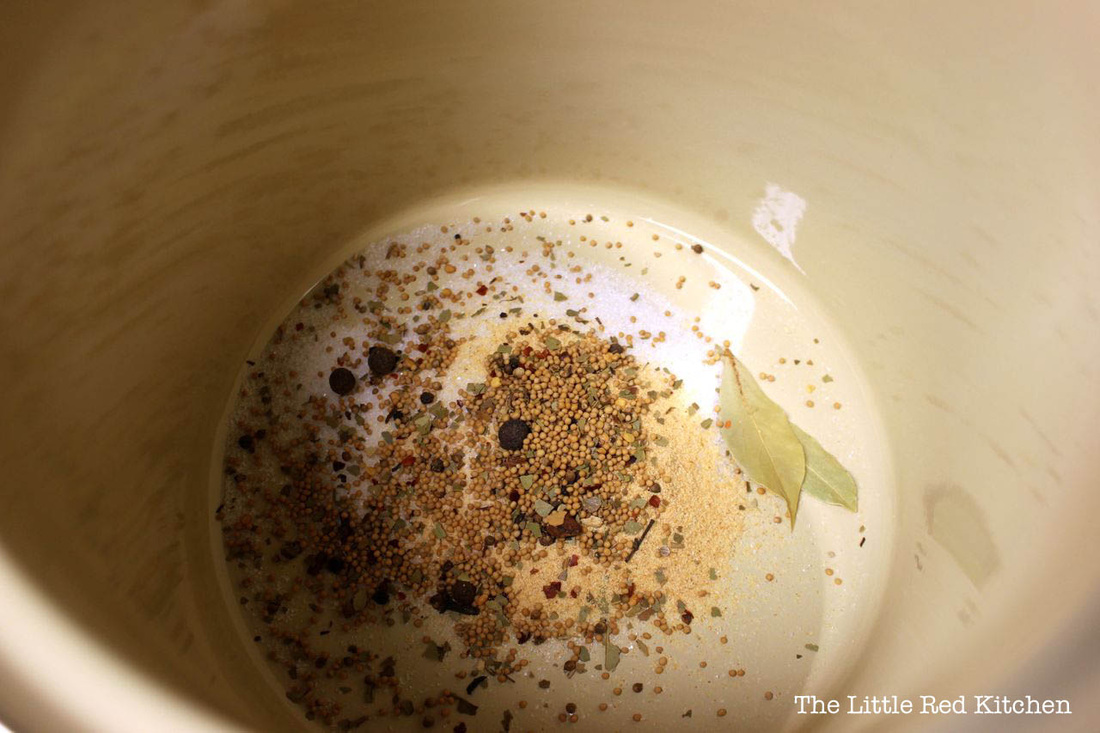
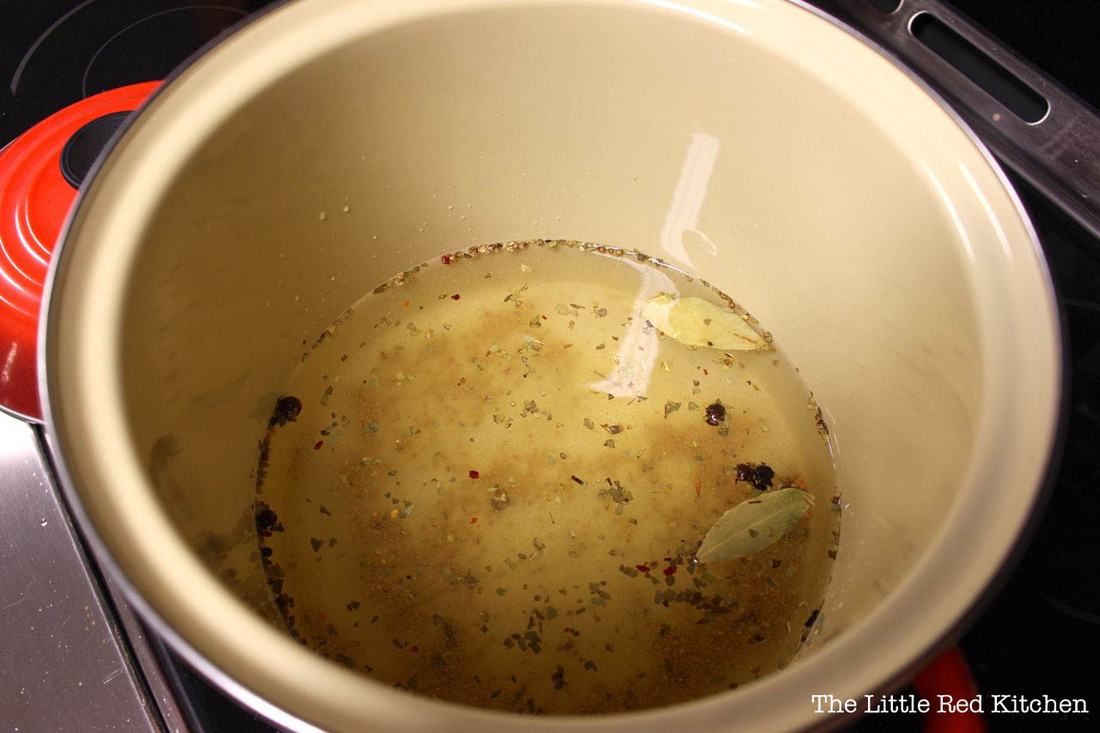
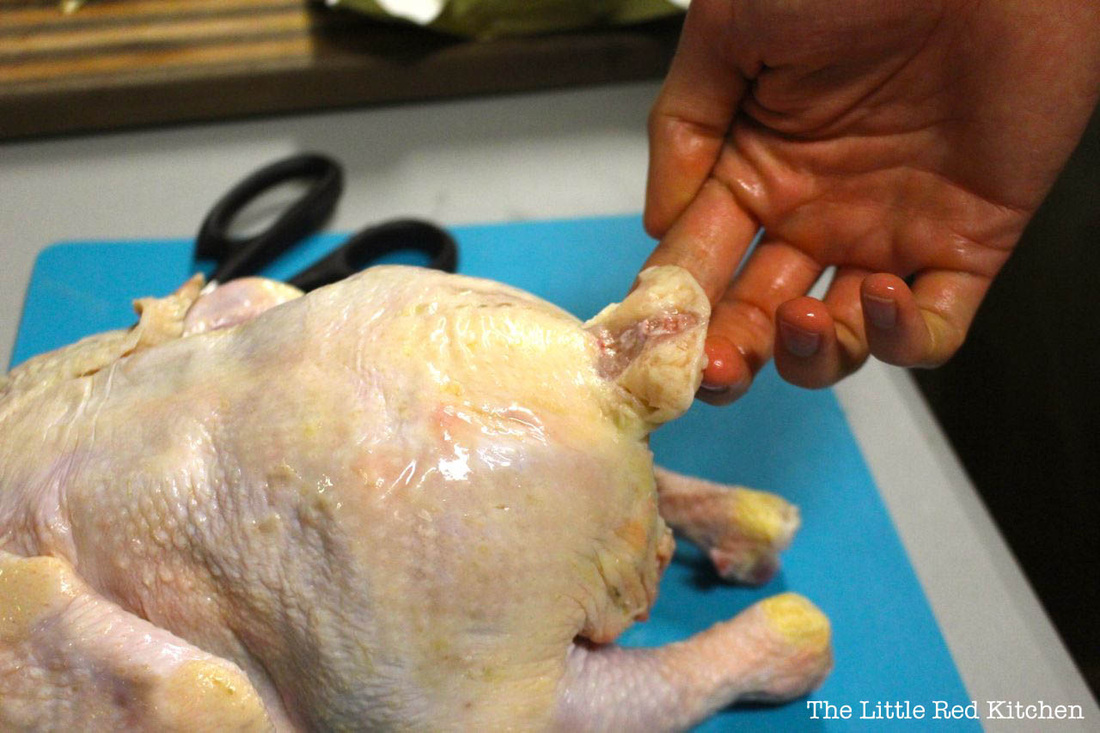
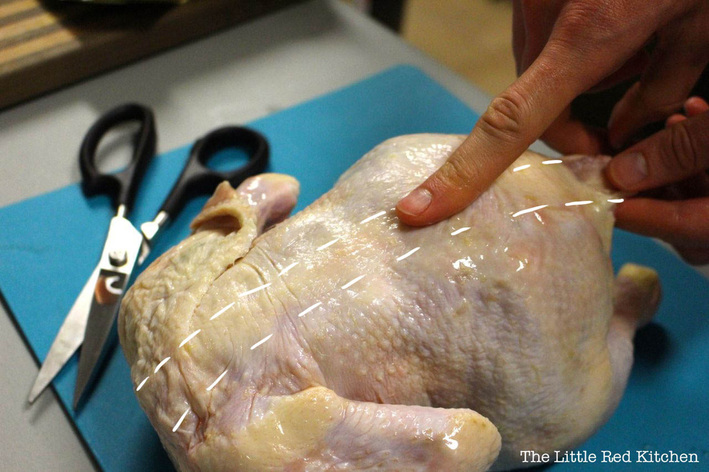
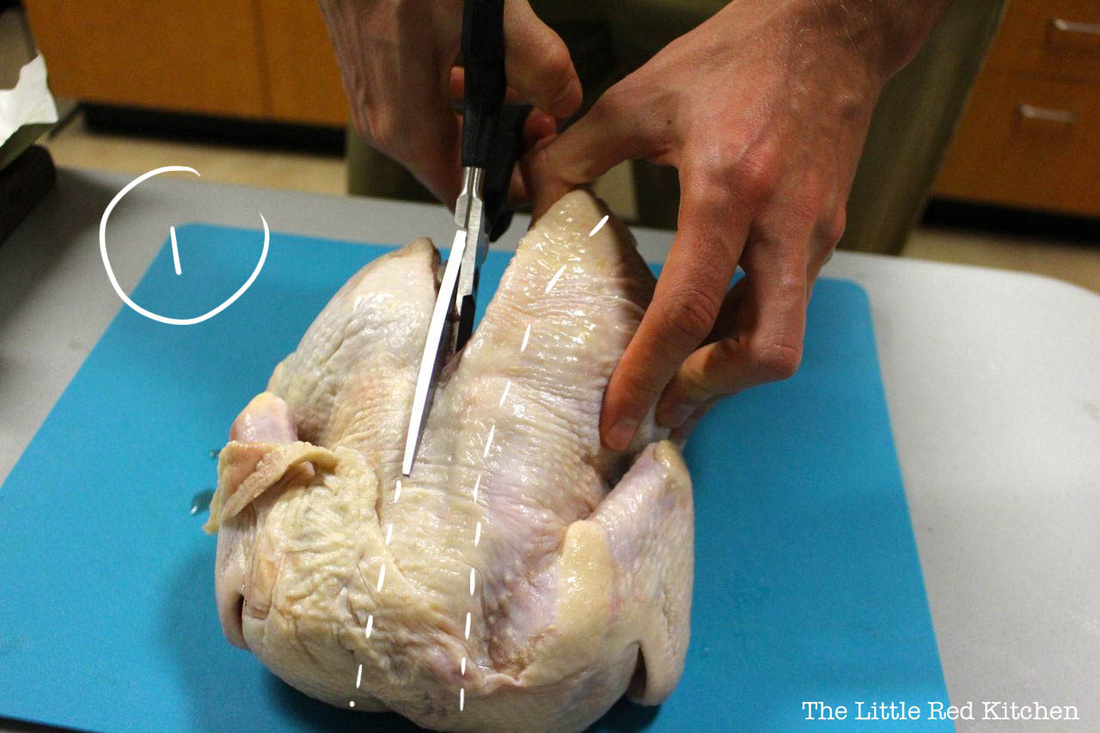
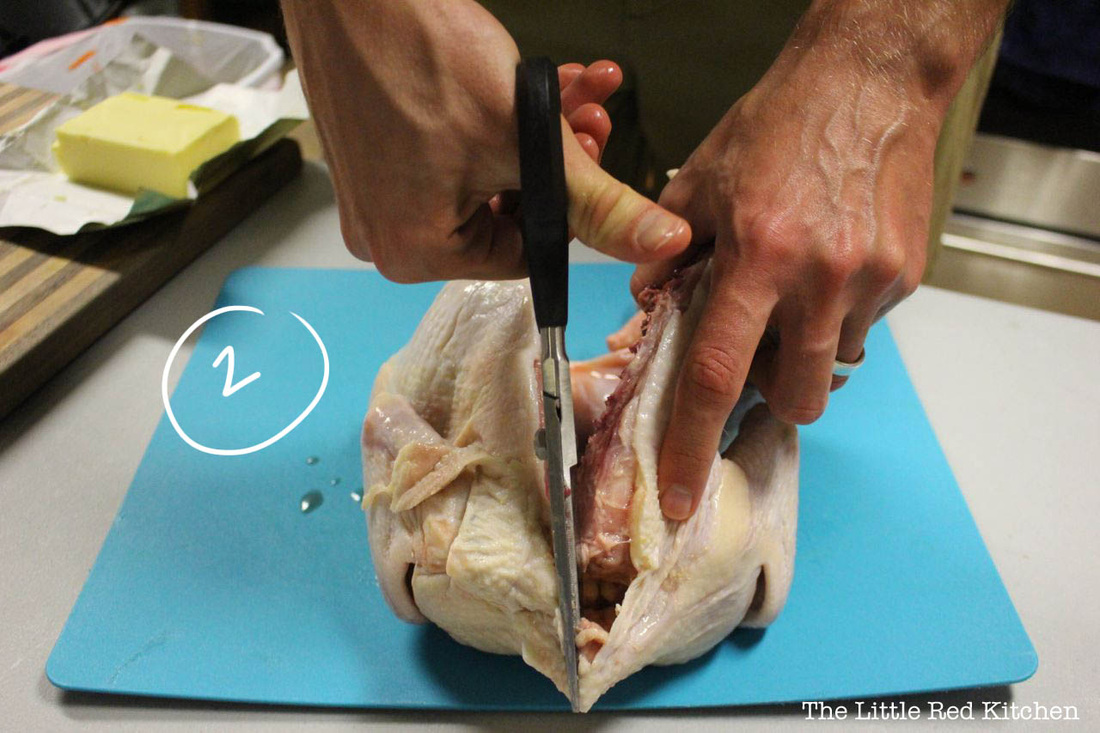
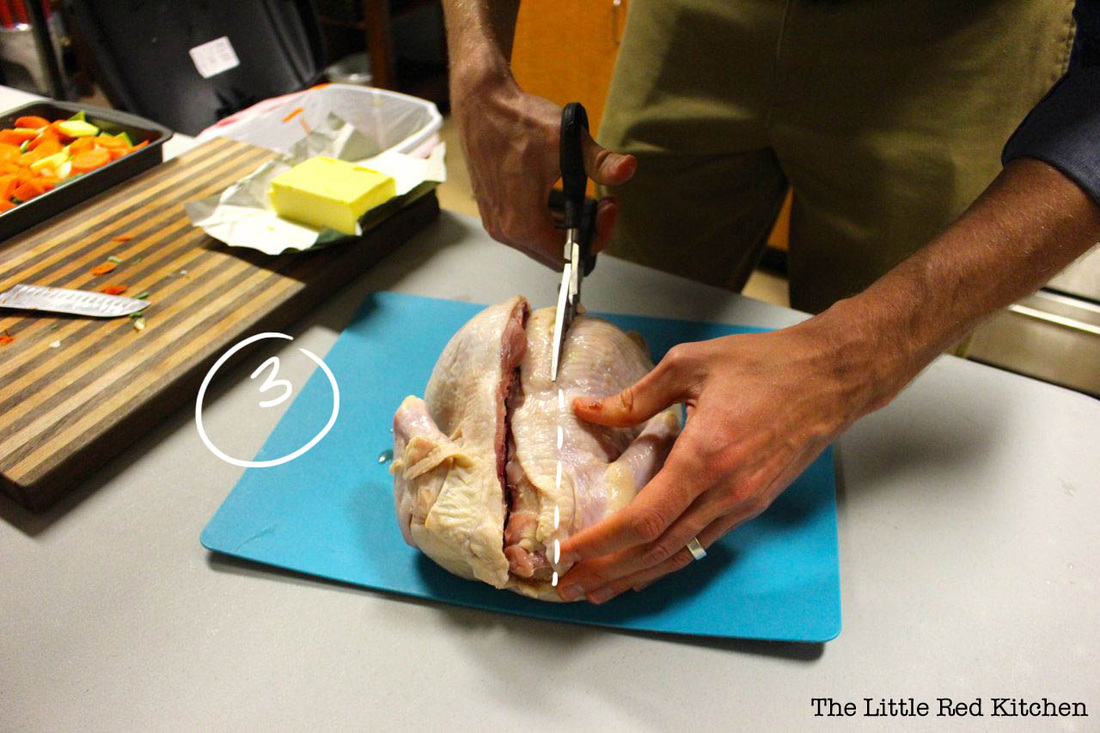
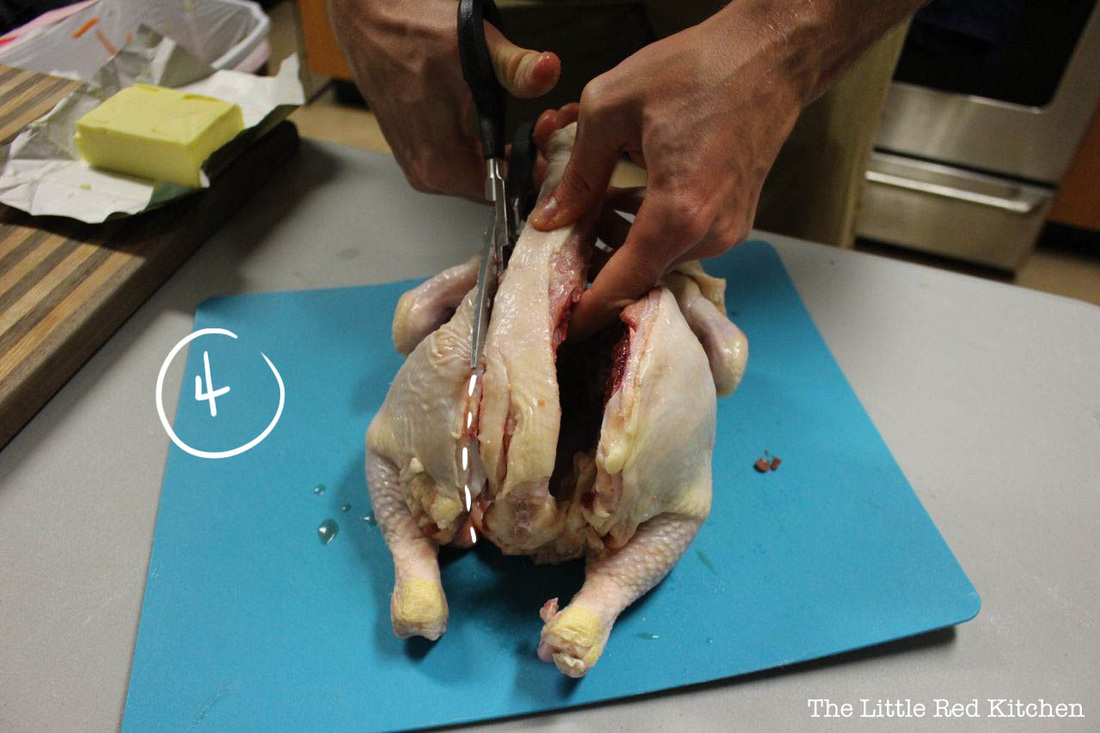
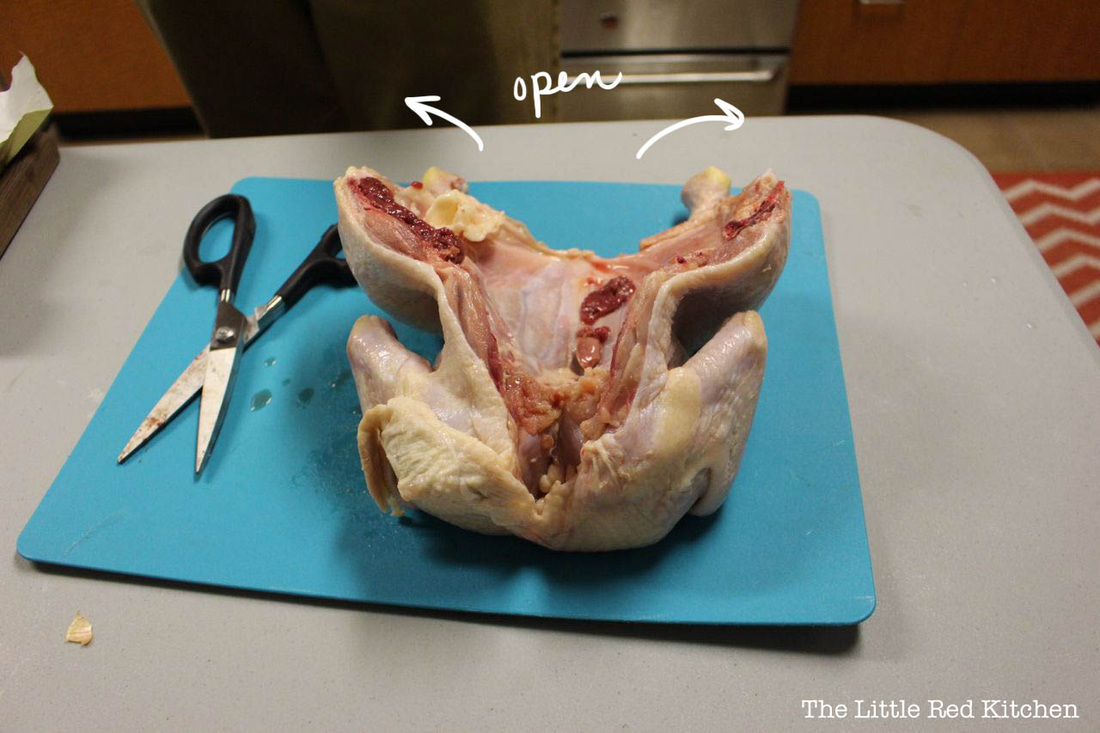
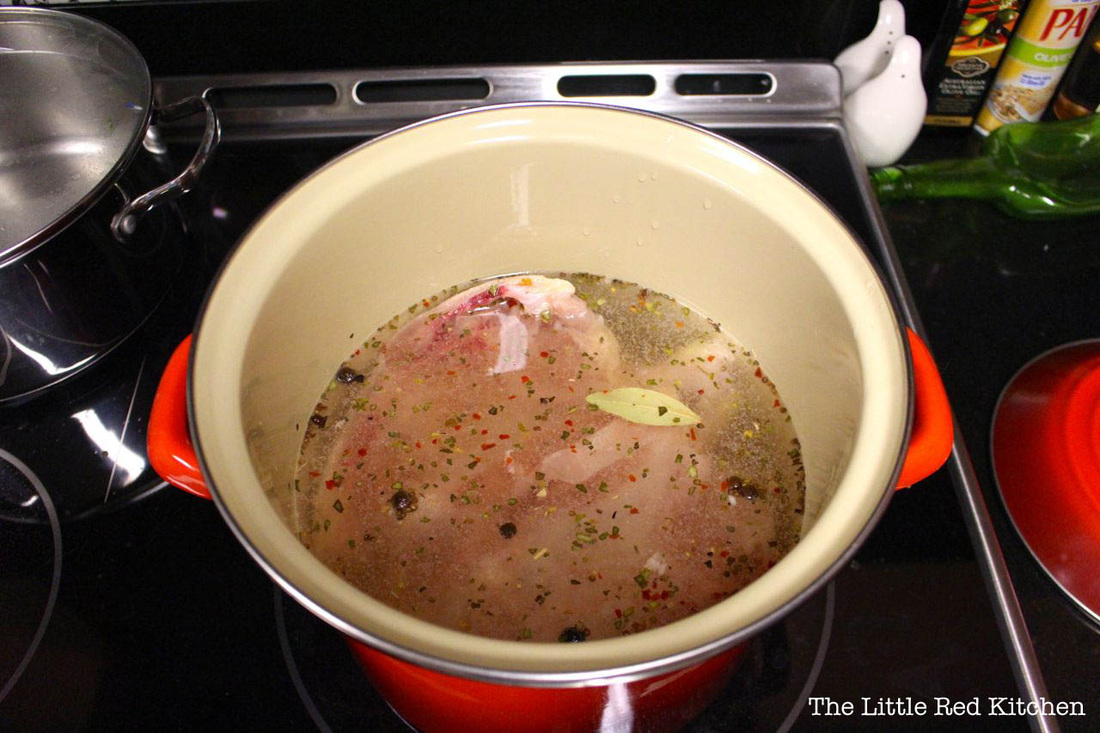
This is one of those recipes that, no matter how many times I make it, I never get sick of. Inevitably, pictures of the perfectly roasted bird end up on my Facebook pages and Instagram. I am not ashamed. Originally, I was inspired by Nom Nom Paleo's " Easiest Roast Chicken Ever*", which (if you have access to a Trader Joe's) means an amazing roast chicken dinner on the table in about an hour. Since I didn't and still don't have access to Trader Joe's (and their amazing pre-brined chickens), I had to make do on my own for the chicken-prep part. (*If you do have access to a Trader Joe's, hop on over to the site linked above. You are in for a quality recipe and some beautiful pictures.) One glance at the available recipes online (ahem, Paula Deen), and it was enough for me to steer clear of any pre-made recipe (although I'm sure there are other great ones out there). I wanted the brine to be strong enough to work in 30 minutes, but not enough that the salt or pickling spices would overpower the chicken. Keep reading to find out how I solved that problem! Ingredients 1 4-5lb chicken 1/3 (rounded) cup sea salt, or more, if you're a salt lover 1-2tbsp garlic powder 2 tbsp pickling spices 2-3 bay leaves 8 cups water 4-5 cups of tough/root vegetables of your choice (leeks, carrots, onions, potatoes), roughly chopped 2-4tbsp butter, softened First, prepare your brine. Throw all of the brine ingredients (sea salt through water, above) into a large stock pot (it will need to hold the water and your chicken), and stir well to combine. The salt will begin to dissolve as you prep the chicken. Some folks like to simmer the brine first, to ensure that all of the salt has dissolved, but I've done it both ways and never had an issue with either one. Next, you're going to need to know how to butterfly the bird. This ensures that it will cook quickly and evenly (that, plus the brine, means fully cooked white and dark meat that's still super tender). To begin, pat your bird dry ( health/microbiology note: Don't rinse first! You're significantly increasing the spread of surface bacteria around your kitchen, even if you don't see the water splash. Here's a great NPR article on this, thanks to my friend Chad.) Step 1. Lay your (now dry) bird on a cutting board (or other easy-to-clean surface, since chickens carry Salmonella spp.), breast side down. Locate the tail-- the backbone runs along the top of the chicken, starting at this point. We'll be cutting out the backbone, so the chicken will lay flat. Step 2: Take a strong, sharp pair of kitchen shears and use them to cut from the tail end (I find this the easiest way, but whichever works for you) along the backbone, all the way through. Like so:
Also: BE CAREFUL! Chicken bones are sharp and obviously this guy contains bacteria, so be sure not to cut yourself. If you do, wash your hands really well with some antibacterial soap. Probably twice.
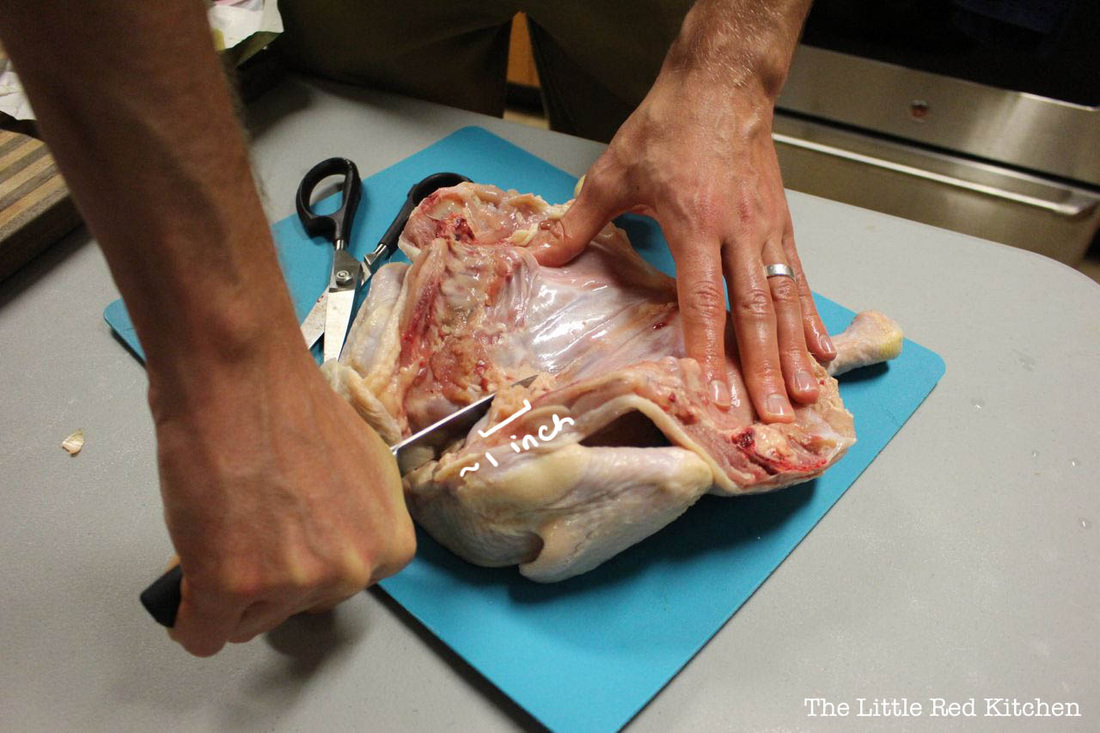
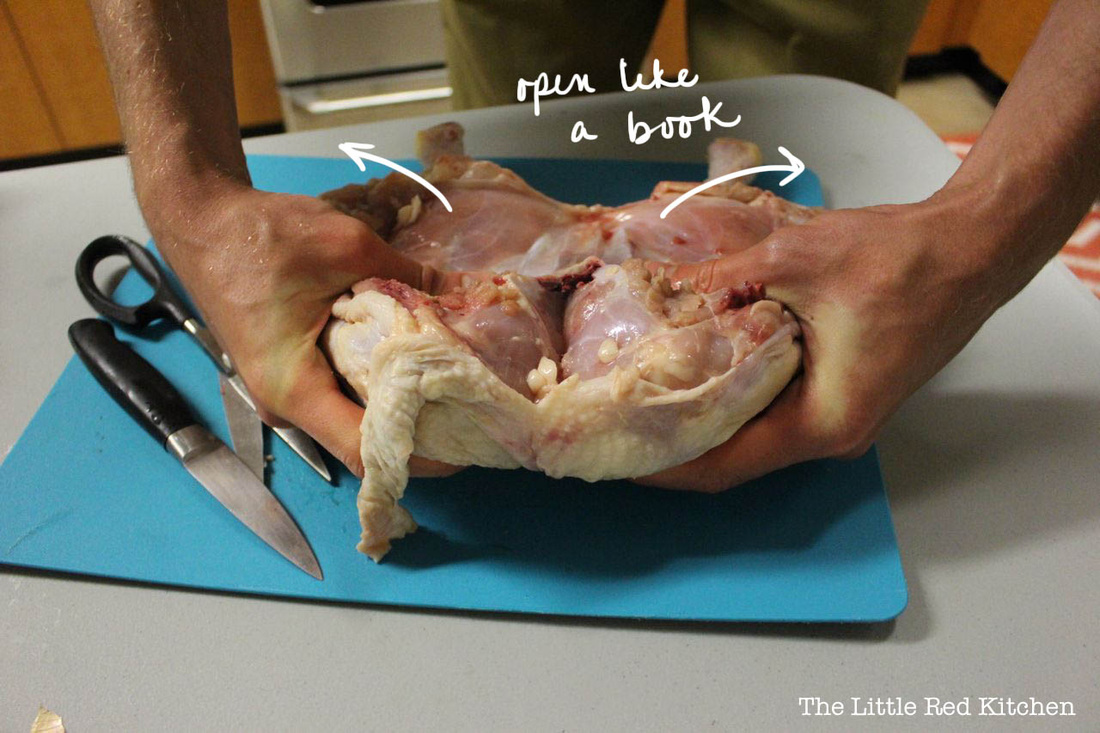
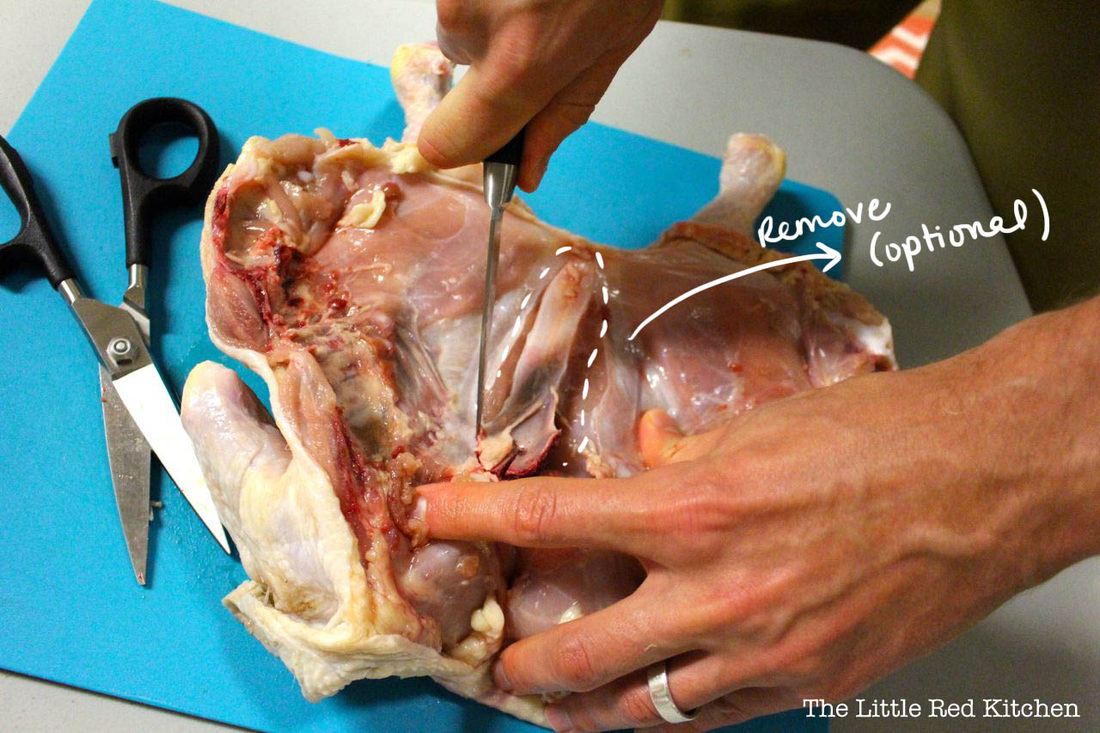
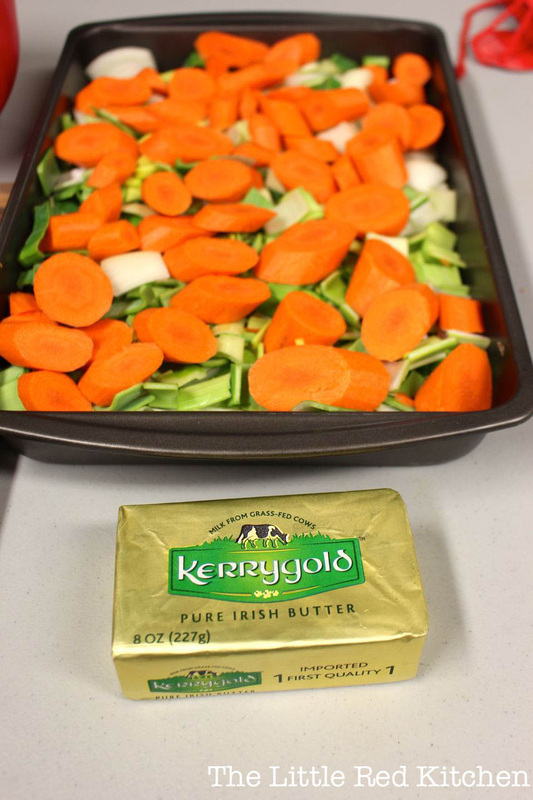
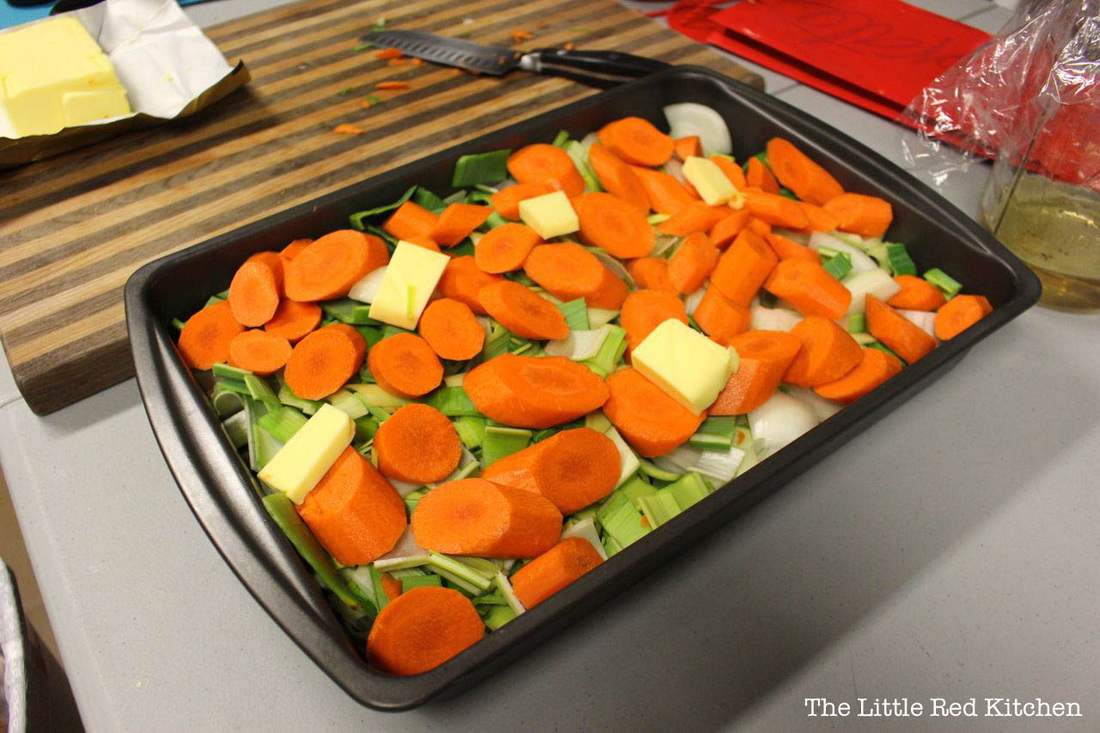
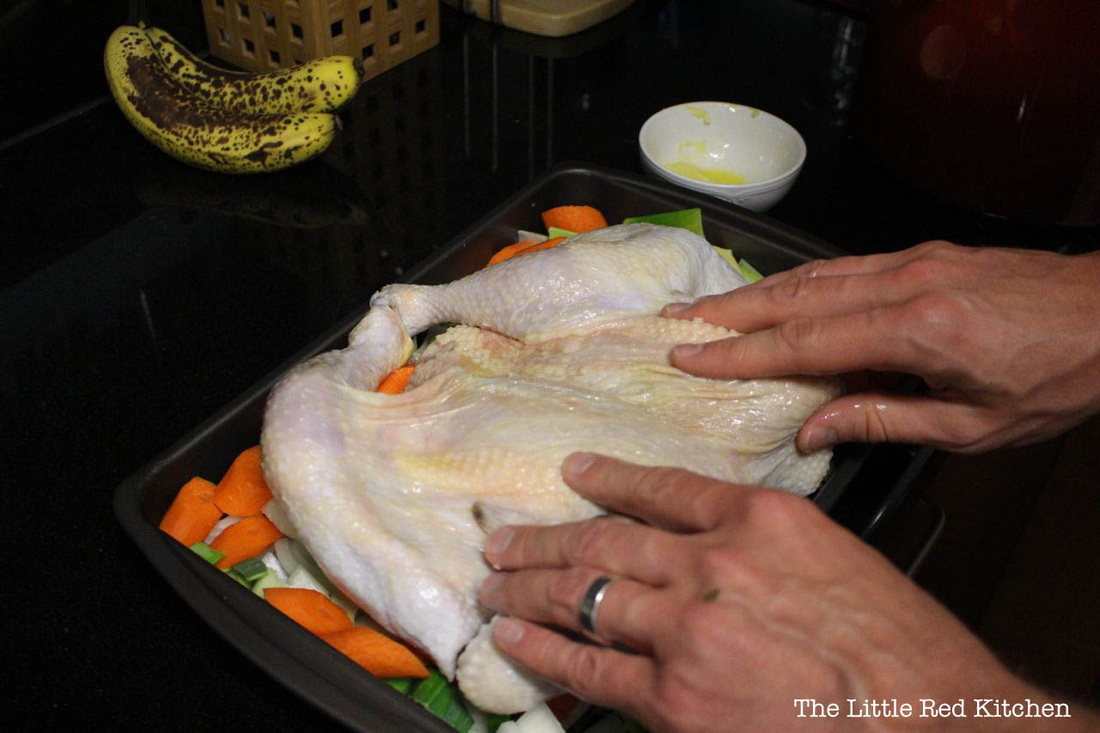
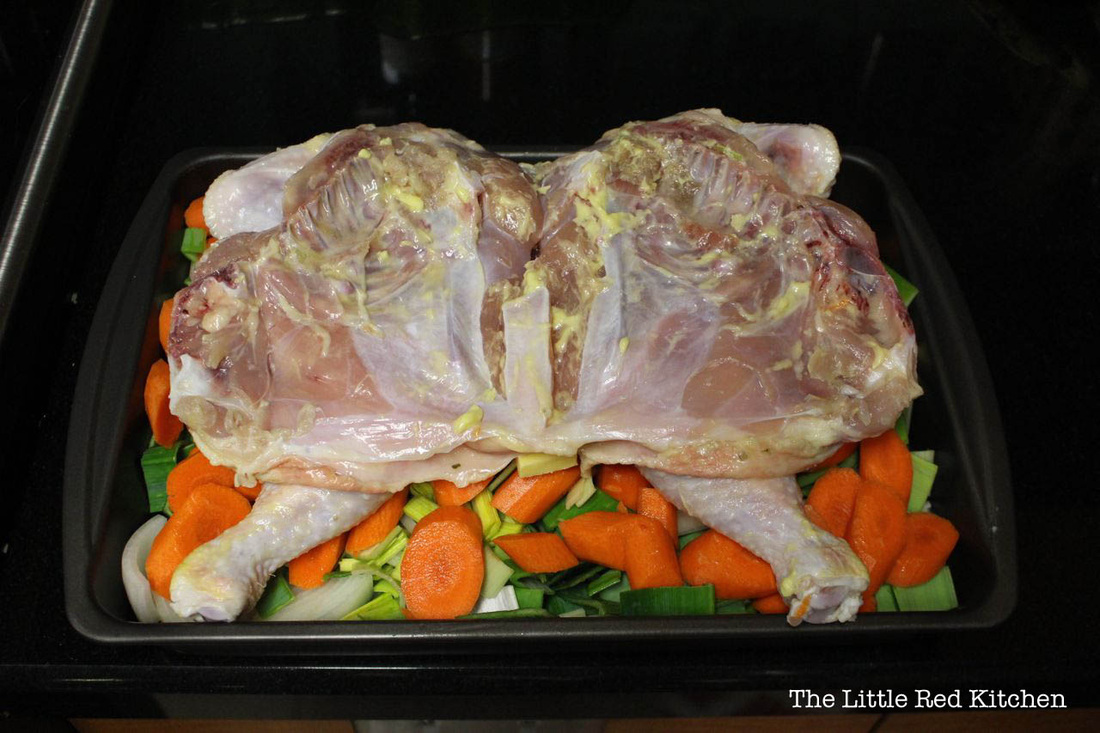
Then, repeat on the other side. Feel free to turn the chicken around to cut from the other direction, if that's easier for you (we almost always do). Once the backbone has been removed (great to save for stocks or soups, if you're into that kind of thing), the chicken should open partway, almost like a book. Step 3: Now, we want to cut the cartilage near the neck area, so the chicken will open up all of the way and lay flat. Part of what is keeping the shape of the bird is a structure called the keel bone (which, unsurprisingly, looks like the keel of a boat). Locate the keel bone, and take a sharp knife... ...which you will use to cut the top ~1 inch of cartilage, starting at the neck region. This will separate the breast meat and allow the chicken to lay flat. Step 4. Use your hands to open the chicken like a book. You may have to use a little force, as we're going to separate the cartilage in this step. Optional step: Using a sharp paring knife, carefully remove the keel bone. Some folks like to do this, and I definitely do (unless I'm feeling lazy)! This won't affect the cooking time or flavor of the chicken, but this is what you'd normally cut the breast meat off of. Without the keel bone, there are no bones keeping you from white meat bliss after this baby is done cooking! Step 5. Put your chicken in the brine at room temperature for 30-45 minutes. Step 6. While your bird is brining, preheat your oven to 425 degrees F. Then, prep and roughly chop your favorite root vegetables, and throw them into a baking pan (that will also fit your chicken). If you're feeling especially decadent, add some pats of butter to the top of the veggies (or toss with your favorite cooking oil). Kerrygold is arguably the best butter, ever. Step 7. Once the chicken has finished brining, remove it from the brine and rinse. (I know, I know... I just told you not to rinse. However, it's pretty terrible biting down on a fresh peppercorn or other pickling spice while you're trying to eat roasted chicken, so we need to do this to remove the brine 'debris'. Just be sure to clean your sink and surrounding area really well afterwards.)
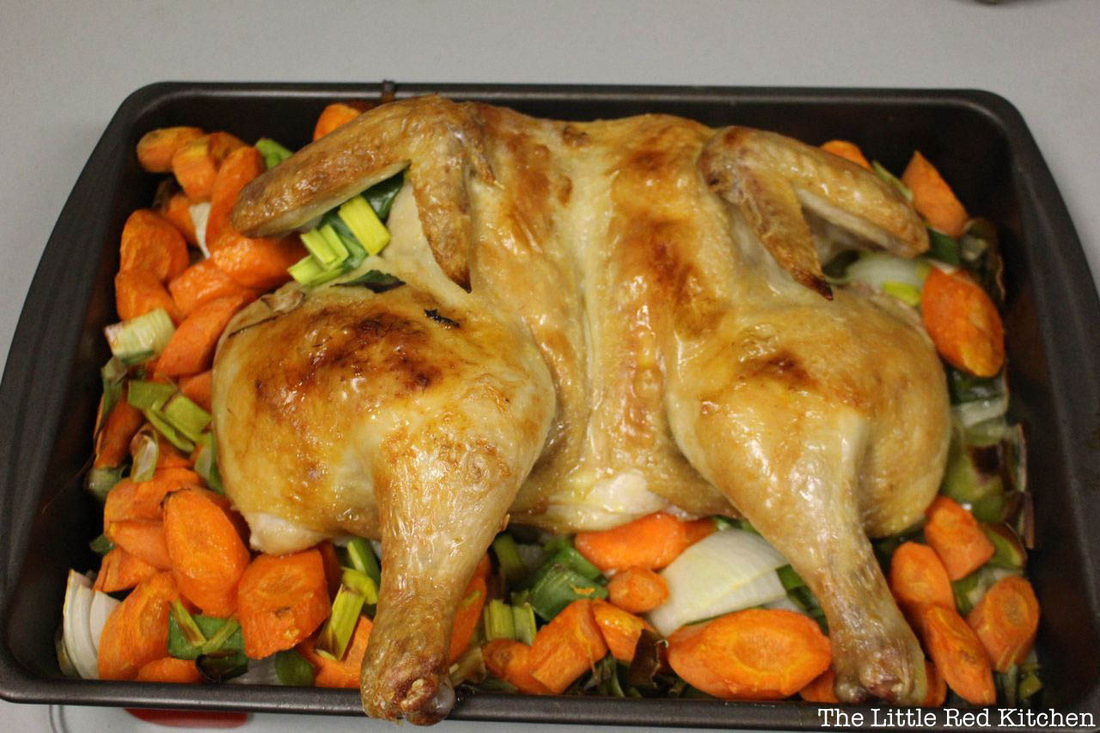
Pat the bird dry, and rub down with a generous coat of softened butter or your favorite cooking oil (both sides). Step 8. Place the chicken breast-side down on the tray of vegetables, and make sure it fits within the tray. Step 9. I like to roast butterflied chicken as follows:
45 minutes, breast side down
15 minutes, breast side up (It's helpful to use tongs for the flipping step.)
broil, 2-5 minutes, breast side up
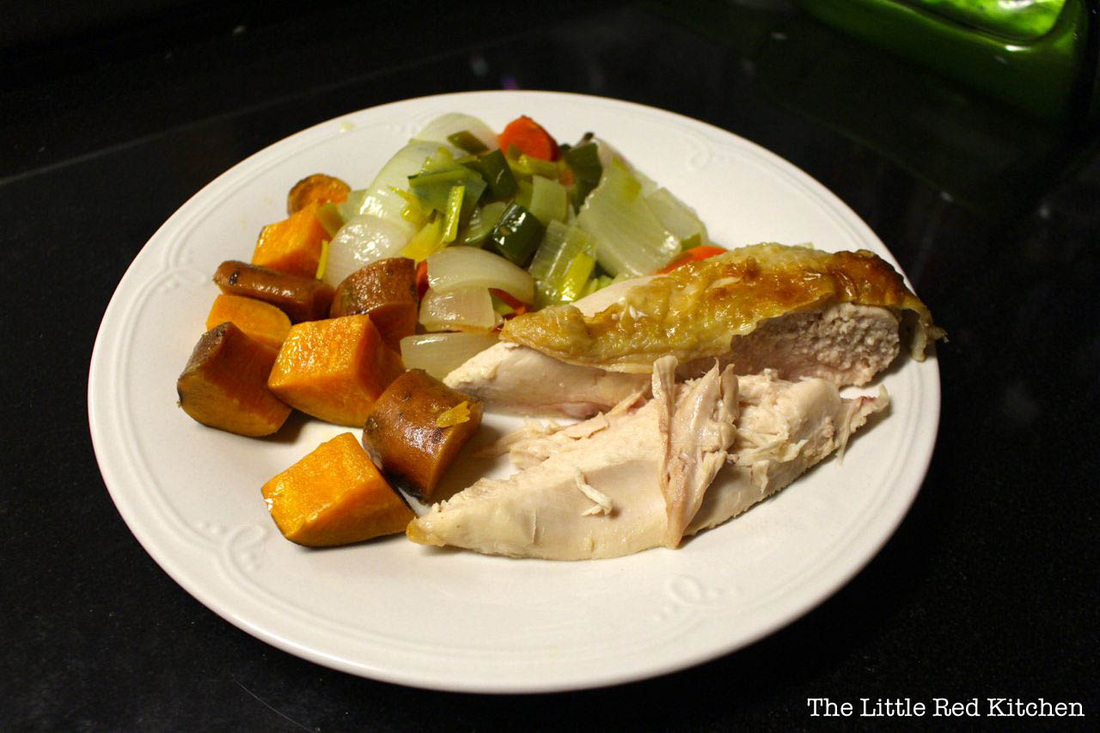
...What you end up with is tender, juicy chicken, with a crunchy, golden skin on top...
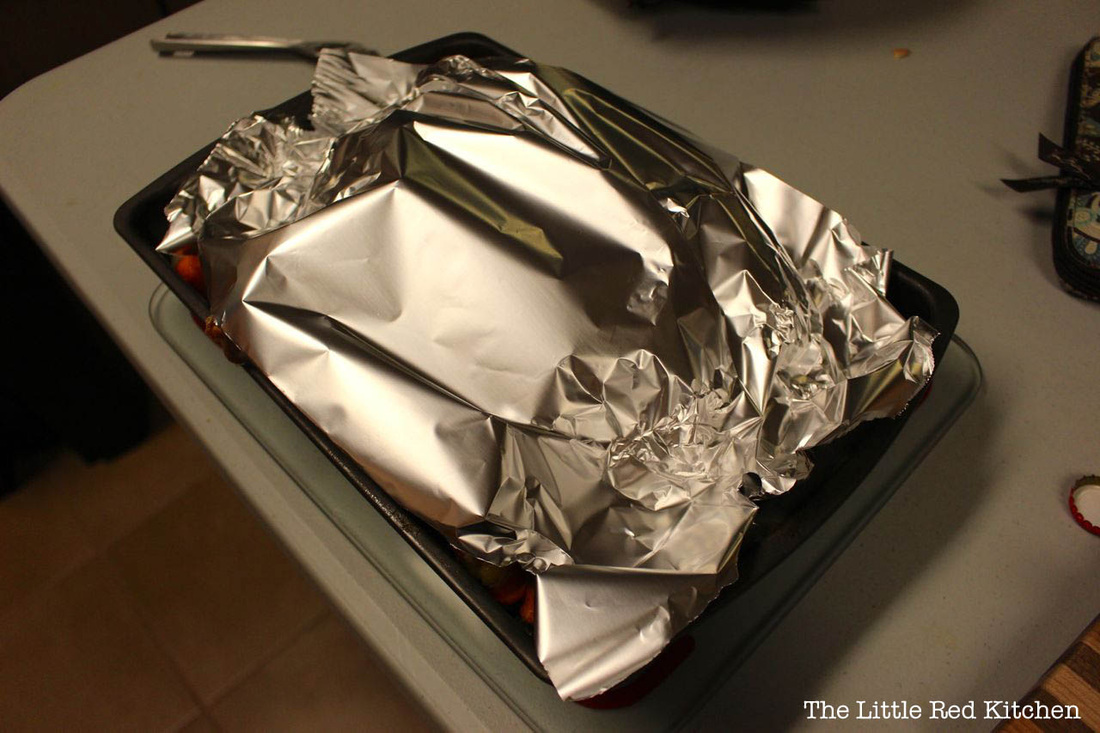
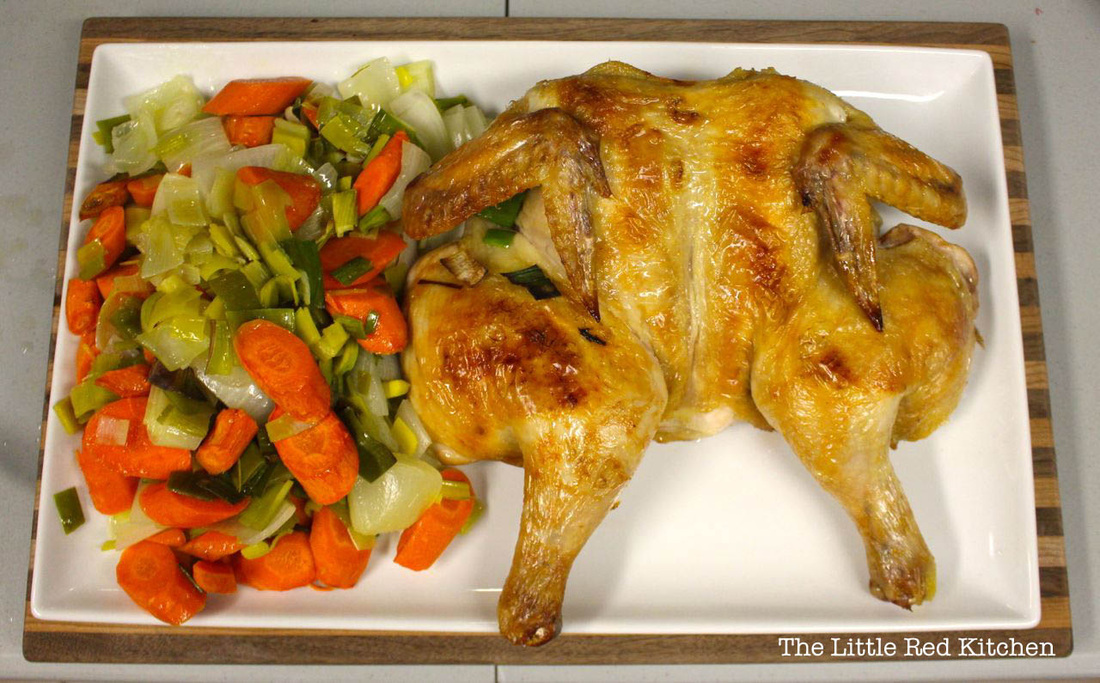
Like this! Step 10. Tent the chicken in tinfoil for 15-20 minutes. Step 11. Then serve up alongside the vegetables you just roasted under the chicken! Delicious. Here's what my dinner plate looked like: Enjoy, and thanks for reading!
- Kaitlin
|


 RSS Feed