I love all butters associated with fall. Regular butter, pumpkin butter, apple butter... especially apple butter. We make an annual trip to the National Apple Harvest Festival in Gettysburg, PA, where we consume all things apple (apple fritters, apple pie, apple sausage, apple beer...just to name a few) and load up on jars and jars of apple butter.
It's officially been fall for over a week now, and I hadn't got my apple butter fix yet! Armed with two bags of cheap apples from Walmart (okay, this recipe would be much better with fresh, local apples), I knew I could figure this out on my own. And I did! And it is delicious! Many recipes call for applesauce to start... and while that would be easier, why not use the plentiful fruit of the season? I used a type of apple that I'd actually never heard of: Ginger Gold. They're an excellent mix of tart and sweet, with a little snap of ginger at the end (hence the name)!
Two things to note:
1. This recipes is SO easy, but without a crock pot (mine died a couple weeks back, devastating) it can be time-consuming (think 2-3 hours). In our case, we were having a lazy Sunday around the house, so it worked out well!
2. I like my apple butter with much less sugar than I've been seeing in other recipes, and I also like it more spiced. What you'll end up with, with this recipe, is a rich, spicy apple butter that takes more like apples than sugar!
What you'll need:
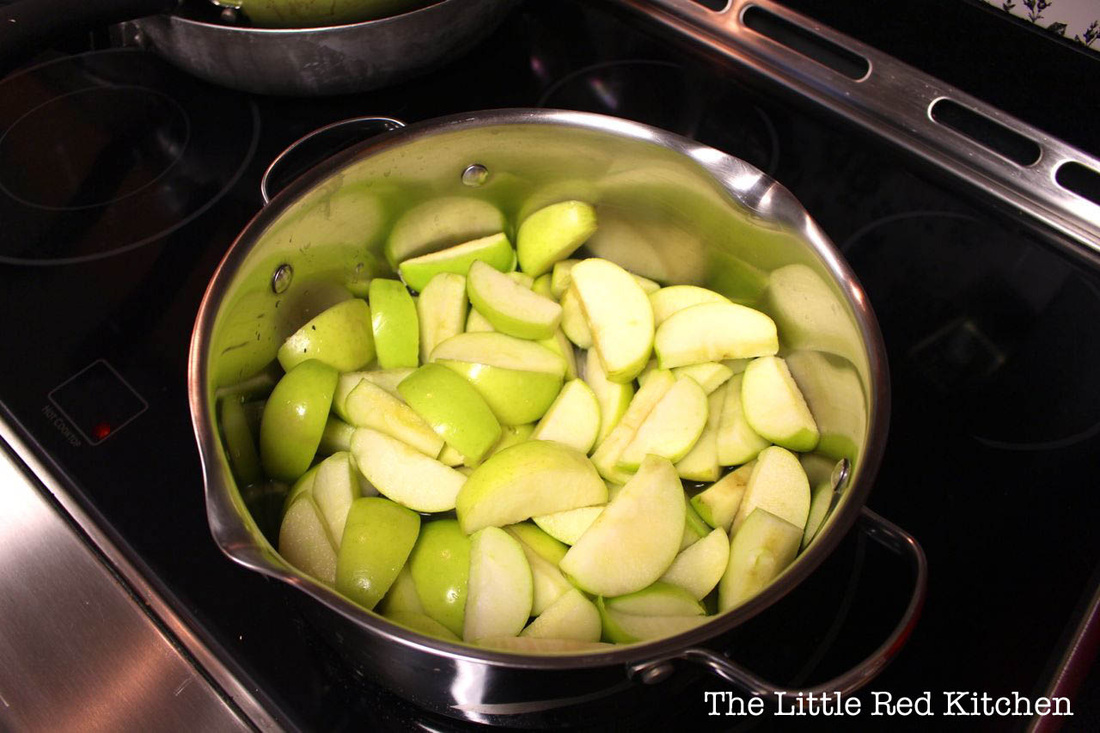
2 lbs apples, cored and quartered (don't worry about peeling them!)
1 cup water
1/2 - 1cup honey, depending on your preference
1 tsp cinnamon
1/2 tsp nutmeg
1/2 tsp ground cloves
a food processor or blender
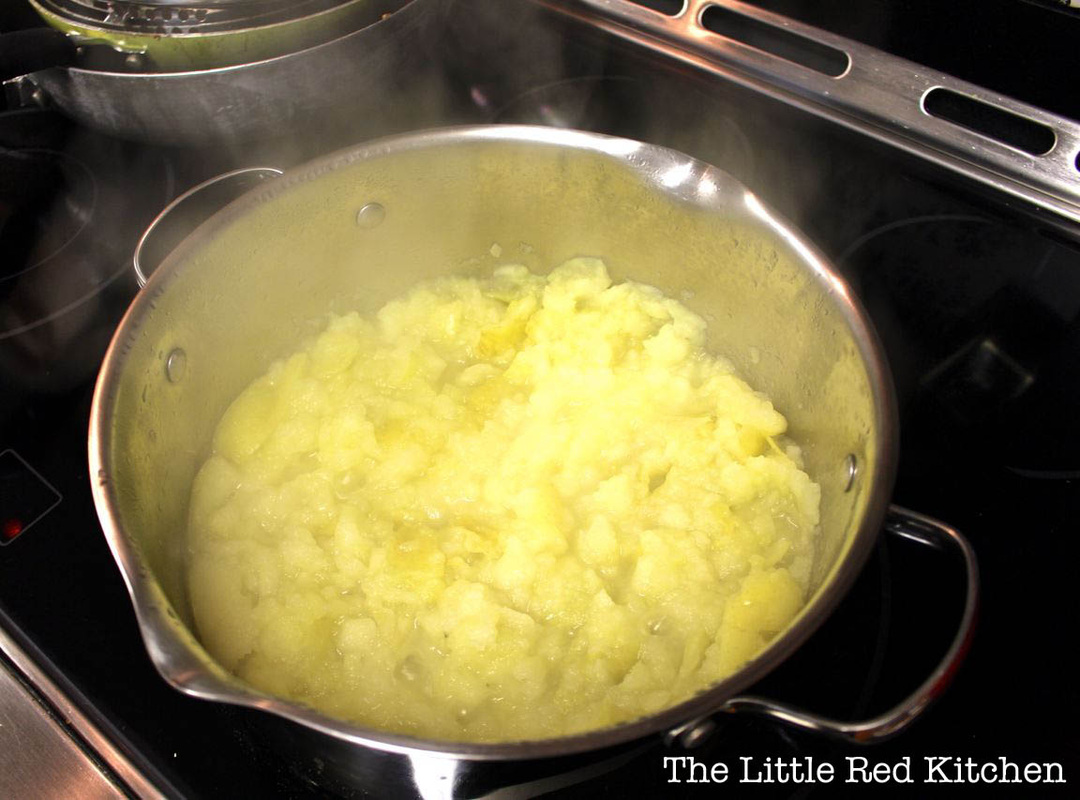
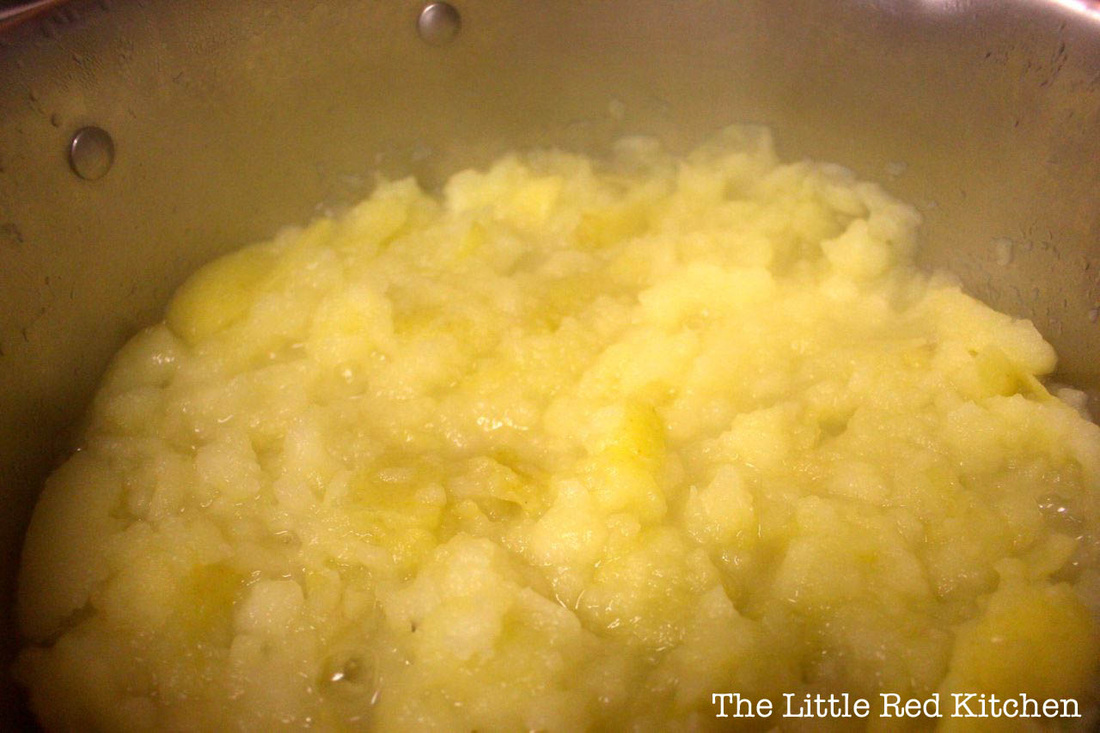
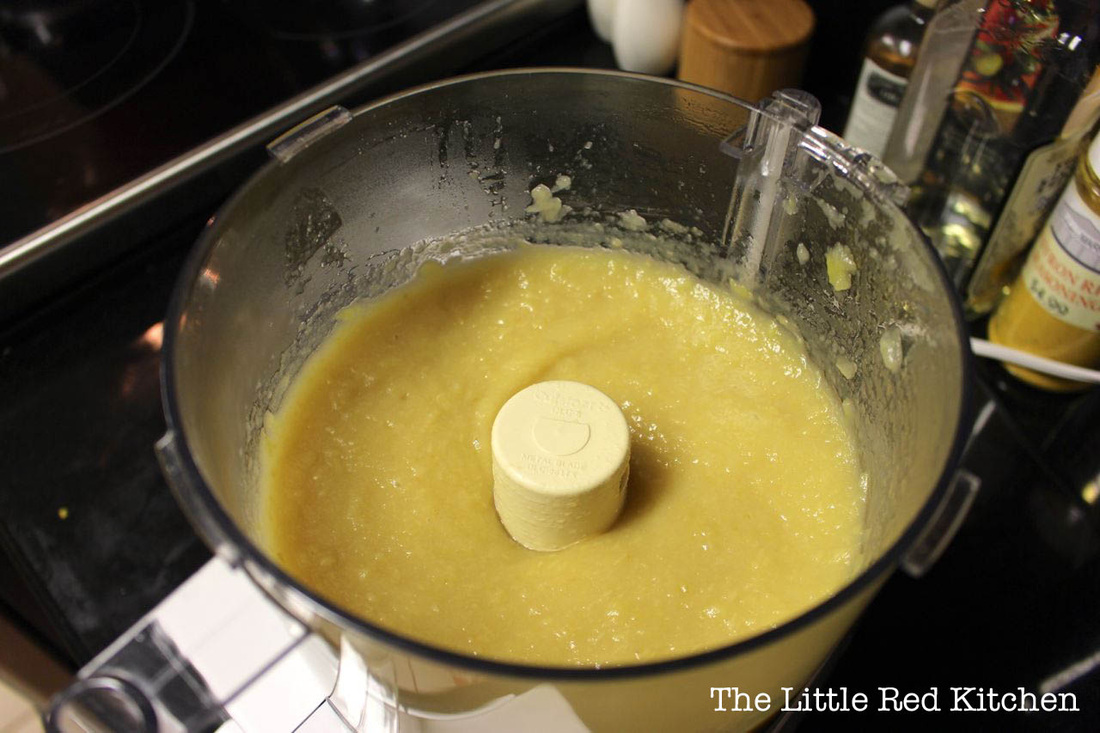
Step 1: Put your prepared apples in a large pot and pour the water overtop. Step 2: Over medium-high heat, bring to a boil and then reduce to a simmer. Cook until the apples soften enough that they are pretty much like apple sauce. You can use a potato masher (like I did!) to speed up this process, just be careful! Step 3: Once you have your "applesauce", remove it from the heat and allow it to cool slightly. When blending, you don't want to use boiling or hot liquids if you can avoid it. When it's cooled, throw it in your food processor and puree until smooth.
Some recipes call for straining the "applesauce" through a fine mesh sieve to remove any pulp or skin from the apples. I really like the addition of the flavor from the skin (not to mention the vitamins!), so grinding it up works just fine for me! If you stop now, you'll have your own homemade applesauce!! (Healthy and delicious!)
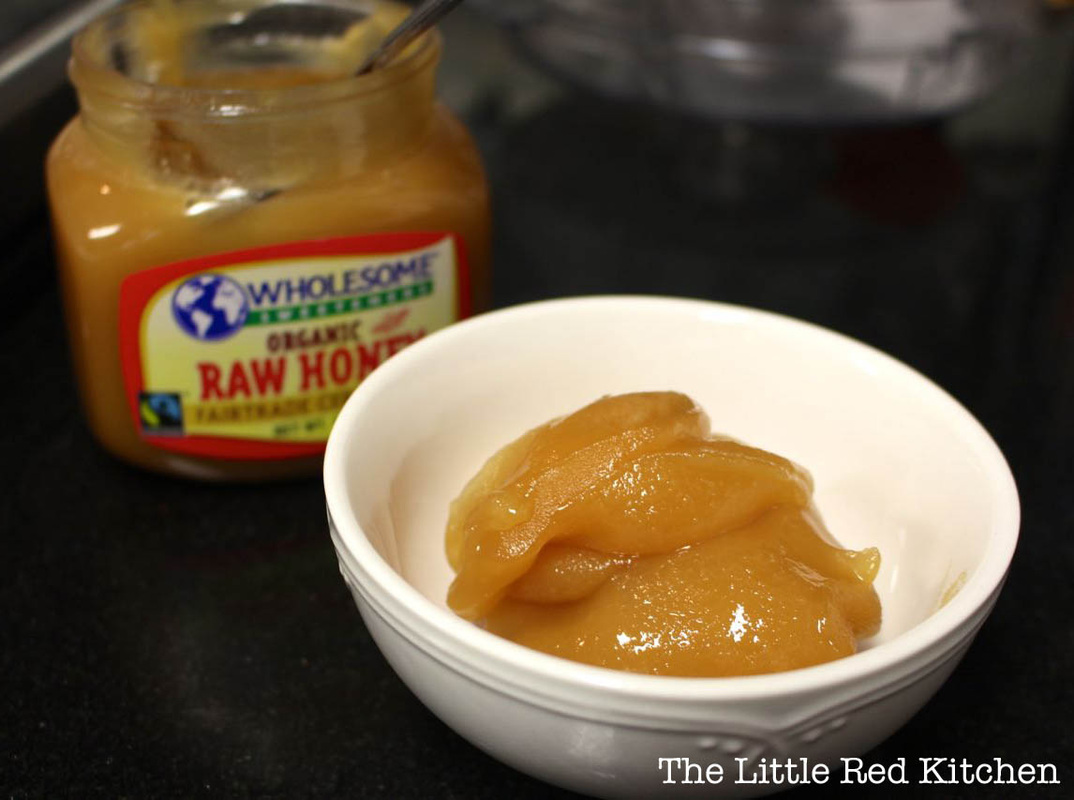
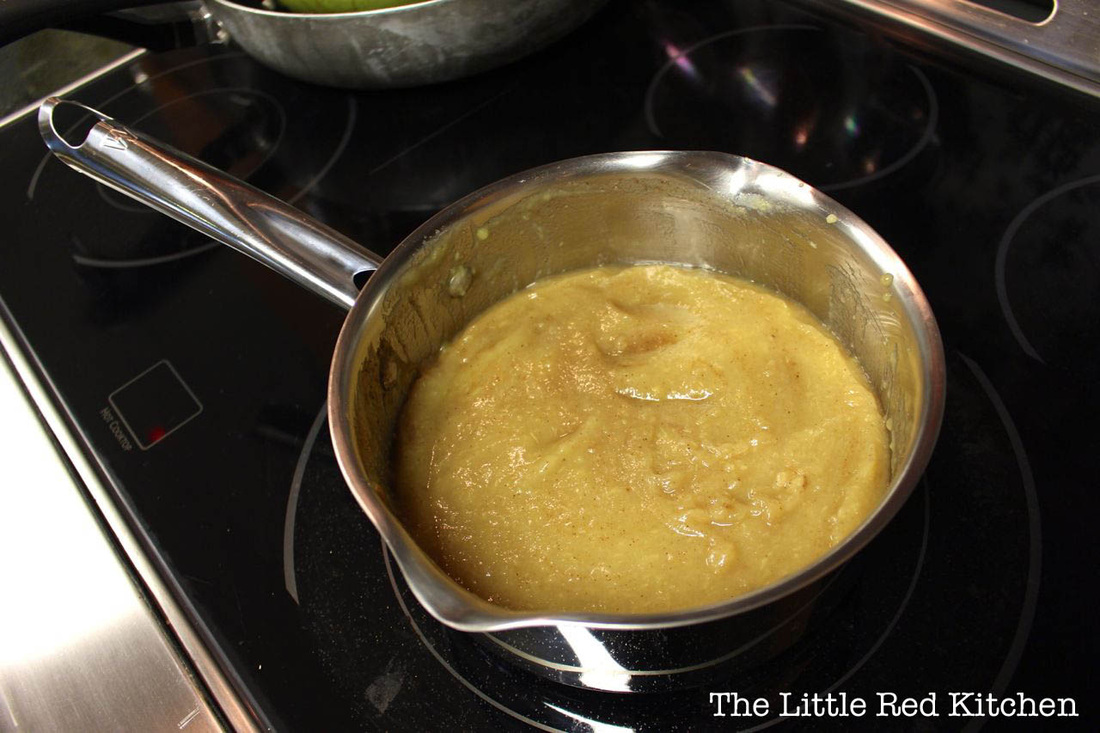
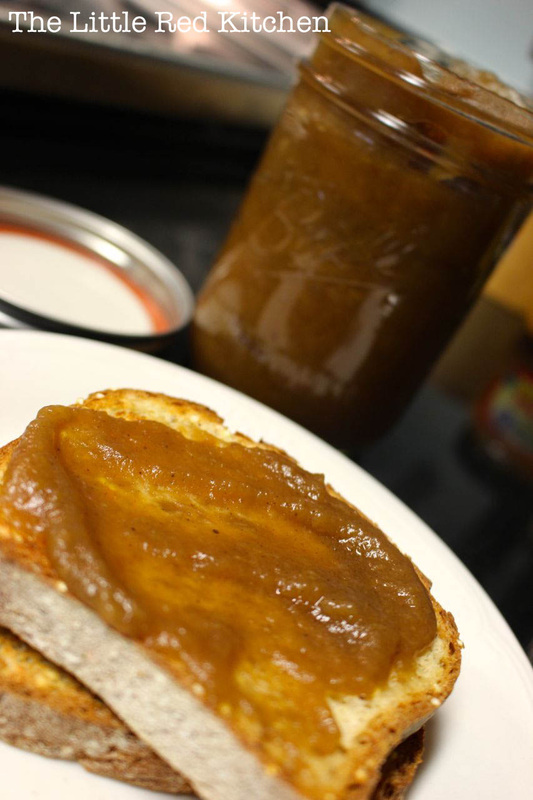
Step 4: Transfer to a medium saucepan, then add in your honey (microwave for a few seconds if you're using raw honey, like me, to soften) and spices. Step 5: Here's the most time consuming part: Keep your pot over medium/low heat and stir occasionally until you reach the consistency and color that you want. I wanted mine to be a thick (won't drip off of an inverted spoon) caramel-colored butter. I'd say it took 1-2 hours of cooking over low heat, stirring every 5-10 minutes. This process is really messy if you're not careful, and you need to be sure not to turn the heat up too high, or you'll scorch the bottom of the butter. Unfortunately, this is not something you can rush!
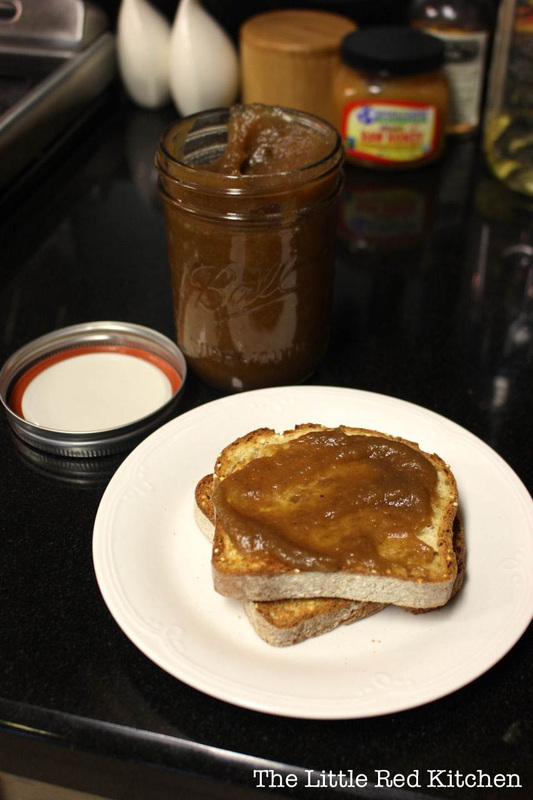
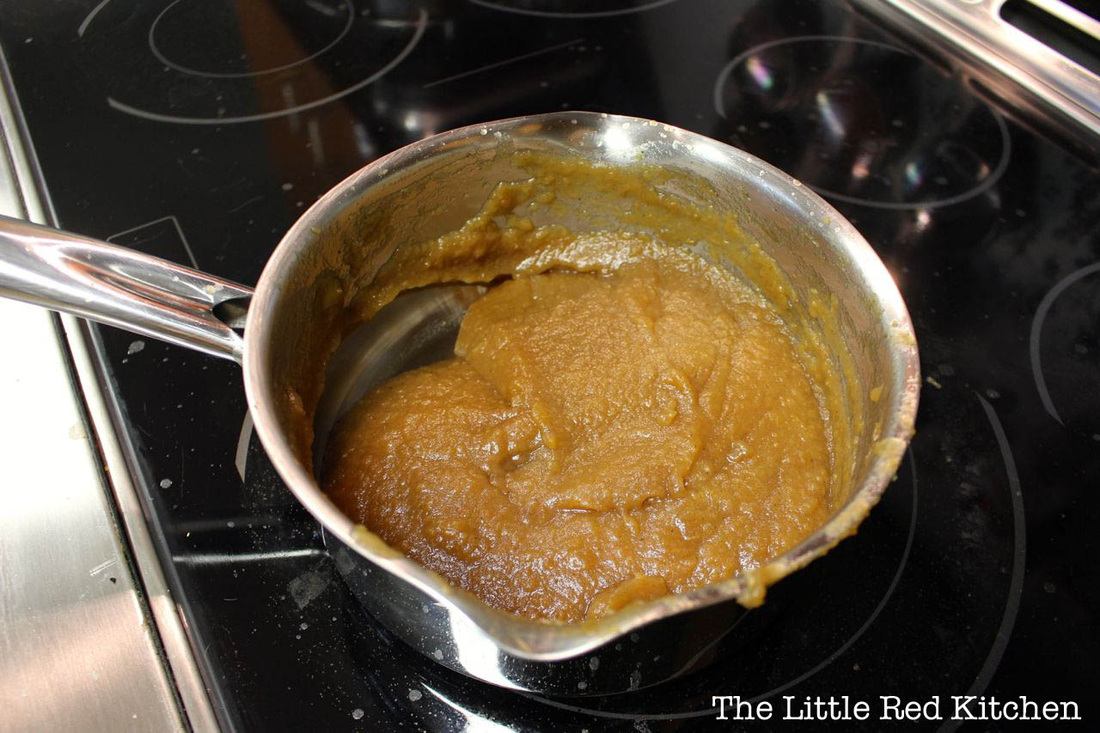
Although you can tell that I made a huge mess, the results speak for themselves in terms of beautiful apple butter: When you're finished, stick in a clean jar. This will keep in the fridge for a couple of weeks (if it lasts that long!), or you can freeze it for longer storage. Slather over toast or consume directly from the jar. I've done both.
Enjoy!
- Kaitlin
Let's just get one thing straight: I'm a fan of Swiss Miss hot chocolate. I am, and I've had those more "gourmet" brands that come in their individual pouches and cost probably much more than a cup of hot cocoa ever should...but, when I came across this recipe 2 years ago that promised super thick and creamy hot chocolate, and it was right in the middle of a cold and bleak Pennsylvania February, I knew I had to try it. And I'm so glad I did because it. is. unbelievable. Give this recipe a try once. Like I said, I've saved this cut-out from a magazine for 2 years, and it's not going anywhere anytime soon.
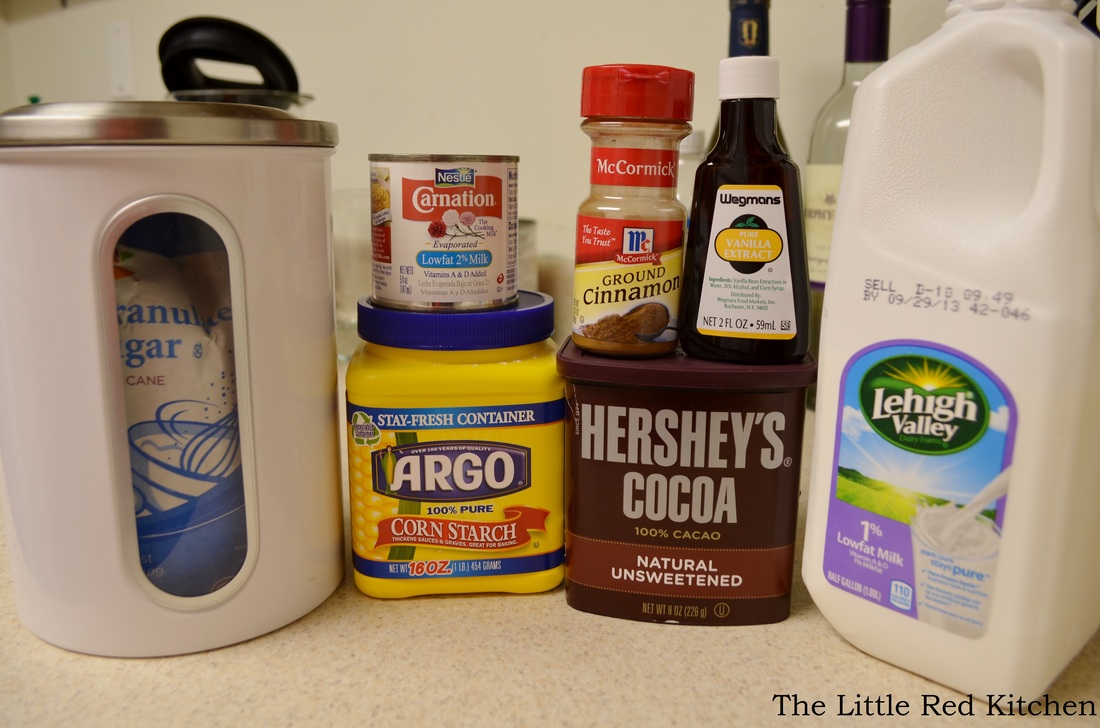
Ingredients:
1.5 cups of milk (if you want to be decadent you can use whole milk but I use 1% because that's what we always buy)
5 oz. evaporated milk (The full contents of 1 of those mini cans)
1/4 tsp. vanilla extract
1/8 cup cocoa powder
1/8 cup sugar
1 tbsp. cornstarch
1/4 tsp. ground cinnamon
pinch of salt
This recipe will make 2 drinks and can double easily to make 4. I know, that seems like a lot of ingredients for a couple cups of cocoa. But, level with me here, because it only takes about 5 minutes to whip up.
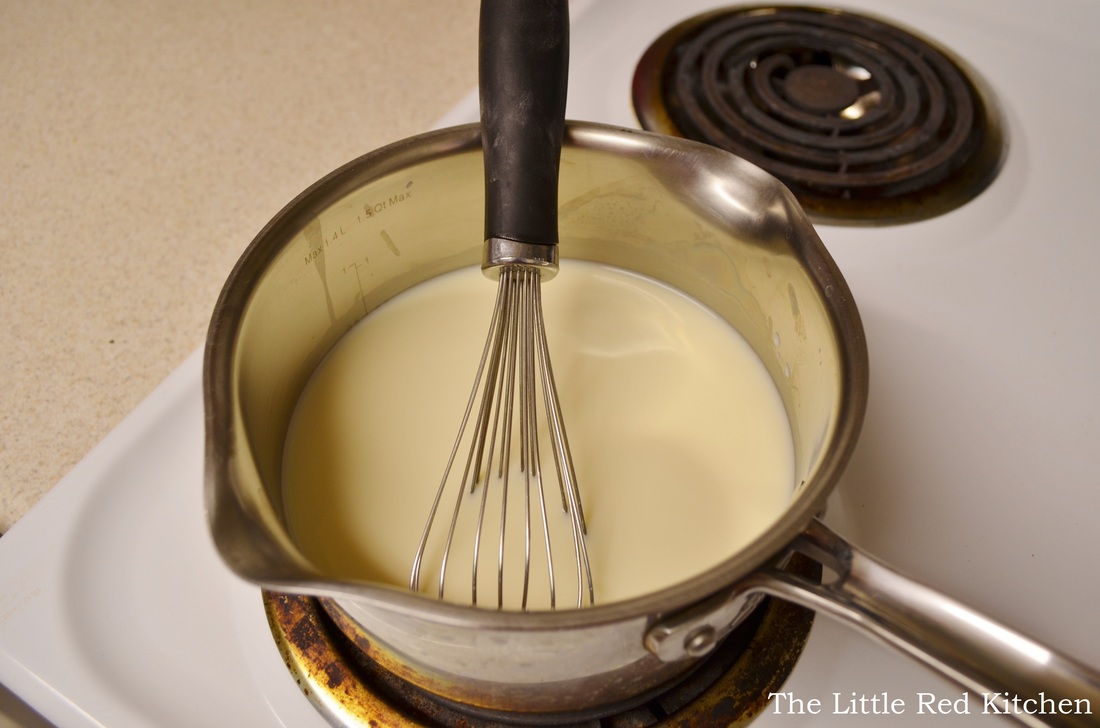
Step 1:
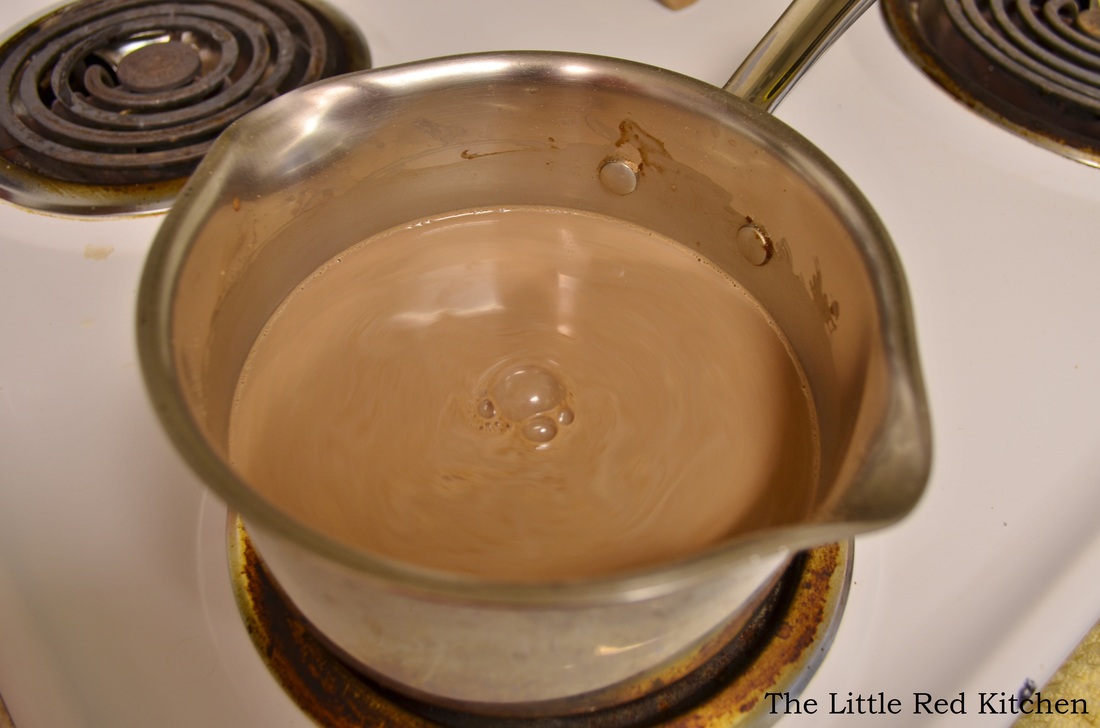
Combine the milk, evaporated milk, and vanilla in a small saucepan and warm up over low heat on the stove.
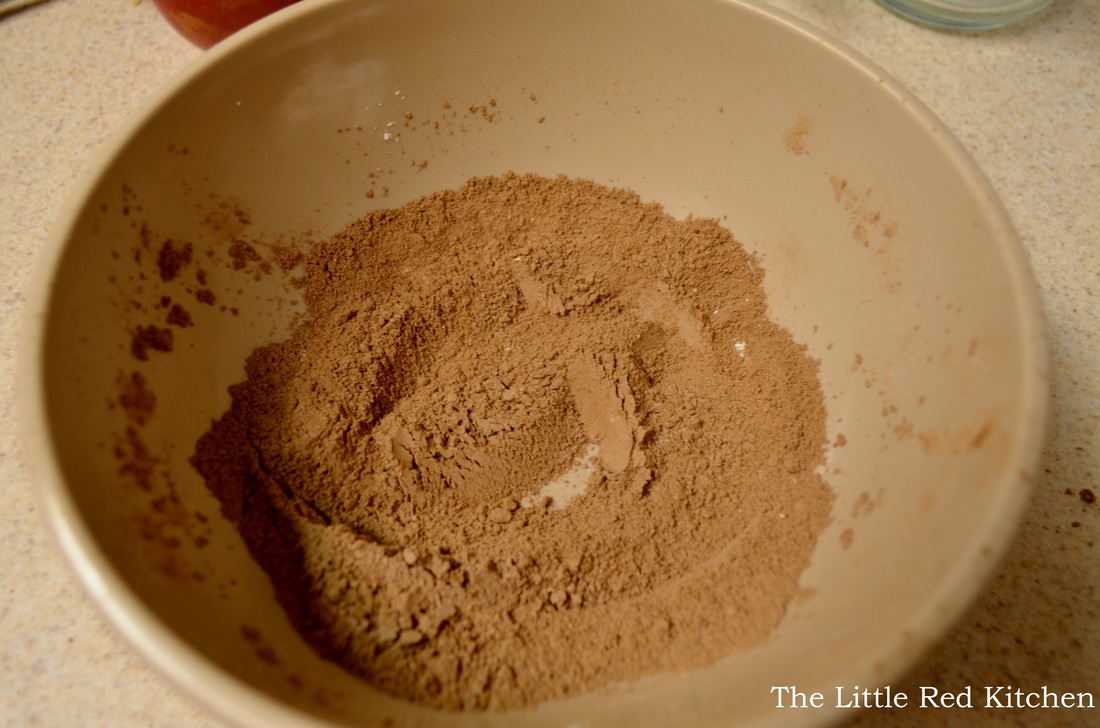
Step 2:
Meanwhile, in a small bowl combine the cocoa powder, sugar, cornstarch, cinnamon, and salt. Step 3:
Whisk the cocoa mixture into the milk mixture until smooth. Bring to a boil, whisking a LOT to keep anything from burning on the bottom of the pan. This should take a couple minutes. Once it comes to a boil, remove from heat and serve! The hot cocoa will be super thick, and it will have excellent chocolate flavor, better flavor than you've ever gotten out of a pouch in your life. Note, if you don't drink the cocoa and let it sit around, it might form a thin "skin" on the top from the cornstarch. It's no big deal at all, just give it a stir when ready to serve. And be glad, because it's doing that because it doesn't contain any preservatives or artificial ingredients!
This cocoa really doesn't need any embellishment, but if you feel so inclined, especially if you are having friends or family over for dinner and want to serve something special with dessert:
~add a pinch more cinnamon and a pinch of cayenne to make Mexican hot chocolate
~add instant coffee for that smooth mocha flavor
~make it more "adult" and add peppermint schnapps; um, can you imagine drinking that on a cold December night? Heaven on earth!
I actually keep a couple mini cans of evaporated milk in my pantry for whenever I feel inclined to make this wonderful treat. I hope you'll do the same, and I hope you'll give this deliciously decadent beverage a try!
~Lauren
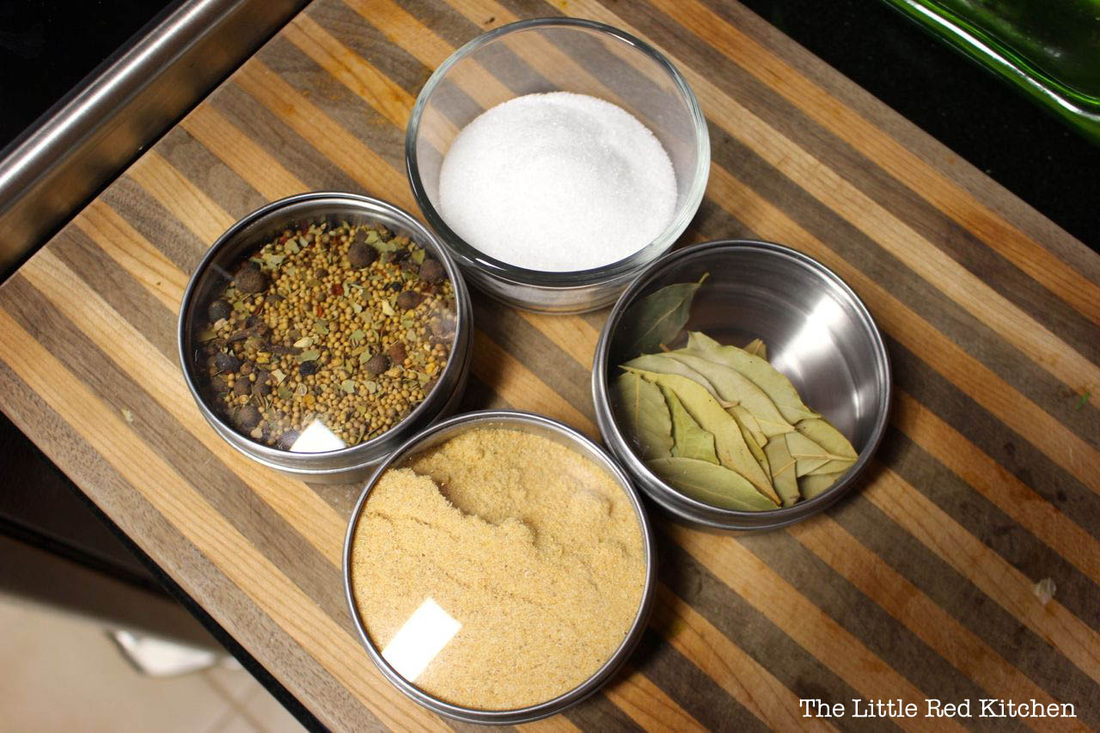
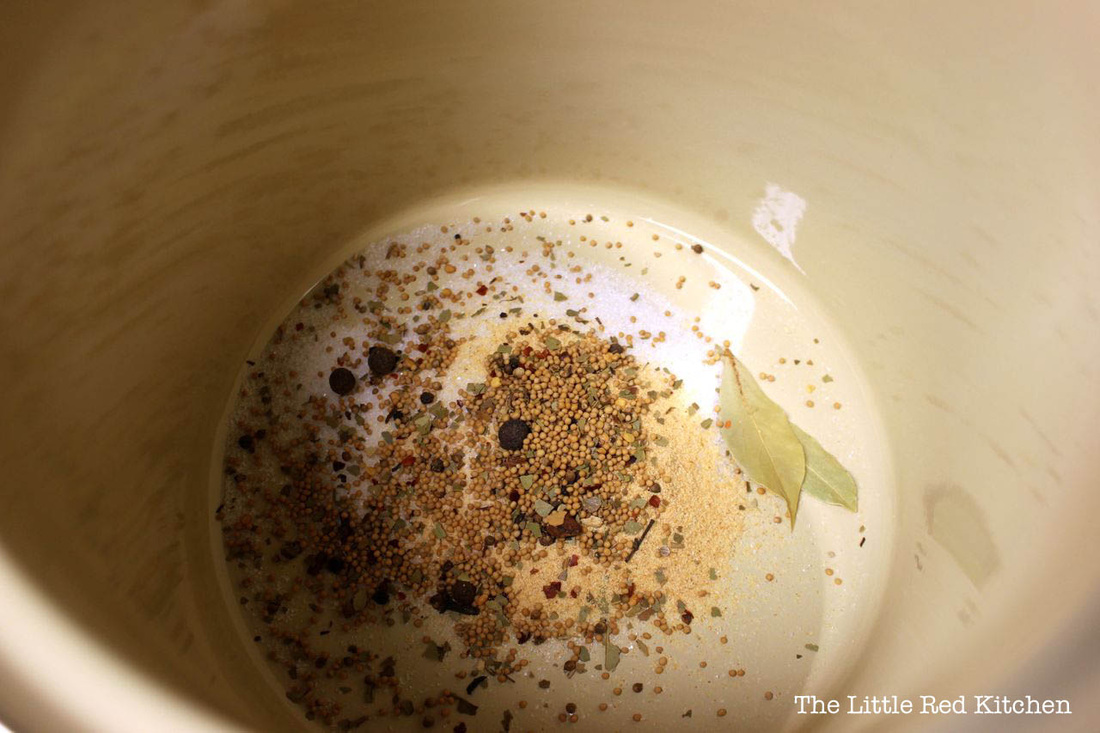
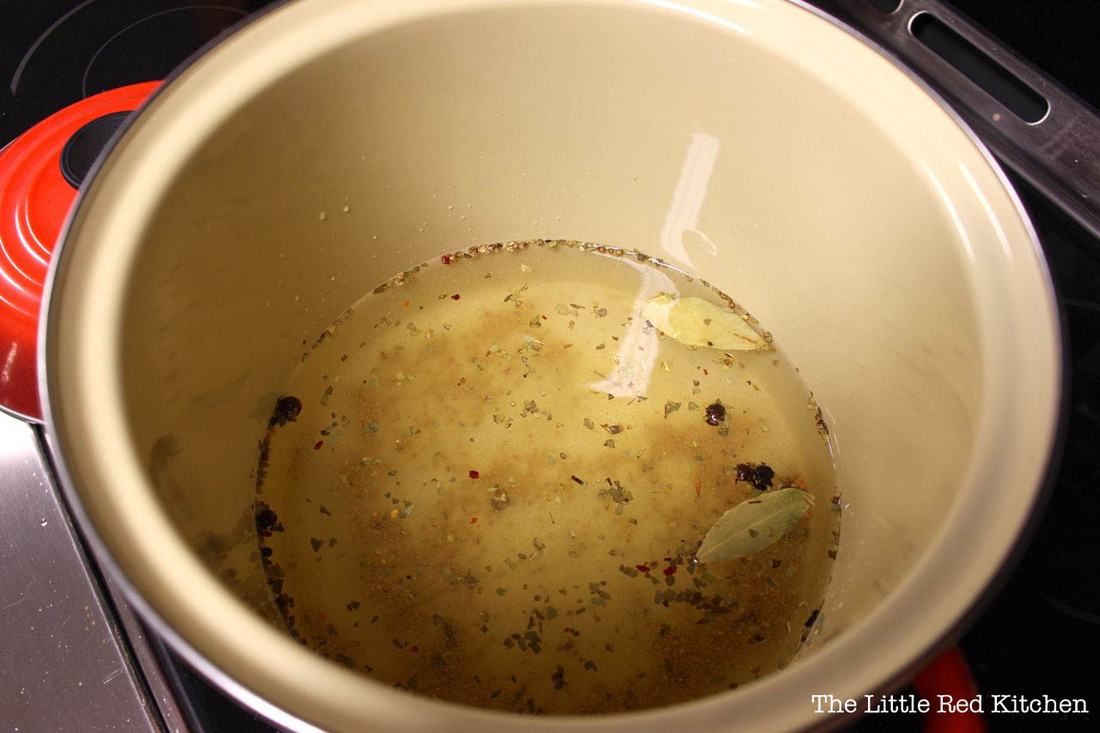
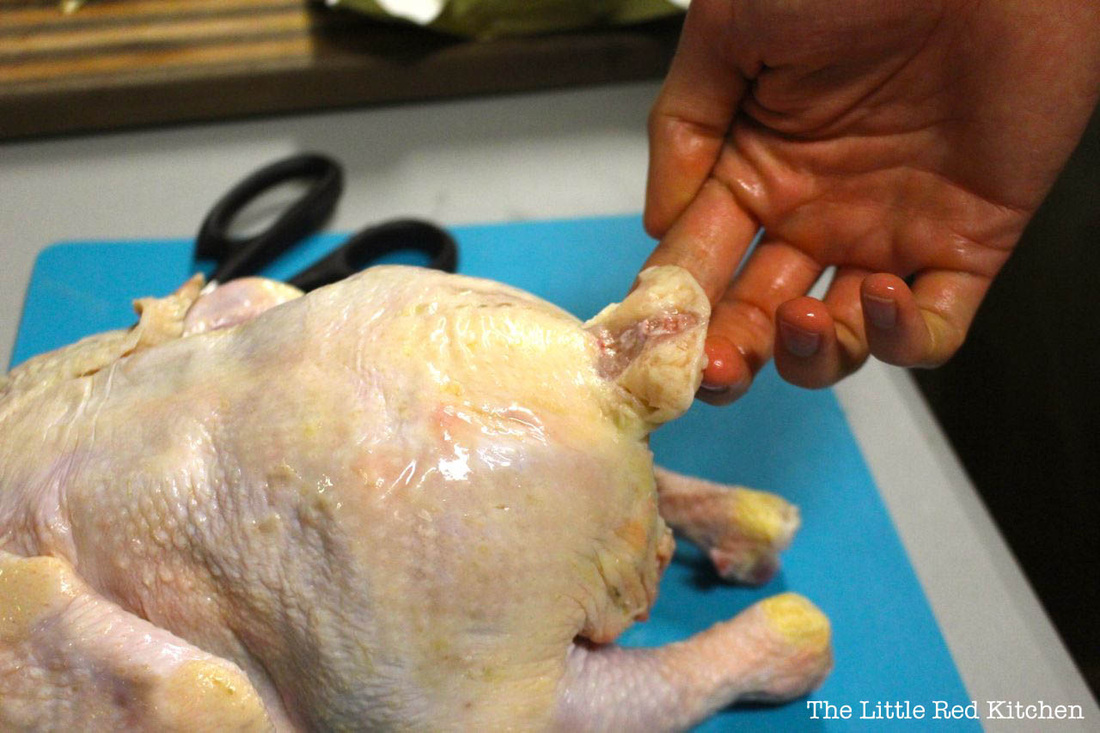
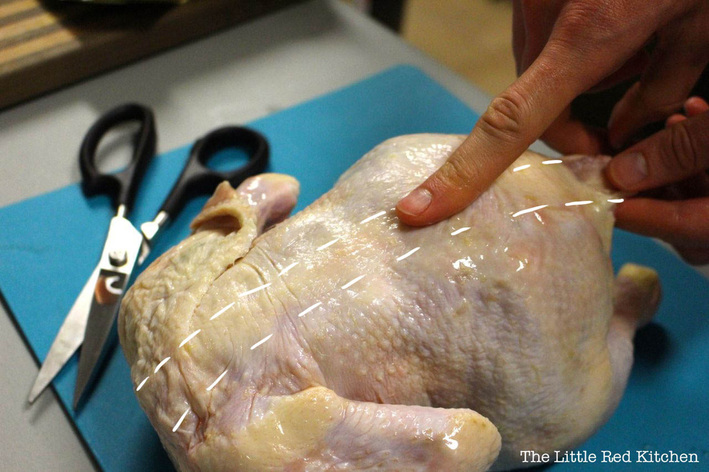
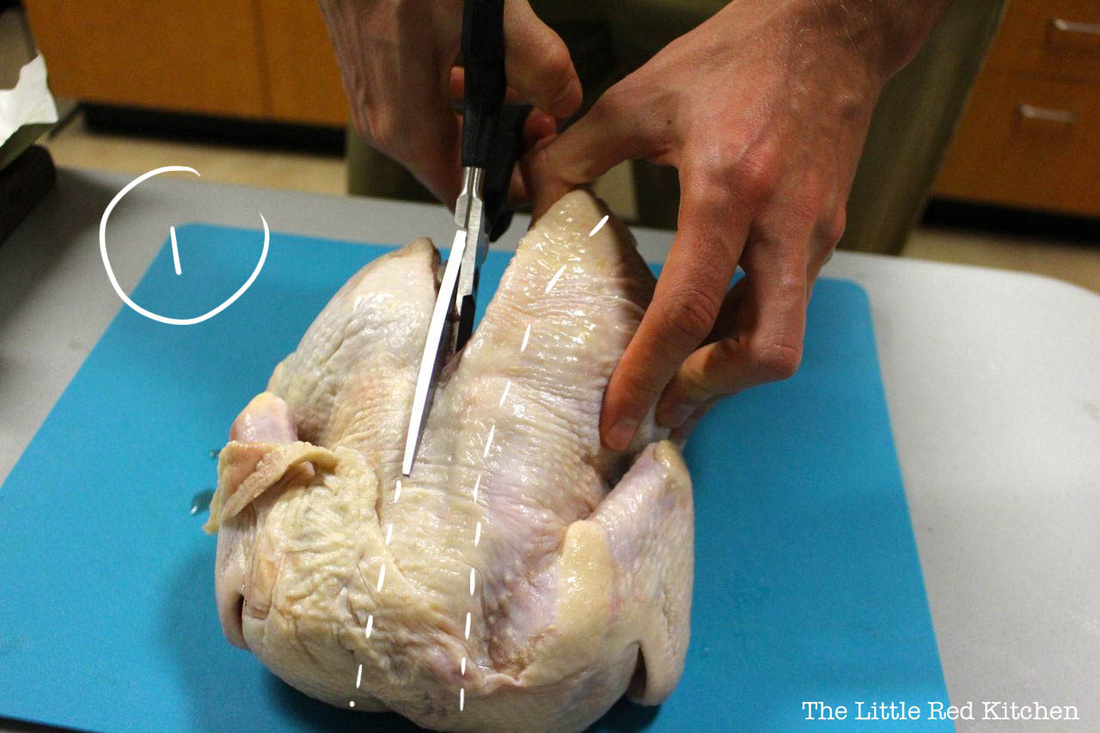
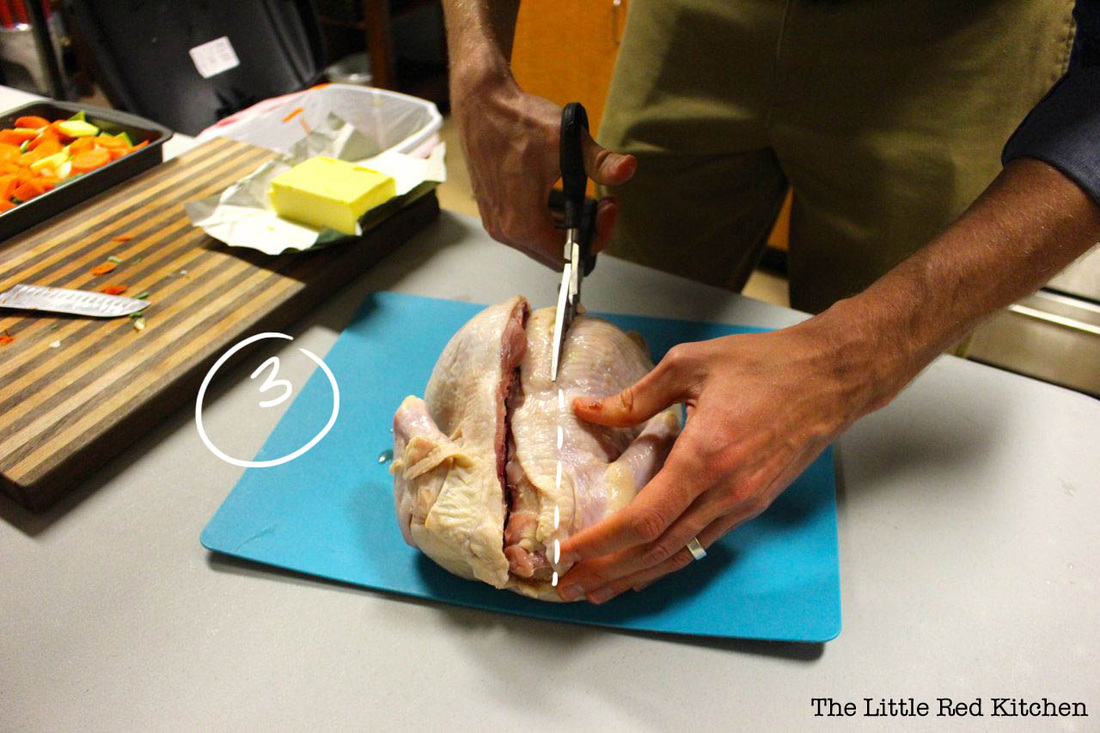
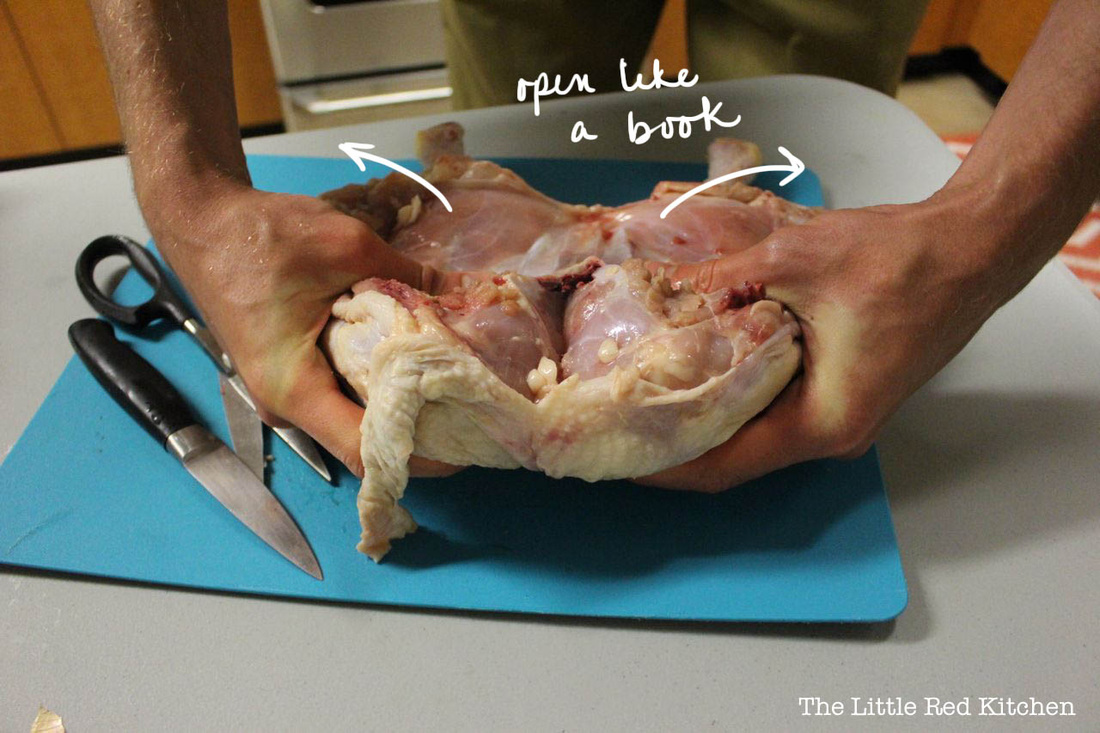
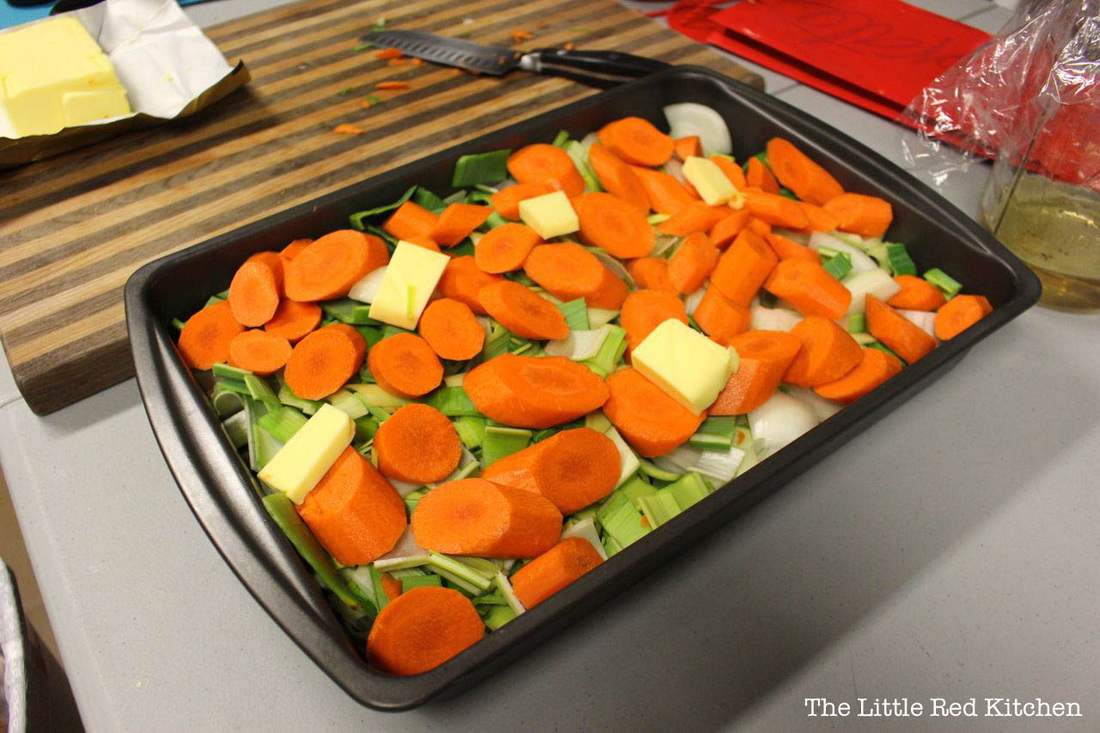
This is one of those recipes that, no matter how many times I make it, I never get sick of. Inevitably, pictures of the perfectly roasted bird end up on my Facebook pages and Instagram. I am not ashamed. Originally, I was inspired by Nom Nom Paleo's " Easiest Roast Chicken Ever*", which (if you have access to a Trader Joe's) means an amazing roast chicken dinner on the table in about an hour. Since I didn't and still don't have access to Trader Joe's (and their amazing pre-brined chickens), I had to make do on my own for the chicken-prep part. (*If you do have access to a Trader Joe's, hop on over to the site linked above. You are in for a quality recipe and some beautiful pictures.) One glance at the available recipes online (ahem, Paula Deen), and it was enough for me to steer clear of any pre-made recipe (although I'm sure there are other great ones out there). I wanted the brine to be strong enough to work in 30 minutes, but not enough that the salt or pickling spices would overpower the chicken. Keep reading to find out how I solved that problem! Ingredients 1 4-5lb chicken 1/3 (rounded) cup sea salt, or more, if you're a salt lover 1-2tbsp garlic powder 2 tbsp pickling spices 2-3 bay leaves 8 cups water 4-5 cups of tough/root vegetables of your choice (leeks, carrots, onions, potatoes), roughly chopped 2-4tbsp butter, softened First, prepare your brine. Throw all of the brine ingredients (sea salt through water, above) into a large stock pot (it will need to hold the water and your chicken), and stir well to combine. The salt will begin to dissolve as you prep the chicken. Some folks like to simmer the brine first, to ensure that all of the salt has dissolved, but I've done it both ways and never had an issue with either one. Next, you're going to need to know how to butterfly the bird. This ensures that it will cook quickly and evenly (that, plus the brine, means fully cooked white and dark meat that's still super tender). To begin, pat your bird dry ( health/microbiology note: Don't rinse first! You're significantly increasing the spread of surface bacteria around your kitchen, even if you don't see the water splash. Here's a great NPR article on this, thanks to my friend Chad.) Step 1. Lay your (now dry) bird on a cutting board (or other easy-to-clean surface, since chickens carry Salmonella spp.), breast side down. Locate the tail-- the backbone runs along the top of the chicken, starting at this point. We'll be cutting out the backbone, so the chicken will lay flat. Step 2: Take a strong, sharp pair of kitchen shears and use them to cut from the tail end (I find this the easiest way, but whichever works for you) along the backbone, all the way through. Like so:
Also: BE CAREFUL! Chicken bones are sharp and obviously this guy contains bacteria, so be sure not to cut yourself. If you do, wash your hands really well with some antibacterial soap. Probably twice.
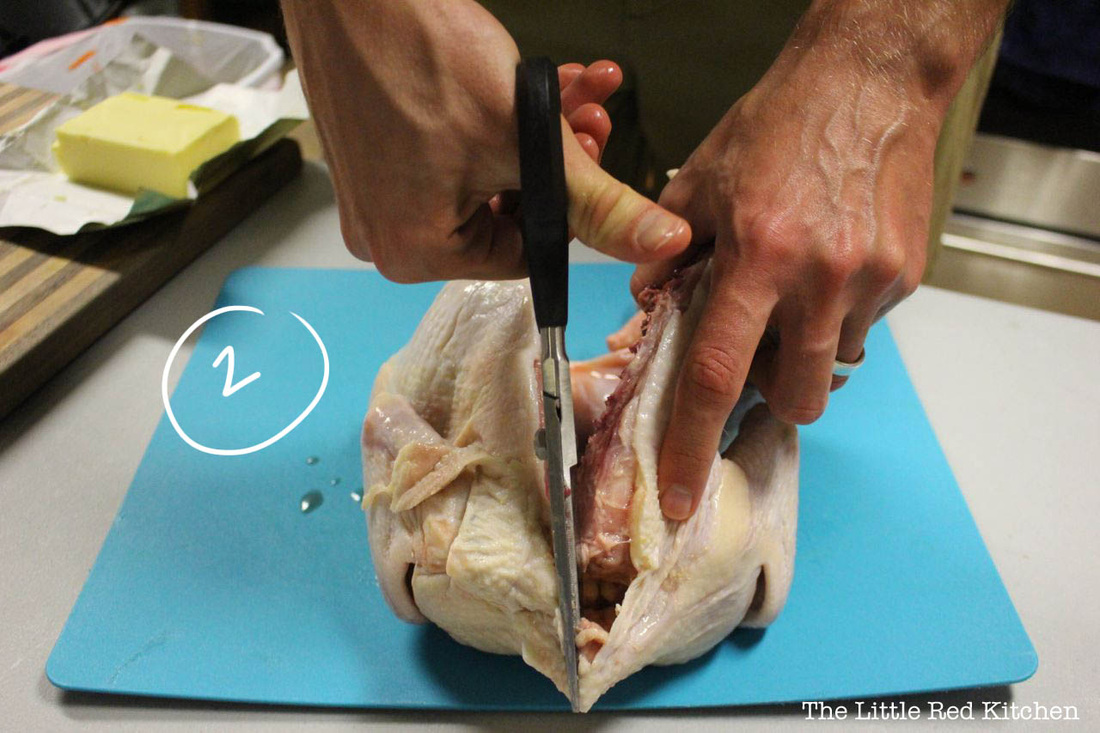
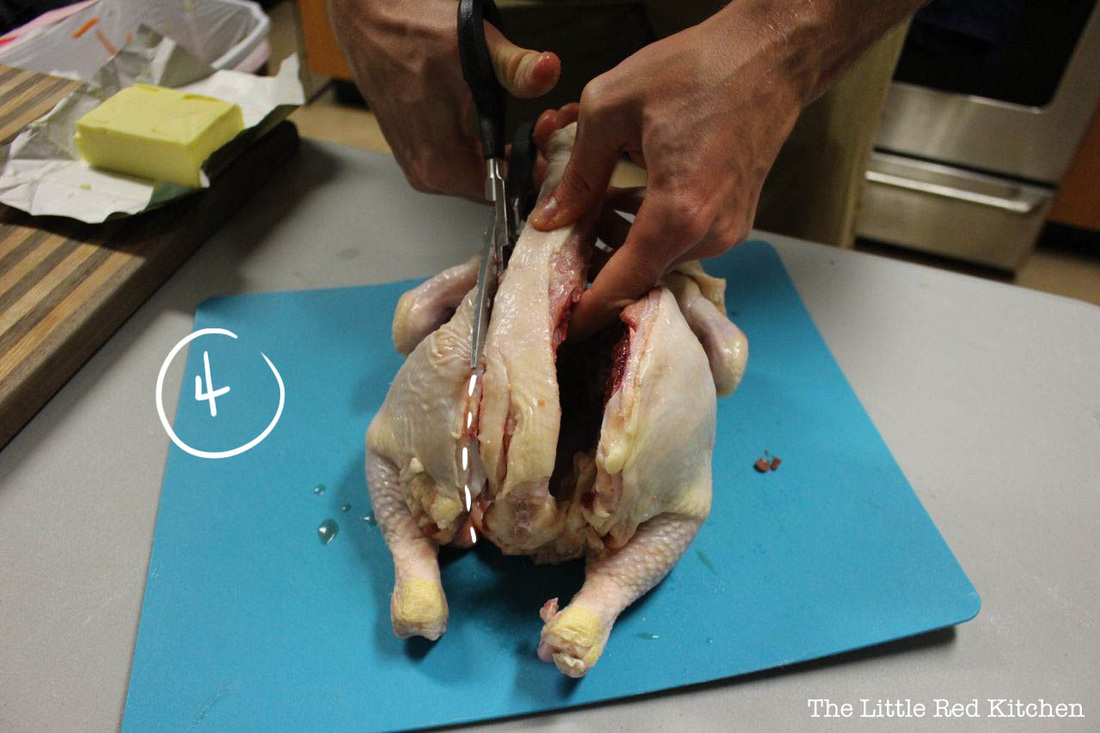
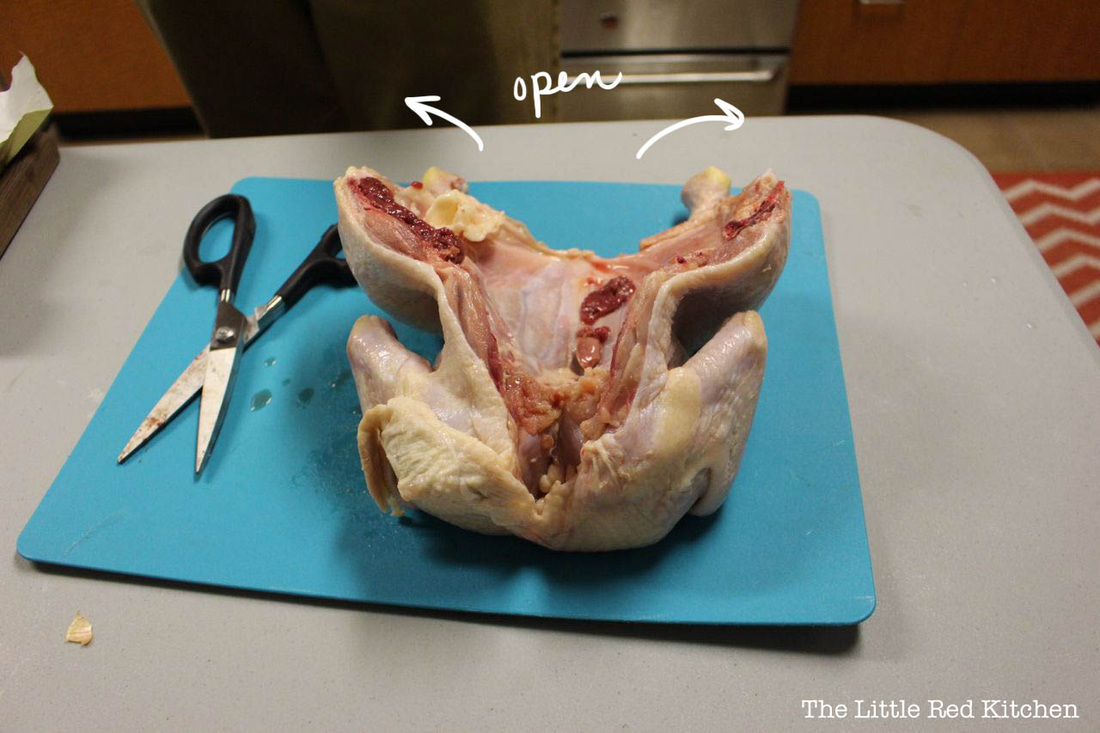
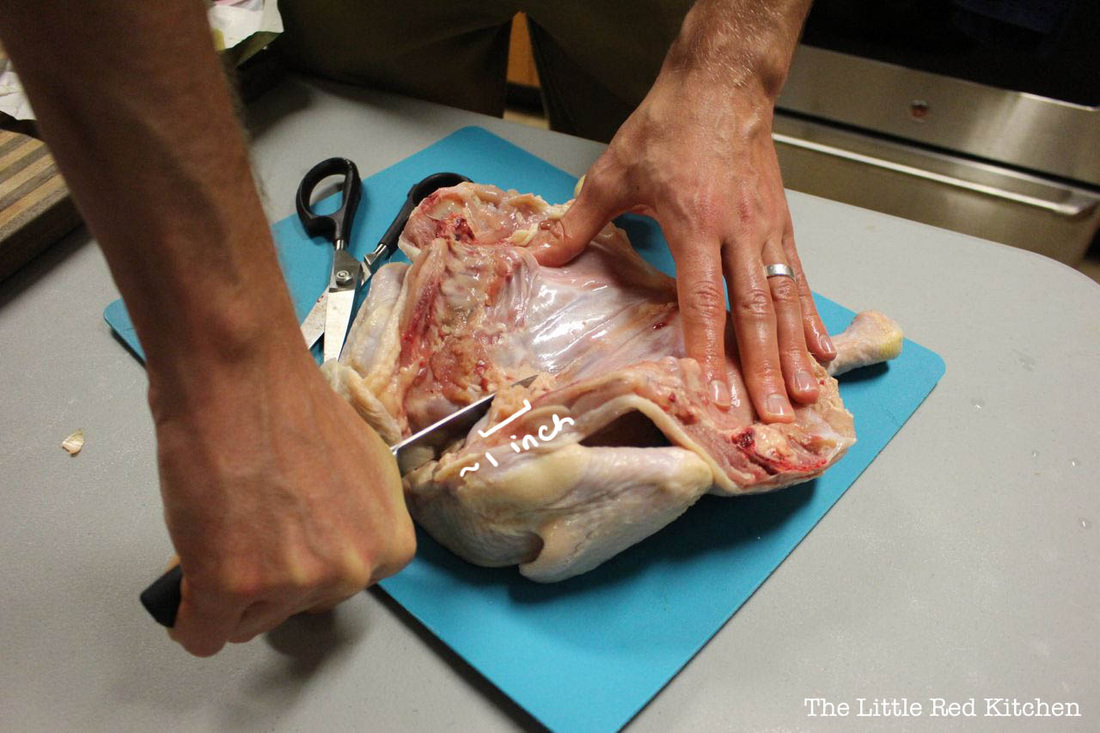
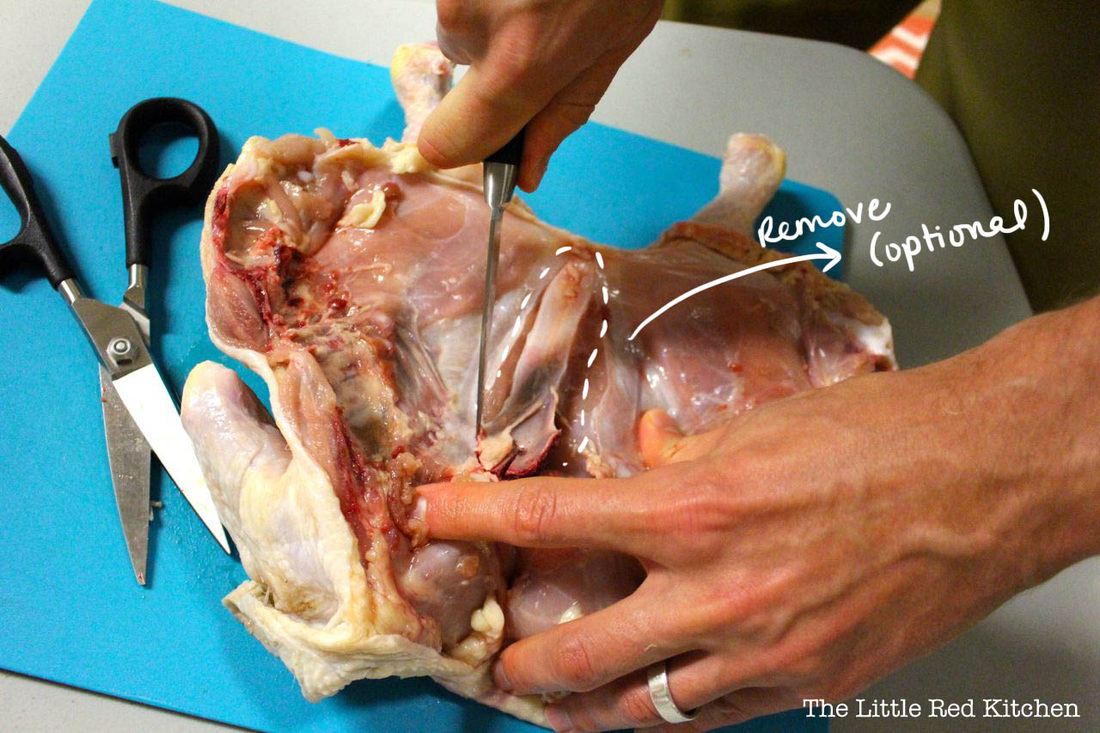
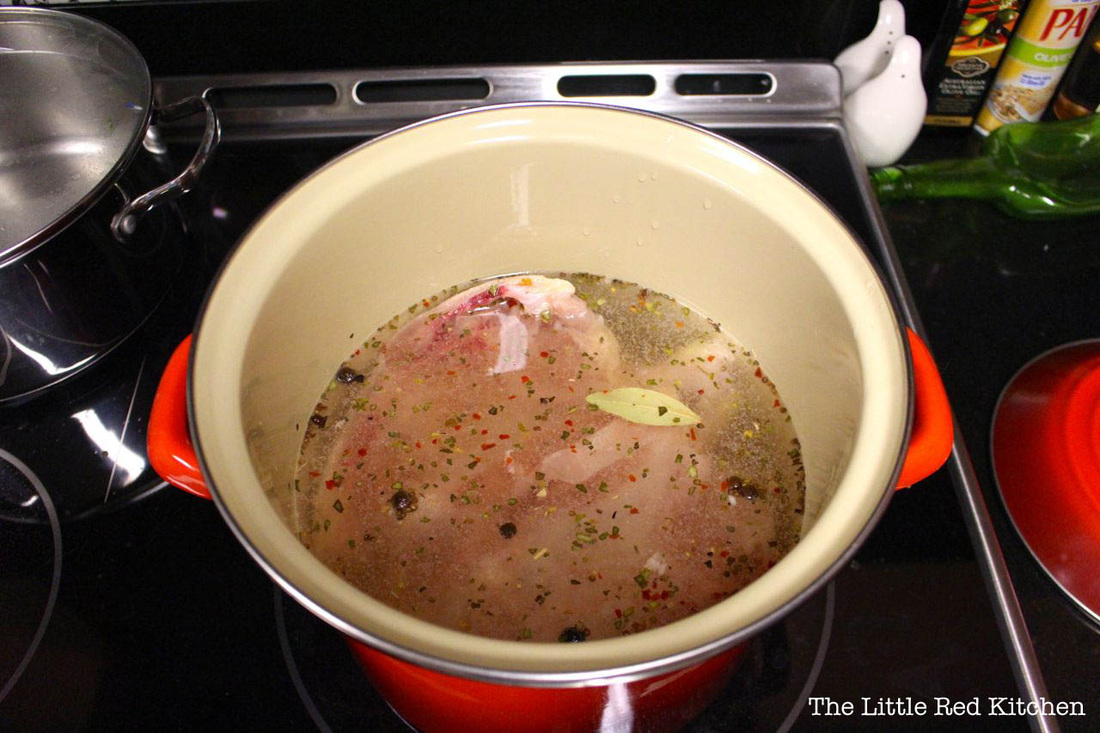
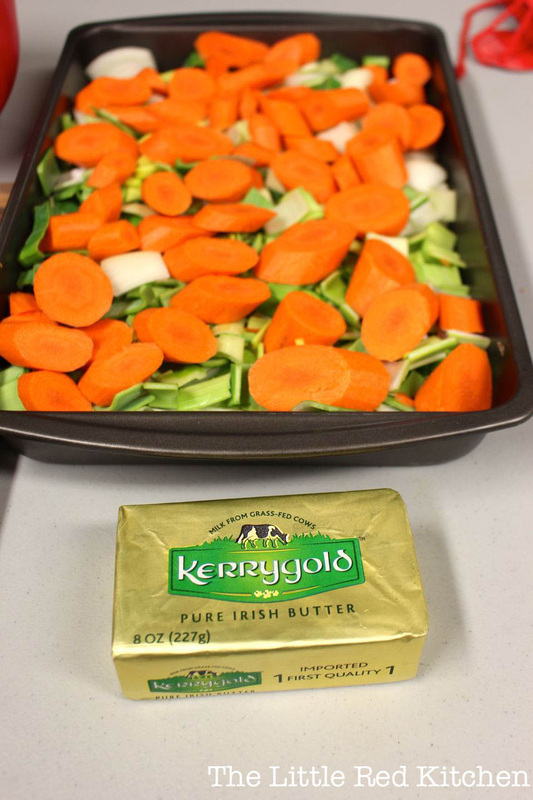
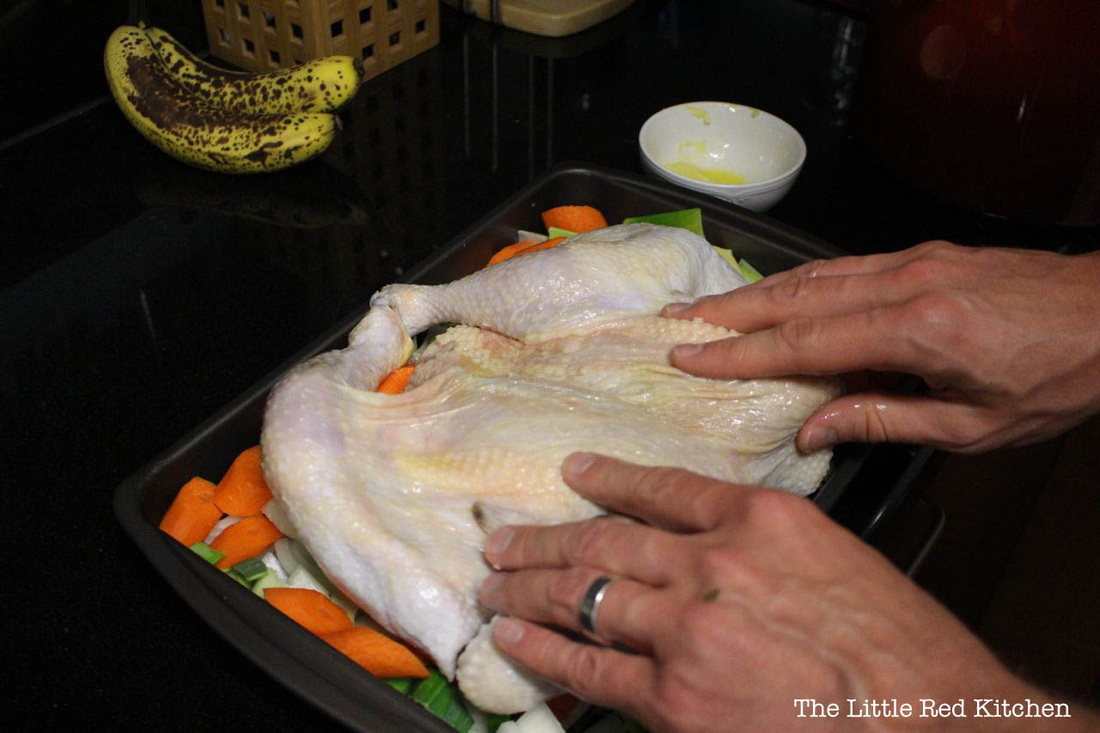
Then, repeat on the other side. Feel free to turn the chicken around to cut from the other direction, if that's easier for you (we almost always do). Once the backbone has been removed (great to save for stocks or soups, if you're into that kind of thing), the chicken should open partway, almost like a book. Step 3: Now, we want to cut the cartilage near the neck area, so the chicken will open up all of the way and lay flat. Part of what is keeping the shape of the bird is a structure called the keel bone (which, unsurprisingly, looks like the keel of a boat). Locate the keel bone, and take a sharp knife... ...which you will use to cut the top ~1 inch of cartilage, starting at the neck region. This will separate the breast meat and allow the chicken to lay flat. Step 4. Use your hands to open the chicken like a book. You may have to use a little force, as we're going to separate the cartilage in this step. Optional step: Using a sharp paring knife, carefully remove the keel bone. Some folks like to do this, and I definitely do (unless I'm feeling lazy)! This won't affect the cooking time or flavor of the chicken, but this is what you'd normally cut the breast meat off of. Without the keel bone, there are no bones keeping you from white meat bliss after this baby is done cooking! Step 5. Put your chicken in the brine at room temperature for 30-45 minutes. Step 6. While your bird is brining, preheat your oven to 425 degrees F. Then, prep and roughly chop your favorite root vegetables, and throw them into a baking pan (that will also fit your chicken). If you're feeling especially decadent, add some pats of butter to the top of the veggies (or toss with your favorite cooking oil). Kerrygold is arguably the best butter, ever. Step 7. Once the chicken has finished brining, remove it from the brine and rinse. (I know, I know... I just told you not to rinse. However, it's pretty terrible biting down on a fresh peppercorn or other pickling spice while you're trying to eat roasted chicken, so we need to do this to remove the brine 'debris'. Just be sure to clean your sink and surrounding area really well afterwards.)
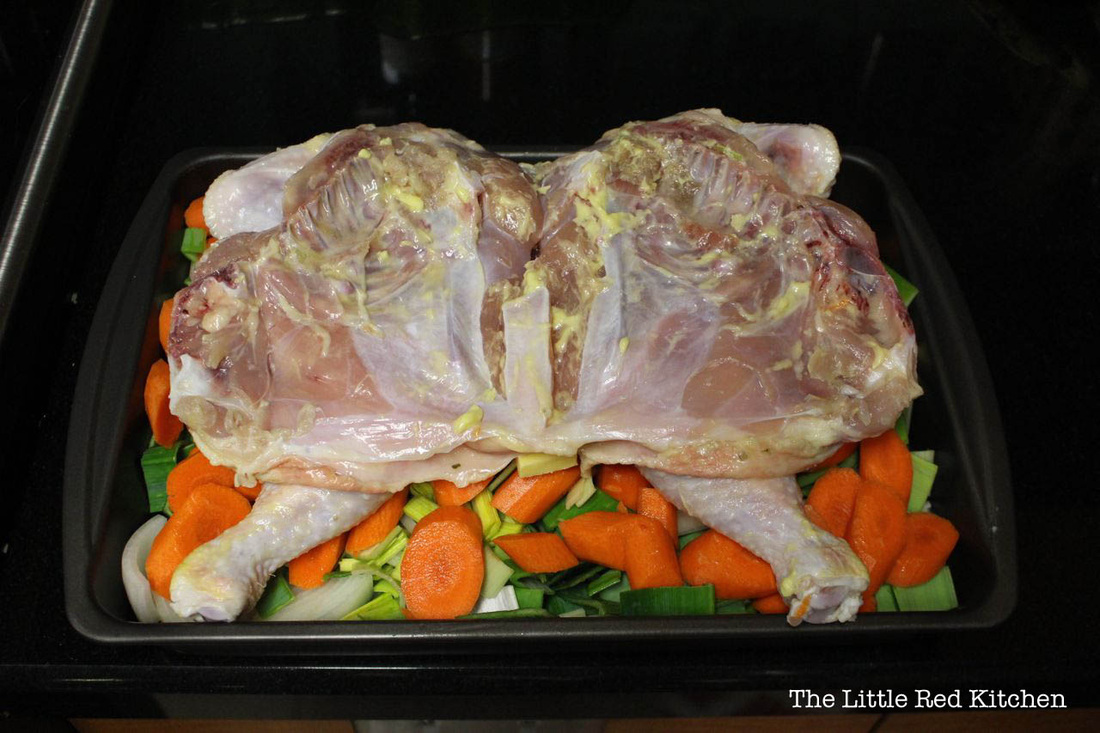
Pat the bird dry, and rub down with a generous coat of softened butter or your favorite cooking oil (both sides). Step 8. Place the chicken breast-side down on the tray of vegetables, and make sure it fits within the tray. Step 9. I like to roast butterflied chicken as follows:
45 minutes, breast side down
15 minutes, breast side up (It's helpful to use tongs for the flipping step.)
broil, 2-5 minutes, breast side up
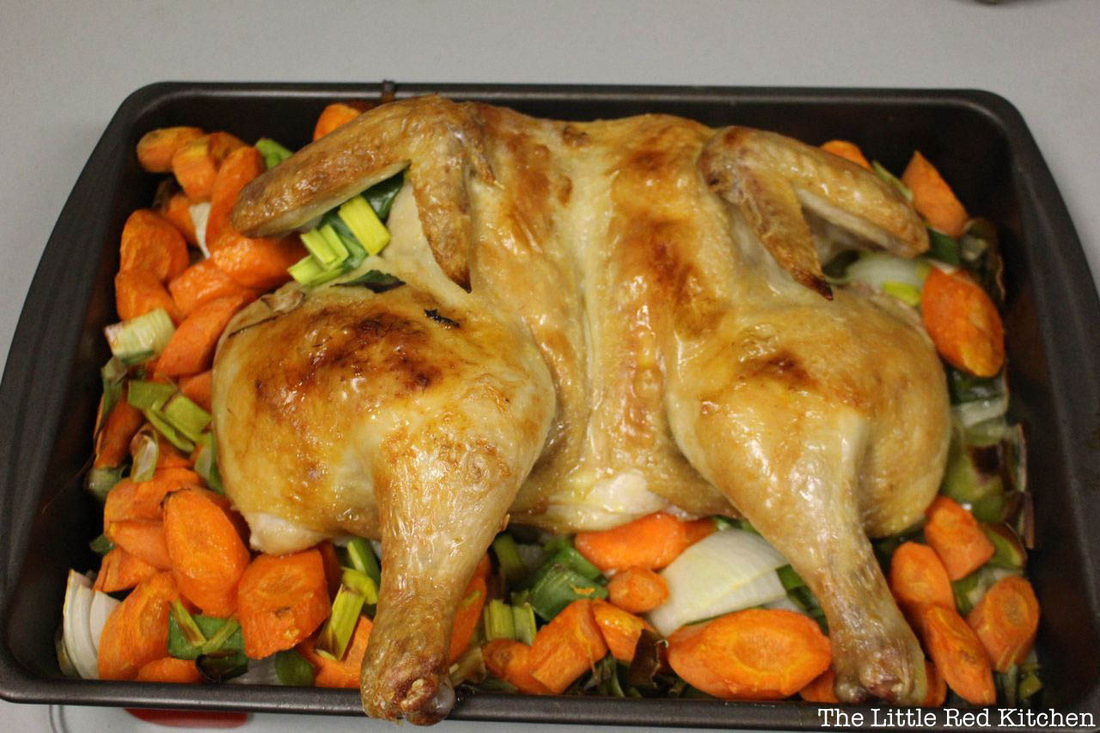
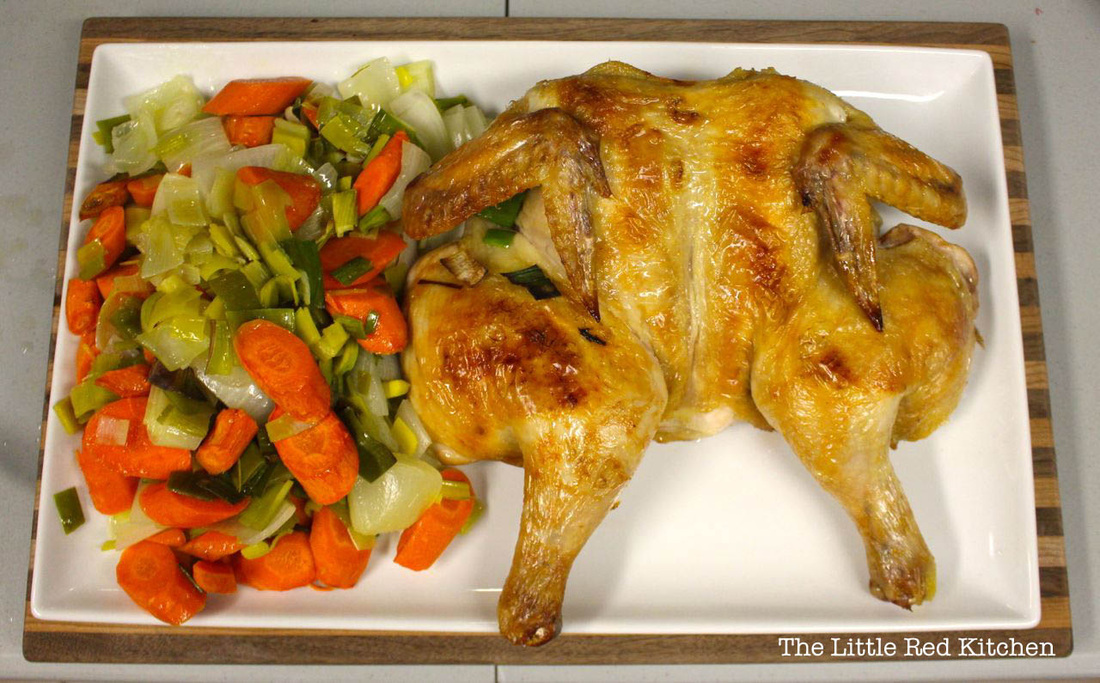
...What you end up with is tender, juicy chicken, with a crunchy, golden skin on top...
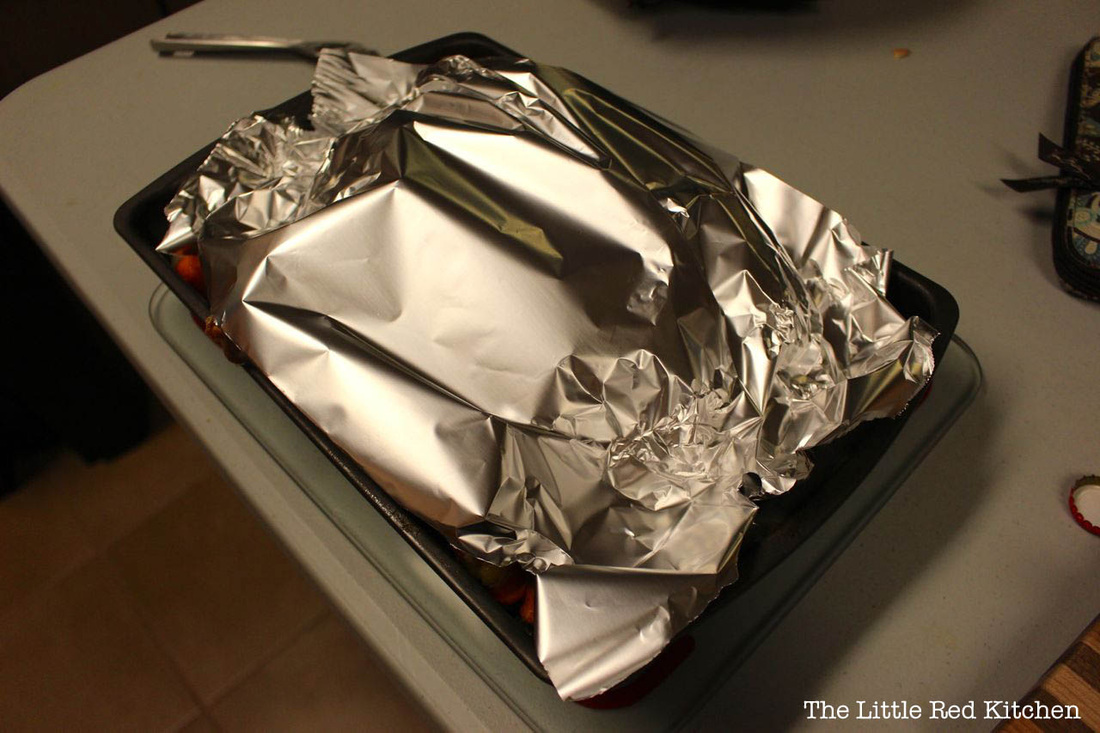
Like this! Step 10. Tent the chicken in tinfoil for 15-20 minutes. Step 11. Then serve up alongside the vegetables you just roasted under the chicken! Delicious. Here's what my dinner plate looked like: Enjoy, and thanks for reading!
- Kaitlin
I have a wonderful friend who is a vegetarian, and she lives in New York, where my husband and I try to make several trips a year to visit. For my birthday this summer she got me a book full of recipes from beloved NYC restaurants, and I wanted to cook up a vegetarian entrée from it and use it on the blog in her honor, but the pasta I liked the most had prosciutto in it. Now, I happen to love this tasty little cured ham, but I knew that would not fly for a veggie-only eater, so I figured I could just remove the meat and we'd be good to go...except that left literally just the pasta and the cheese sauce, which would make for a heavy, coma-inducing meal.
The prosciutto, besides being awesome, does the important job of cutting through all that dairy with a salty bite, so I knew it was a simple question of adding in ingredients that would do that same job, but instead of the pig, I'd turn to veggies instead for the task!
Ingredients:
1 lb. ziti or penne dried pasta
2 tbsp. extra virgin olive oil
1 tbsp. butter and 1 tsp. butter, separated
1/4 tsp. red pepper flakes
1 medium shallot, minced
2 medium cloves of garlic, minced
8 oz. baby portabella mushrooms, sliced 1/4 inch thick (you can buy them pre-sliced)
2-3 tbsp. capers, drained and rinsed
1 cup half and half
1 28-oz. can petit diced tomatoes, drained of their juices
1/4 tsp. black pepper
salt
9 oz grated parmesan cheese, or 3 cups
*This dish will serve 6 people.
Step 1:
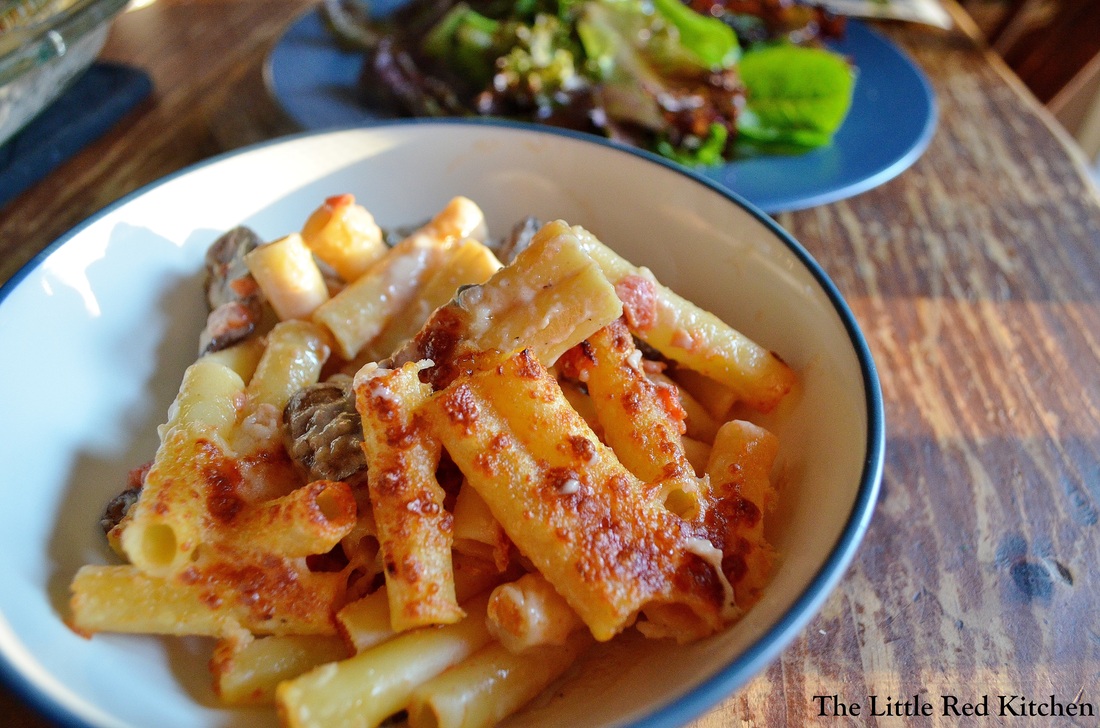
Fill a large stockpot with water, bring to a boil, throw in a hefty amount of salt, and cook the pasta, until it is about 1 minute underdone. At this point, drain the pasta then add it back to the pot along with the tomatoes, and stir to combine. Keep warm, allowing the pasta to soak up any excess tomato juices.
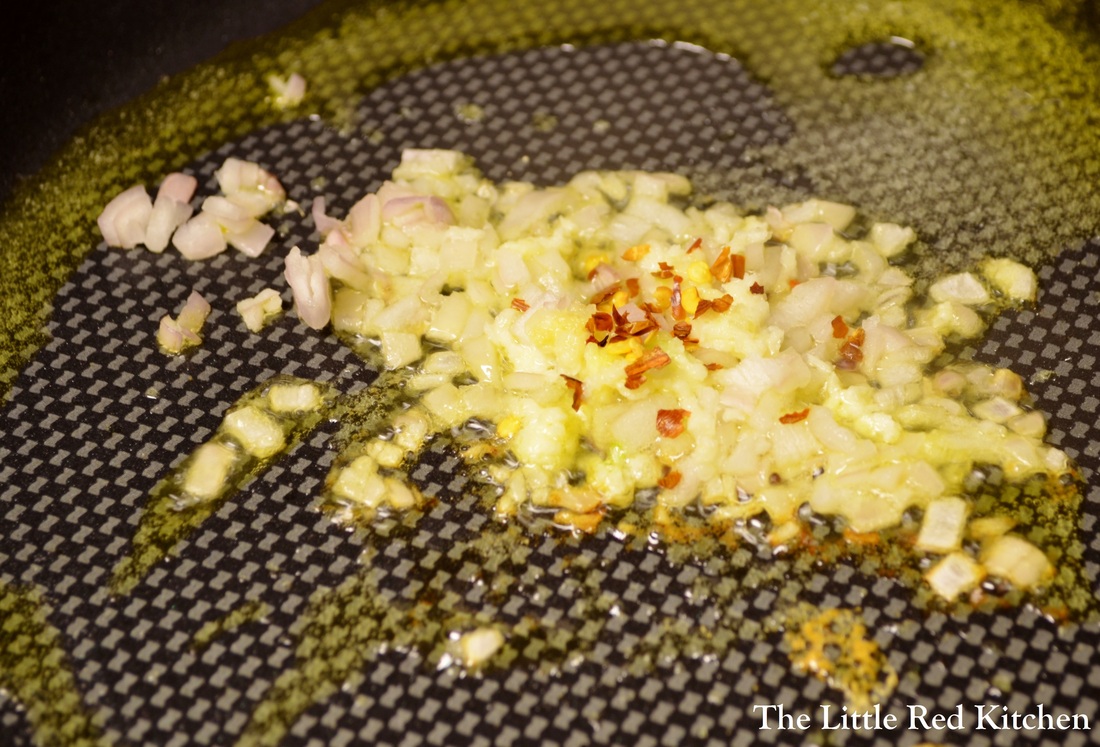
Meanwhile, while the pasta is cooking, heat the extra virgin olive oil and tsp. of butter over medium heat in a 12-inch nonstick sauté pan. (The cheese sauce will be formed in this pan later. If you don't want a scorched mess on your hands, it has to be nonstick!) Add the shallot, garlic, red pepper flakes, and a pinch of salt and sauté for about 1 minute.
Step 2:
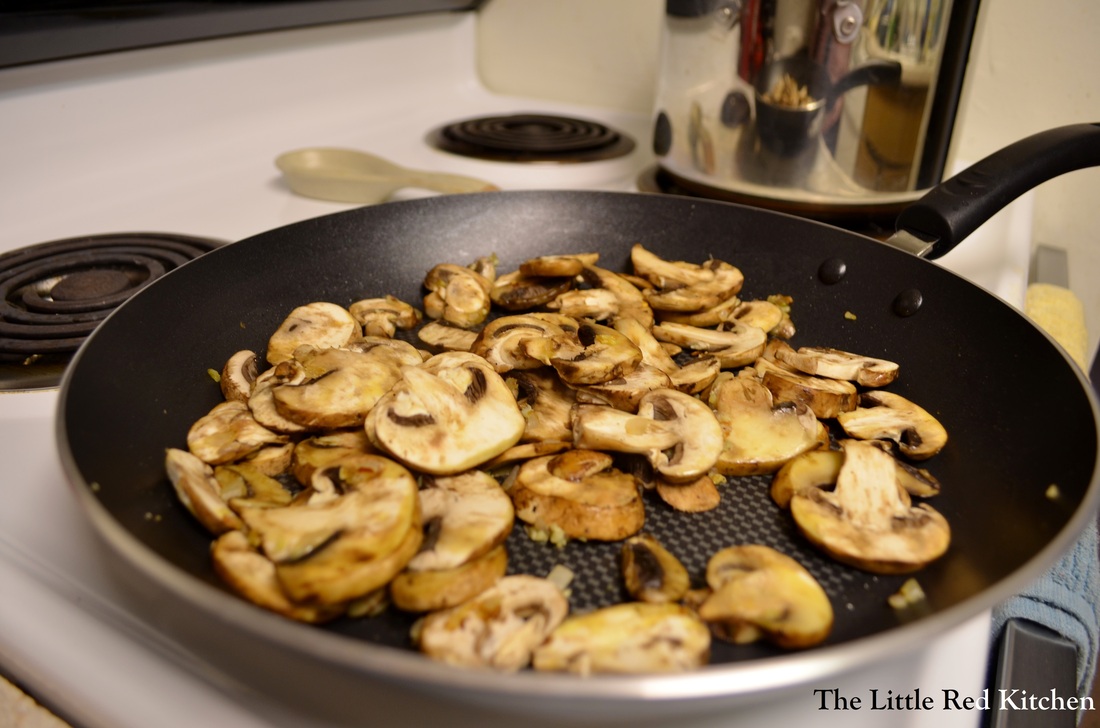
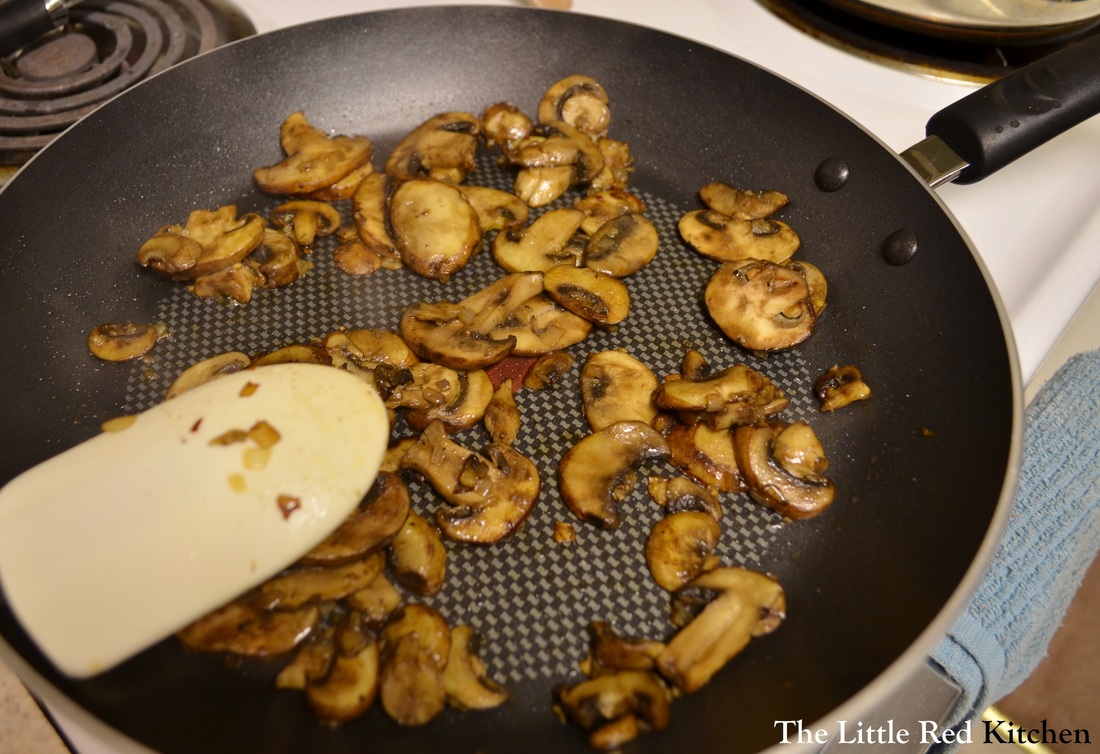
Add the mushrooms, another pinch of salt, and cook for 6-8 minutes, until the mushrooms have browned and released their liquid. They should go from looking like this: To looking like this! Step 3:
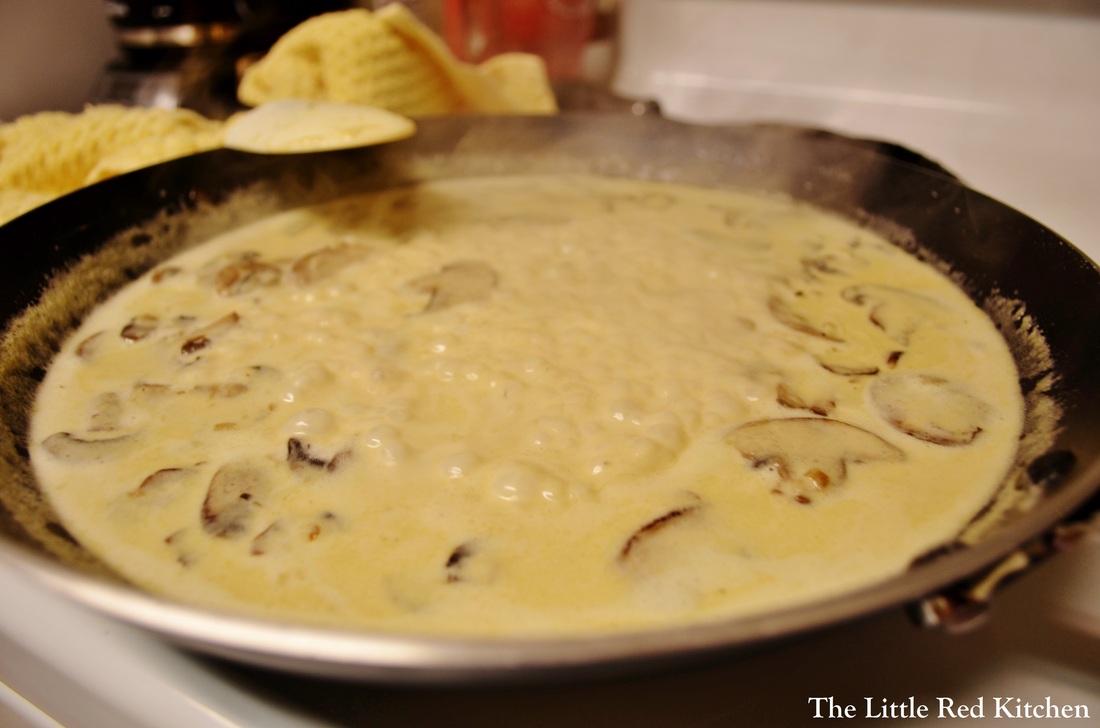
Add the capers and cook for about 30 seconds. Then add the tbsp. of butter, the half and half, and 2 cups of the parmesan cheese, along with the black pepper. Turn the heat to medium-high and simmer for 2 minutes until all the cheese has incorporated into the sauce and it has thickened ever so slightly. It is also somewhere around this step that you want to pre-heat your broiler. Step 4:
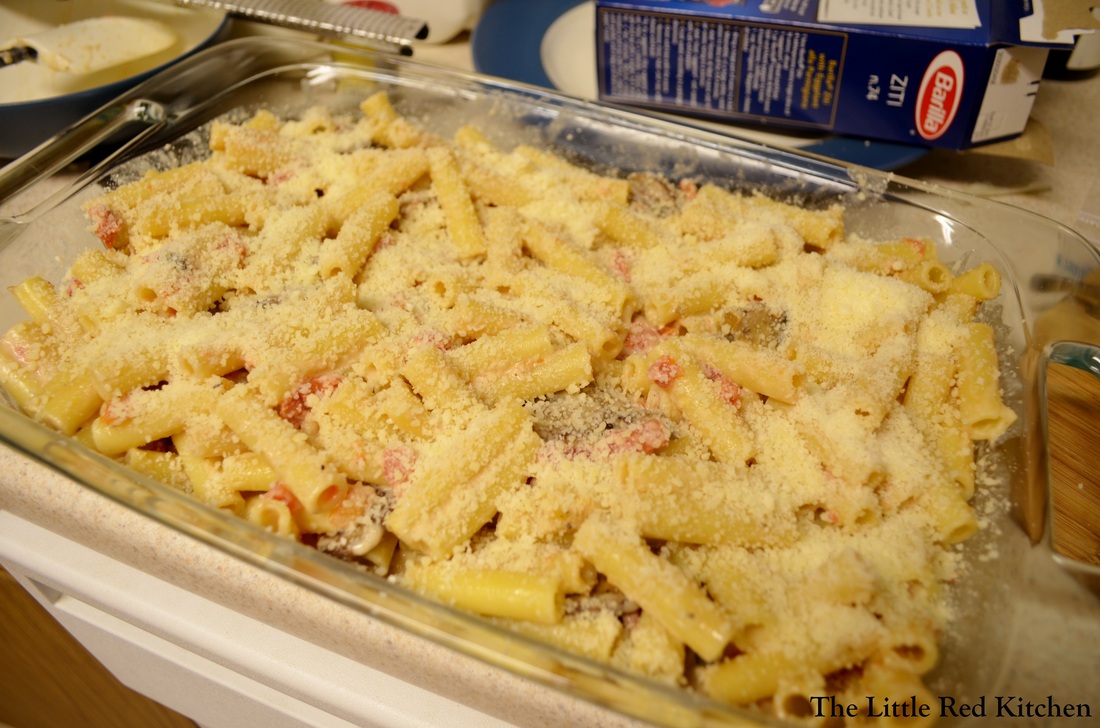
Add the pasta and tomatoes to the skillet and toss (carefully) to combine. Transfer to a 9x13 baking dish and sprinkle with the remaining cup of parmesan cheese. Step 5:
Place under the broiler for 4-5 minutes until the top is nice and brown. Serve immediately!
*Note, while I have never had a problem using a glass pyrex dish under the broiler for a couple minutes, I cannot advocate this action, as pyrex is technically not broiler-safe. Like I said, I've never had a problem, but there are documented cases of pyrex literally breaking, cracking, or exploding, because of exposure to intense broiler heat. Don't be a daredevil, and use a broiler-safe casserole dish if you have one! If you noted the use of capers, red pepper flakes, tomatoes, and mushrooms, and nodded your head knowingly, then you are a genius! These ingredients, whether for their saltiness, spiciness, acidity, or "meatiness", cut through the sauce and keep it from being too heavy. This is a very strong parmesan sauce, almost like an Italian mac and cheese. Serve it up with a glass of wine and a simple salad, and even somebody like me will never miss the prosciutto!
~Lauren
Ah the chicken breast. One of the greatest gifts to weeknight dinners, and also one of the worst. There are literally thousands of chicken breast recipes in existence, but a lot of them are really bland or boring. Yet since this staple is healthy, easy to prepare, and usually relatively inexpensive, I'm always trying to think of ways to keep it interesting in the kitchen.
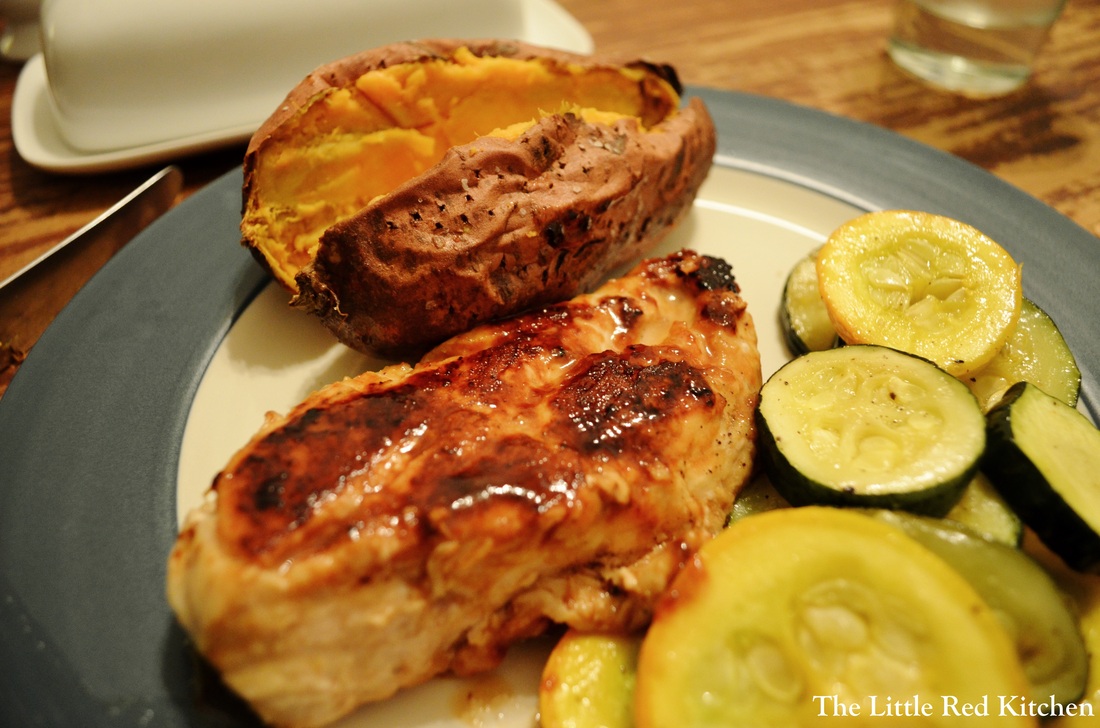
Those ways usually involve flour dredges and wine reductions and pan sauces, but sometimes that is too much work and too much of a mess, especially when it's Wednesday night at 6:30 and we haven't eaten yet. Luckily, I stumbled into this great and easy recipe for Maple Dijon Chicken that takes about 20 minutes from start to finish to prepare, not to mention the fact of how yummy it is. And paired with a DELICIOUS, no frills, perfectly baked sweet potato (**Which does take 50 minutes to bake, hence the asterisk in the title of this post), this is an awesome quick and easy Autumn Supper!
Ingredients:
Chicken:
4 boneless skinless chicken breasts, trimmed of excess fat
1/4 cup maple syrup
1/4 cup Dijon mustard
2 tbsp. olive oil
salt
pepper
Sweet potatoes:
4 medium sweet potatoes
olive oil
1 tsp. salt
(Our readers are smart, so we know you deduced from the ingredients list that this meal serves 4 people.)
Step 1:
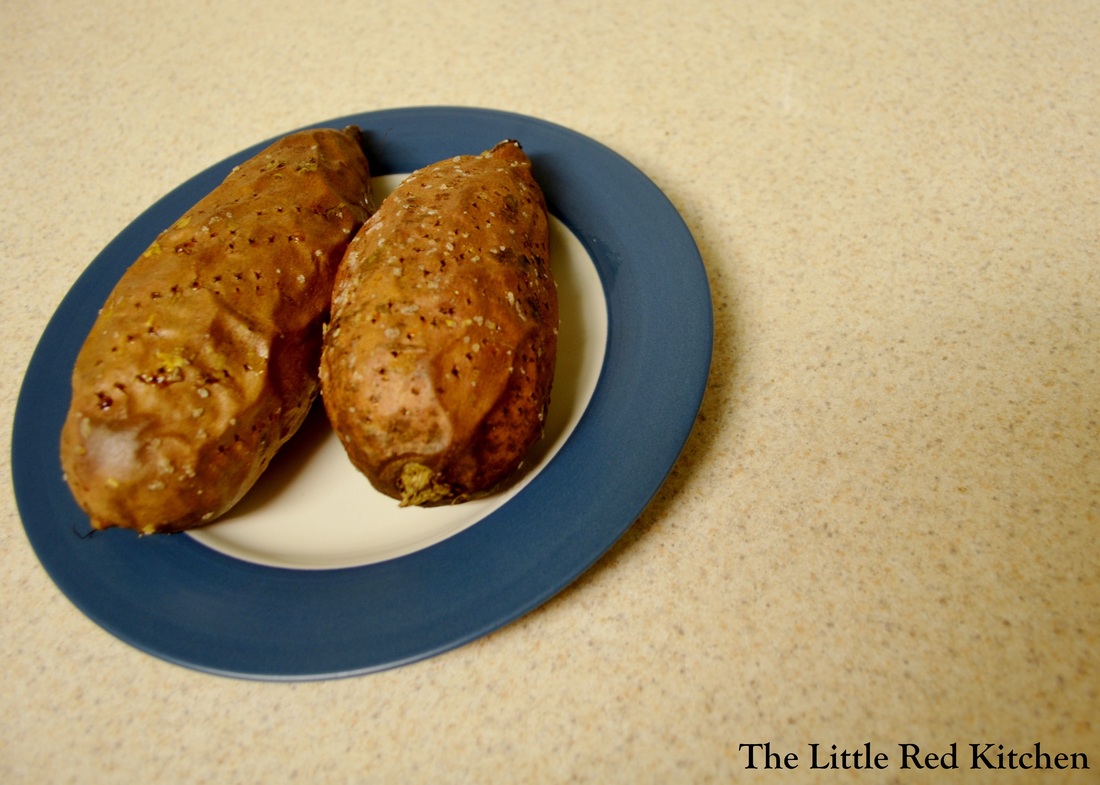
Preheat your oven to 400 degrees. Scrub the sweet potatoes to remove surface dirt and prick all over with a fork. Throw into a large bowl with a couple tablespoons of olive oil and toss to coat, then sprinkle with the salt. Place on an oven rack in the middle of the oven and bake for 50 minutes.
The science: Coating the potato with olive oil helps to regulate the temperature inside while it is cooking, and keeps it from drying out. The salt on the skin is mostly for if you are eating the skin (which you should, it's really good for you!) The olive oil might drip and cause smoke in the oven, so I put an 8x8 pan on the bottom rack with a little water in it to catch drippings. Step 2:
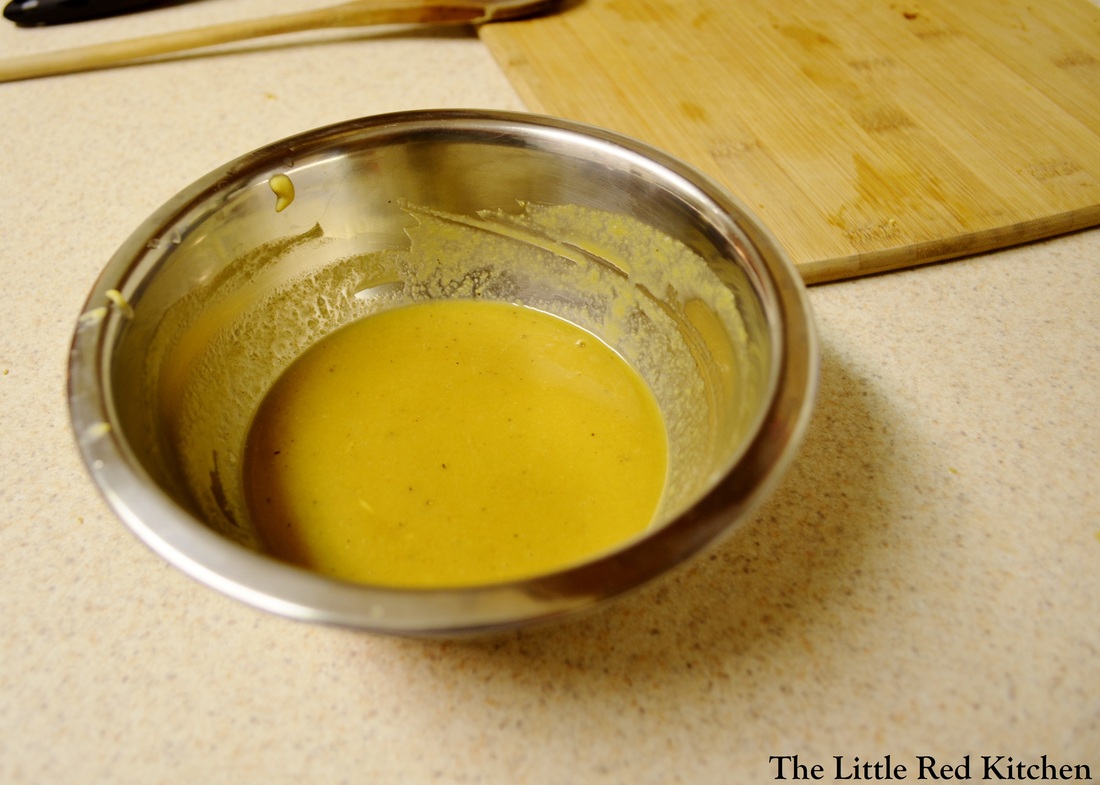
About 20 minutes before the sweet potatoes' cooking time is up, prep the sauce for the chicken by mixing the Dijon mustard, maple syrup, 1/2 tsp. salt and 1/4 tsp. pepper in a small bowl. Set aside. Step 3:
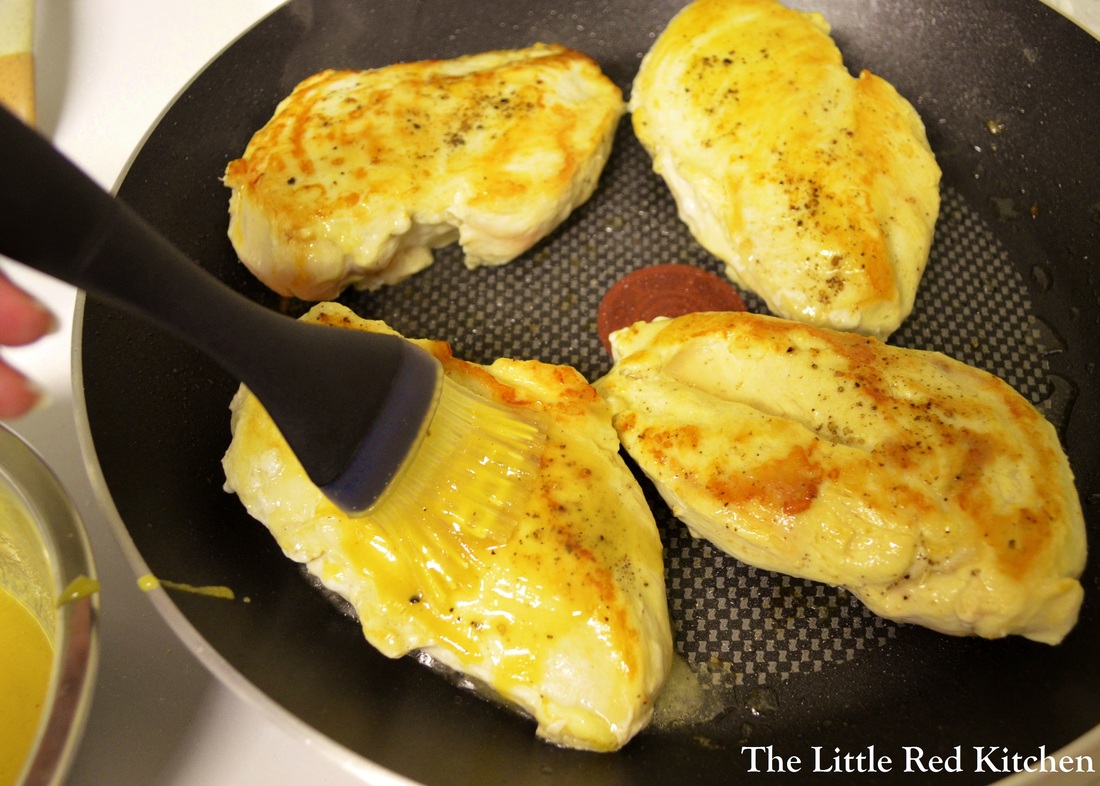
Blot the chicken breasts with paper towels to remove excess moisture and sprinkle on both sides with salt and pepper. Heat the olive oil in a 12-inch nonstick skillet over medium high heat and place the chicken breasts in the pan. Saute for about 6 minutes on one side, then flip. At this point, you can start brushing the sauce onto the cooked side of the breasts. Note, if you don't have a nonstick skillet, that's fine, but SKIP this 'basting' step. The sugars in the maple syrup will burn, burn, burn, and you may not burn down your kitchen but with all the smoke, your family/roommates will think you are trying to. Step 4: After another 6 minutes on the other side, just continue to flip and baste the chicken breasts until they are done, and by done I mean, register 160 degrees. (I use this thermometer. At only 15 bucks, it takes the guess work out of knowing if your food is cooked, and can save you from tough, dry meat!)
Step 5:
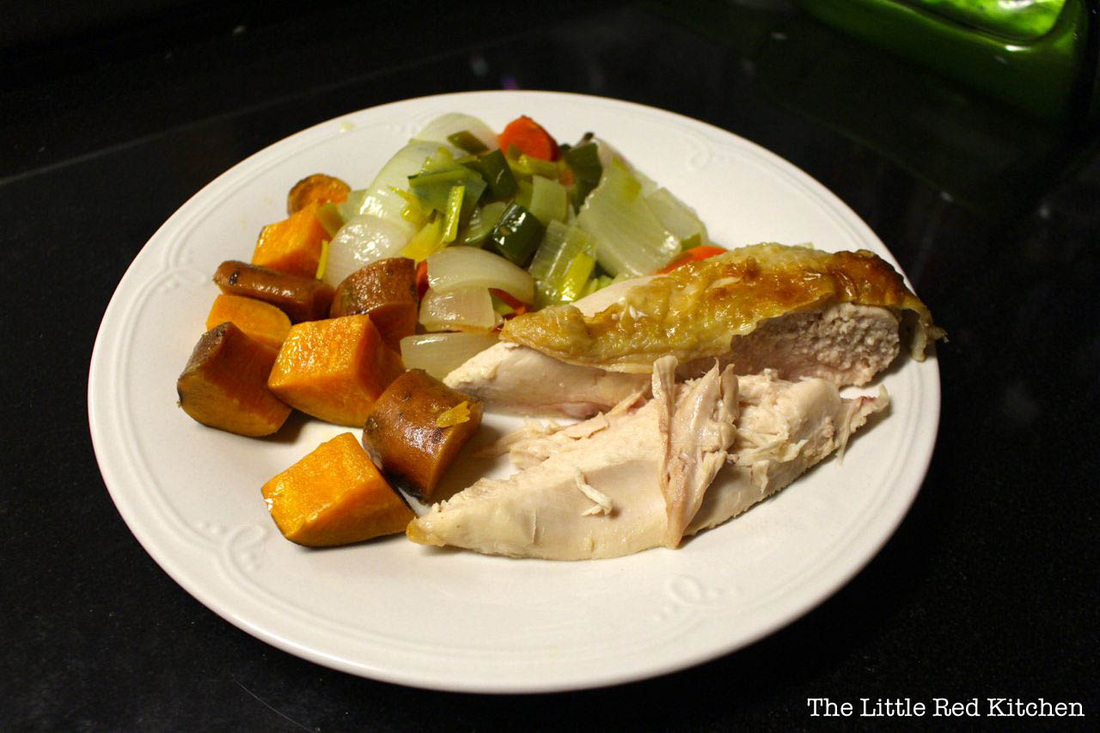
Transfer the chicken to a plate, pour the rest of the sauce on it and cover with aluminum foil and let rest for 5 minutes before serving. It's around this time that you can probably pull the sweet potatoes out of the oven and let them cool off a bit too! I don't know about you but I get cranky when I'm served sweet potatoes that are 'candied' or covered in marshmallows. If you let this potato stand on its own, you will be amazed. Baking and serving with a little olive oil, salt, and pepper is absolutely my favorite technique. The flavor and texture of a sweet potato cooked this way is transcendental! And it pairs wonderfully with the maple Dijon chicken.
P.S. Much like eating the skin, it is a good idea to serve the sweet potato with a little olive oil. The presence of a healthy fat actually helps to distribute some of those nutrients to your body!
Enjoy!
~Lauren
We were so excited to hit 100+ Facebook followers this week! And we figured, celebrating with some new cocktail recipes would be very appropriate.
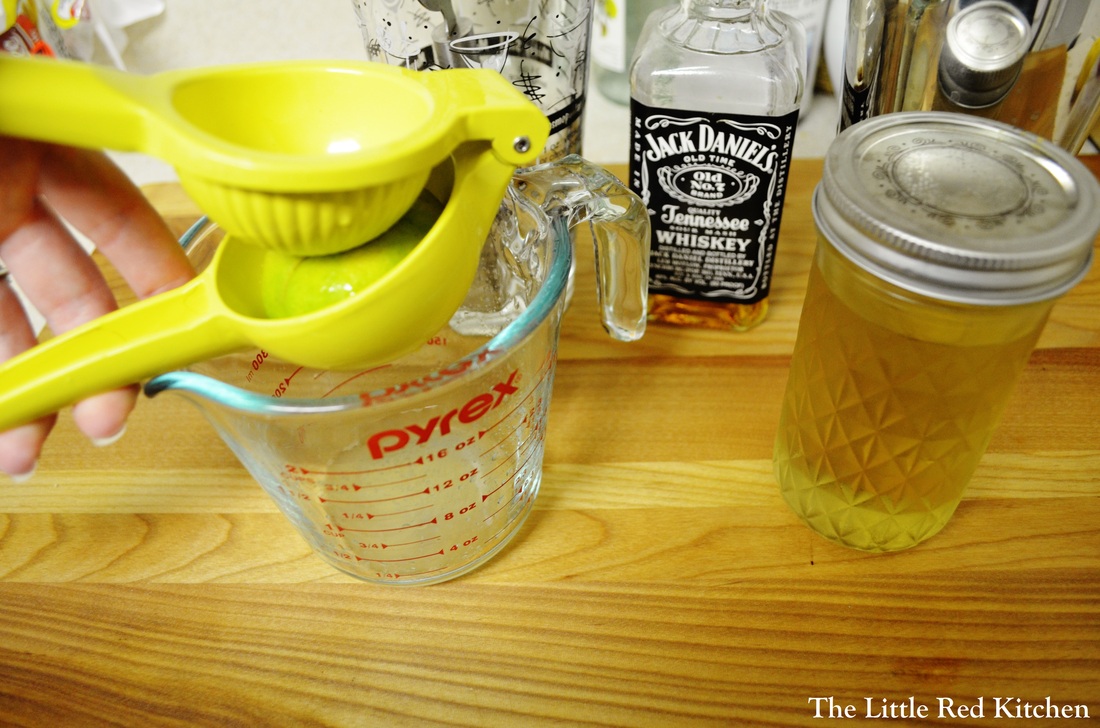
First up, the classic Whiskey Sour.  Whiskey sours should be pretty basic; we're talking whiskey, something sour, obviously, and a dash of something sweet to balance it all out. But when you order one in restaurants, don't be surprised if what you get is artificially sweetened, artificially soured, and royally bad. I've had a whiskey sour that was served in a 16 oz. plastic cup and was little more than a weird whiskey and sprite concoction. BAD. But with a few simple ingredients, you can make them at home, GOOD!
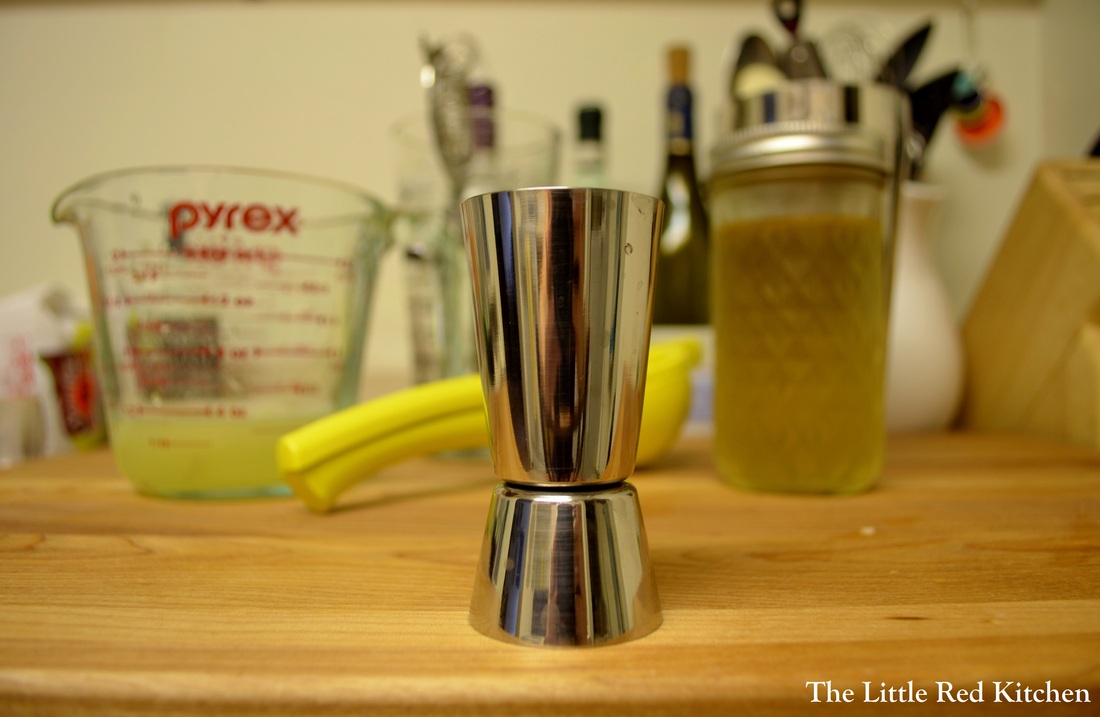
Ingredients: 3 ounces whiskey--I use Jack Daniels. For me, for a whiskey sour, there is no other whiskey. 1/4 cup freshly squeezed lemon juice (about 1 lemon) 1/4 cup freshly squeezed lime juice (about 2 limes) 2.5 ounces simple syrup (to see how to make it, check out another LRK cocktail post!) **I have used all lemon juice before--not as much depth of citrus flavor but still yummy. This recipe yields two drinks. Steps:
Fill a cocktail shaker with ice. Add the lemon juice, lime juice, whiskey, and simple syrup to the shaker and shake for at
least 30 seconds, until extremely cold. Strain into glasses and serve with ice, if desired. This drink packs a wallop! It's sharp and tart and has that unbeatably smooth whiskey taste. A hint of sweetness, and it's no wonder this is my favorite drink. I hope it becomes yours too!
~Lauren New take on the gin-and-tonic: Hendrick's and cucumber Ingredients (makes one 8oz drink) 1 oz Hendrick's gin 7 oz tonic water 3-4 slices of cucumber Ice First off, let me say that I realize this isn't the most inventive drink. Sometimes you want to just throw a couple of things in a glass and call it a day (or night, whichever)! The addition of cucumber is actually recommended by the producer of my husband's and my favorite gin: Hendrick's. Immediately, I know a bunch of you are saying, "...but I don't LIKE gin and tonics!" My response to that is, yes, you (probably) do... you just probably haven't had them with this gin. Am I paid in any way to say this? Nope! Does Hendrick's even know I'm doing a post with their product? Nope! But I can honestly tell you that I never liked gin and tonics before I tried it. It does not, as you may be thinking, "taste like pine trees". In fact, the predominant flavor on the finish is rose. It also includes juniper (of course, it's gin after all), coriander, cucumber, and citrus. If that's not enough to convince you, this liquor has been the recipient of many awards over the years. Admittedly, this isn't the cheapest bottle around, and at $35 on average for 750mL, it's definitely a special-occasion splurge. (My husband, Jay, usually gets a bottle for his birthday every year-- that's it!) To make this drink, simply put everything into a tumblr and stir. Garnish with a cucumber slice. This is a nice, refreshing take on an old favorite, and will be good to enjoy as we wrap up the last warm days of the year. Thanks for reading, and Happy Friday! - Kaitlin
 As big breakfast people, my parents make these all the time. They take about 20 minutes, tops, and are good for almost a week's worth of breakfast (depending on how hungry you are in the morning). I'm a huge proponent of eating breakfast (with a giant mug of black coffee, yum) right after you wake up-- let's get that metabolism going! I also wake up hungry, so the easier, the better!
Having not had the chance to make these with my parents, I'm not sure where they got the original recipe, but they just kind of throw in whatever they have in the fridge at the time.
To get a basic idea of the recipe "groundwork", I took a look at this recipe, but used what I had handy!
Ingredients (please use whatever you'd like, the only important part is the eggs!)
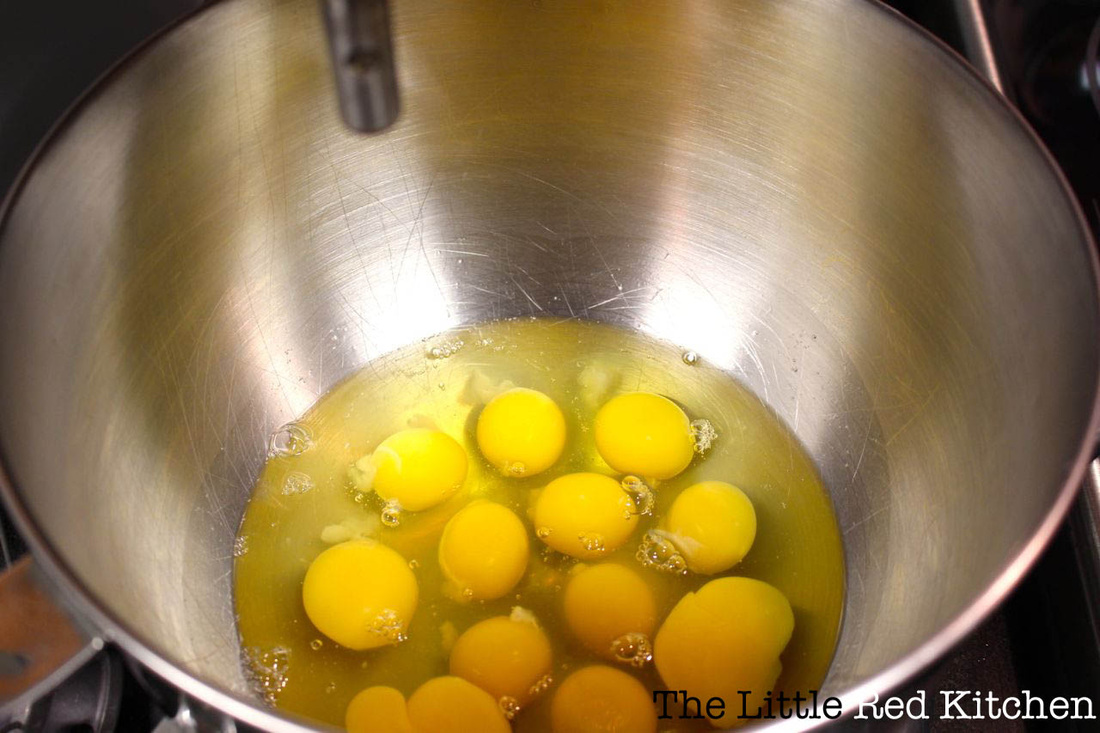
12 large eggs
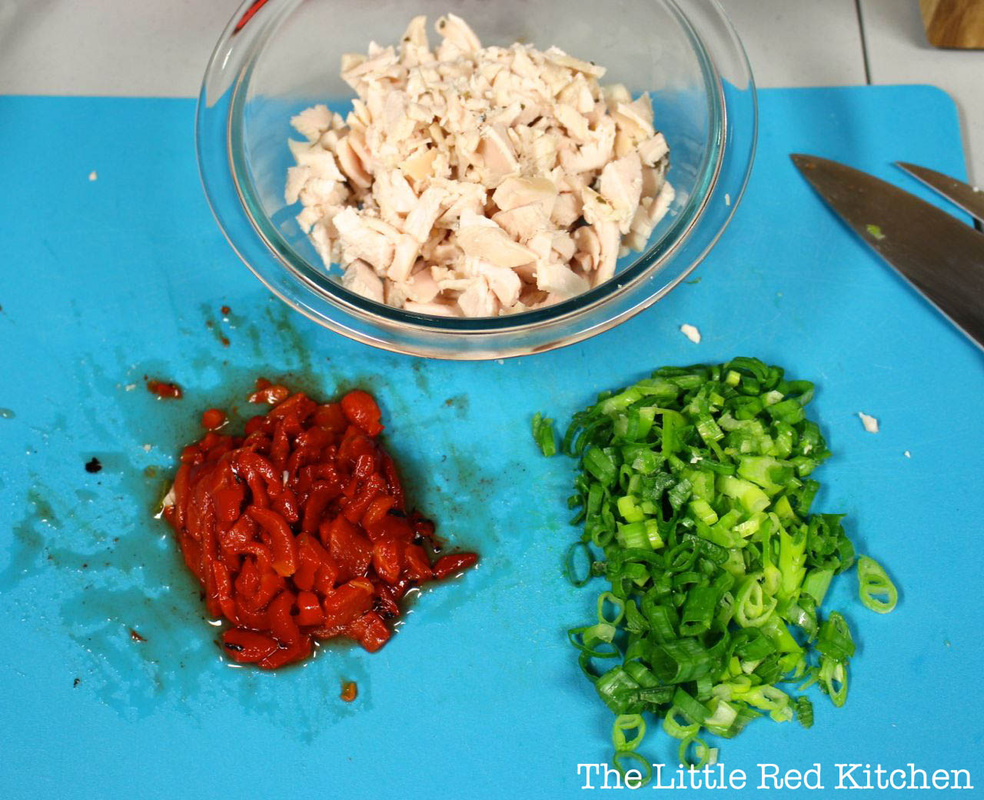
1/4 cup roasted red bell peppers, diced
2 green onions (green parts only), finely chopped
1/2 cup shredded chicken, finely chopped
2-3tbsp goat cheese
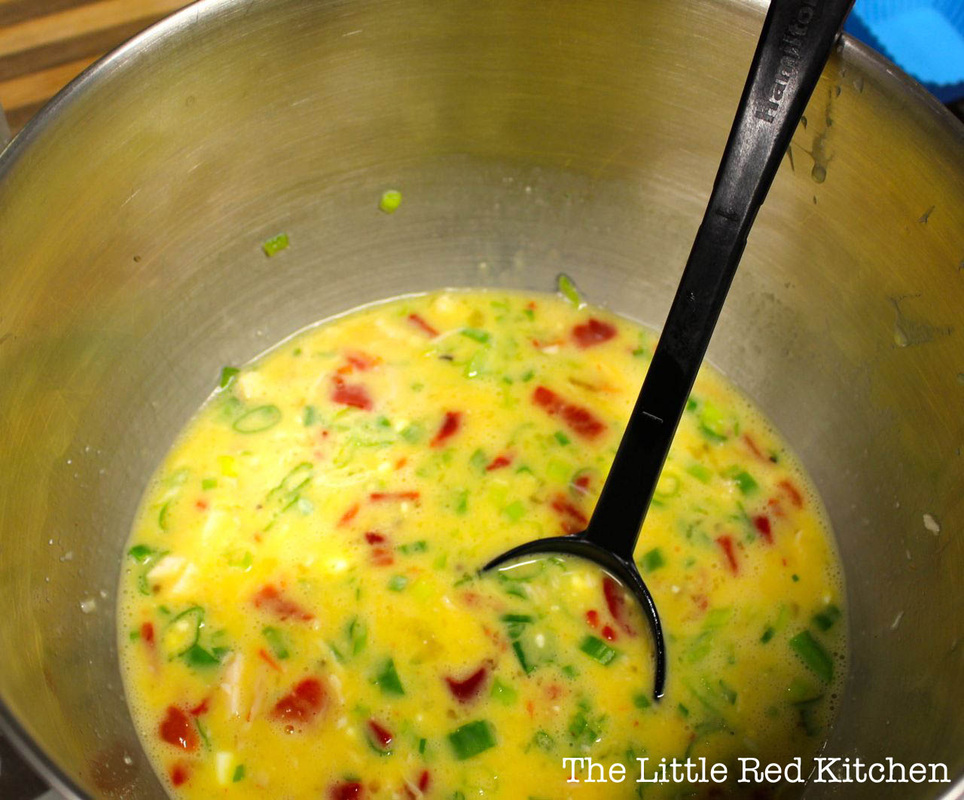
Step 1. Preheat your oven to 375F, and crack your eggs into a large bowl. Whisk until well beaten (but not frothy). I used my stand mixer because I'm lazy. Step 2. Prep your ingredients-- you want enough for even distribution throughout the egg mixture, but not so much that the cups will fall apart.
Step 3. Stir in your ingredients. Step 4. Oil a muffin tin (or mini muffin tin, whatever floats your boat), or prep some silicone baking cups (by prep, I mean set out in rows on a cookie sheet). I love these darn things-- they let you bake up small portions without the need for oil or grease-and-flour, and when you're done, they flex to let you pop your creations out easily. You can get the silicone baking set I use here, or individual cups here. (Amazon should really be paying me, given how much I purchase/ link to their products...) Then, you can fill them most of the way, since they shouldn't fluff up too much during baking. Step 5. Bake at 375F for 10-15 minutes, depending on your oven and the size of your baking pan, until the cups are cooked through (if they don't jiggle in the middle, you should be good to go.) Looking good! I always like to cut them in half just to make sure!
They're great with a little ketchup and reheat very well (30-40 seconds in the microwave should do it).
Now, go enjoy this delicious way to get your protein in the morning. Thanks for reading!
- Kaitlin
You know what they say about invention being the product of necessity? Well, I had a pound of ground beef, and some sorry-looking vegetables that were on their way out the door. Something told me that a meatloaf was in order!
Meatloaf can be wonderful, homey, comfort food that you just dig into and feel satisfied beyond words after eating.
Or, it can be dry, bland (or overly seasoned), chewy, tough, and about a dozen other unappealing adjectives. I tried to solve all of these issues with my recipe and I think I did a pretty good job! You will have to make it to see for yourself.
Ingredients:
Meatloaf:
1 lb ground beef (80/20 is preferable, but definitely no leaner than 85/15)
1 large carrot, diced fine
1 large rib of celery, diced fine
1 medium onion, diced, you guessed it, fine (Yellow or red is fine)
1 clove of garlic, minced
1 tsp dried thyme
1 piece of white sandwich bread, crusts removed
1/4 cup milk
1 large egg
1 tbsp. Worcestershire sauce
1 tsp Dijon mustard
1 tsp tomato paste
1/2 cup panko breadcrumbs
1 tsp oil
1 tsp butter
salt and papper
Glaze:
1/4 cup plus 2 tbsp. ketchup
1.5 tbsp. cider vinegar
1/4 tsp salt
1 tbsp. brown sugar
pinch of cayenne pepper
**I know these ingredient lists look long, but if you actually take a look at what's on them, it's almost all things that you have on hand already.
Because I know the importance and value of leftover meatloaf, I will tell you that this recipe makes enough for 2 with leftovers, or enough for 3 or 4 without. It's a little guy; hence, the little red meatloaf! I'd wager that you could easily double this recipe, but you may have to adjust your cooking times.
Step 1:
Pre-heat the oven to 350 degrees. Line a rimmed baking sheet with parchment paper.
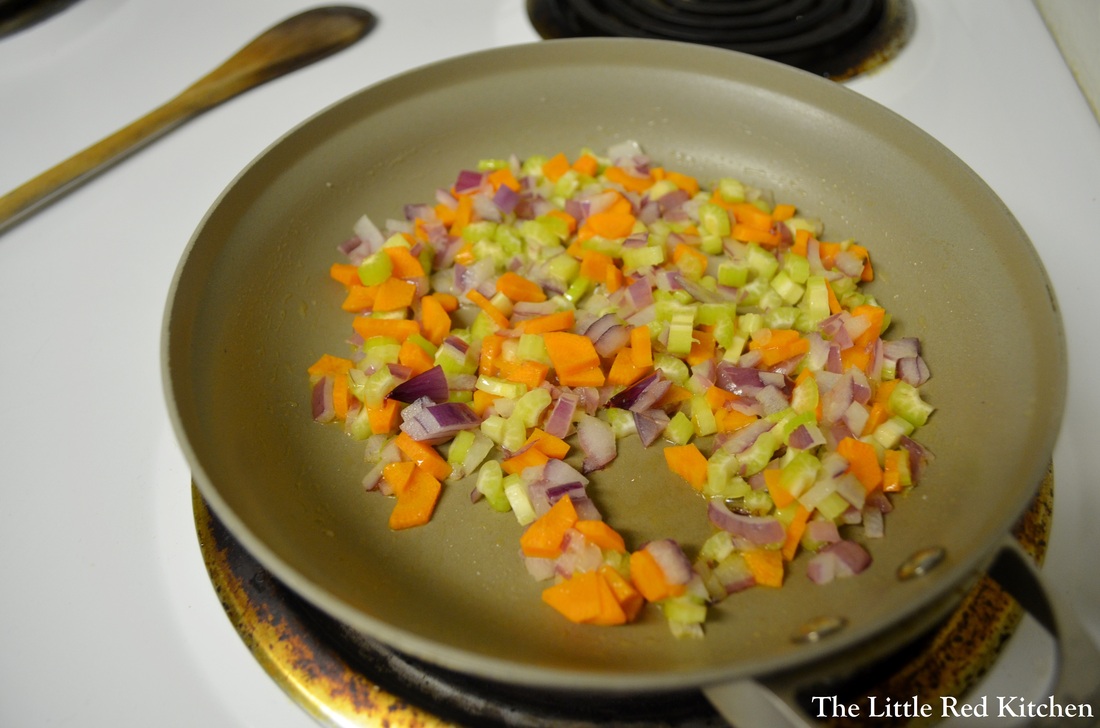
Melt the butter and oil together over medium-low heat, then sauté the carrot, onion, and celery with a tsp of salt for 6-7 seven minutes, until they are softened and translucent. We're not looking to brown here.
Then add the garlic and thyme and cook for 30 seconds, until fragrant. Remove from the heat and set aside. Step 2:
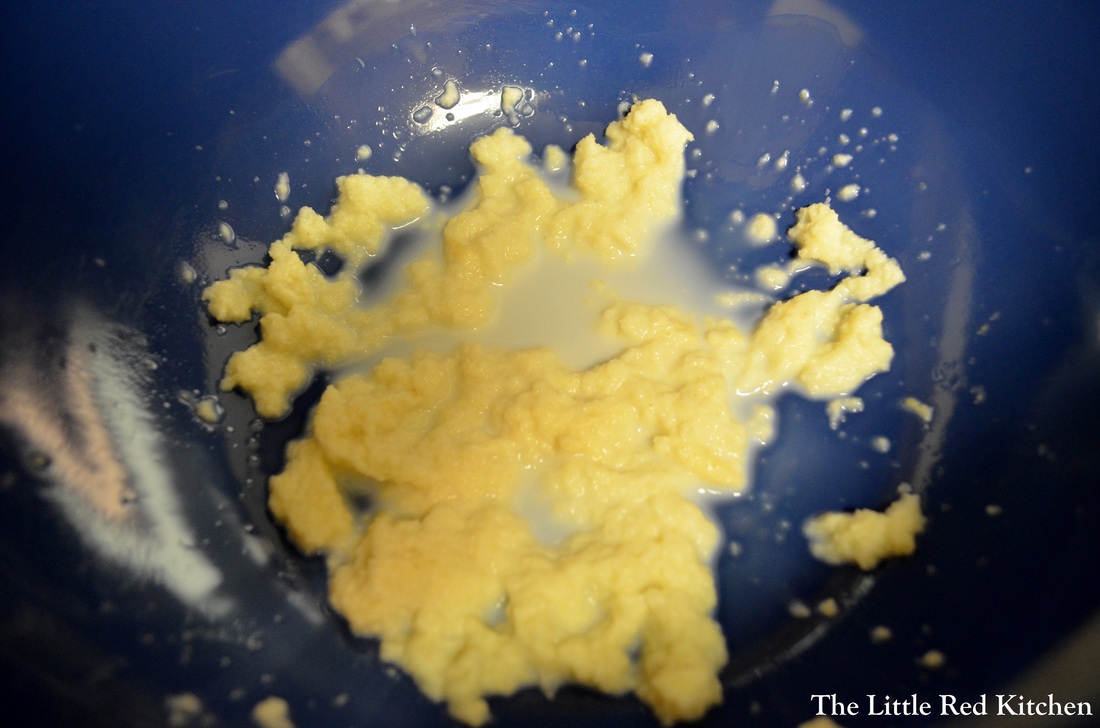
Put the piece of bread in a large bowl and pour the milk over it. Mash this up with a spoon or fork. Looks gross and unnecessary, doesn't it? Well, this mixture is called a panade, and as that milk-soaked bread distributes throughout the meatloaf, it's going to ensure that it stays moist. It's just as effective in meatballs too!
To this bowl, add the egg, Worcestershire, tomato paste, Dijon mustard, 1/2 tsp salt and 1/2 tsp pepper. Stir to combine.
Step 3:
Add the vegetables from the pan to the bowl, followed by the ground beef and the breadcrumbs. This is where you want to mix the meatloaf together, preferably with your hands. It's pretty critical that you are gentle in this process. Don't compact the meat or overwork it; this is what produces that tough, chewy loaf in the end product. Instead you want to use your fingers to mix until everything is just combined.
Step 4:
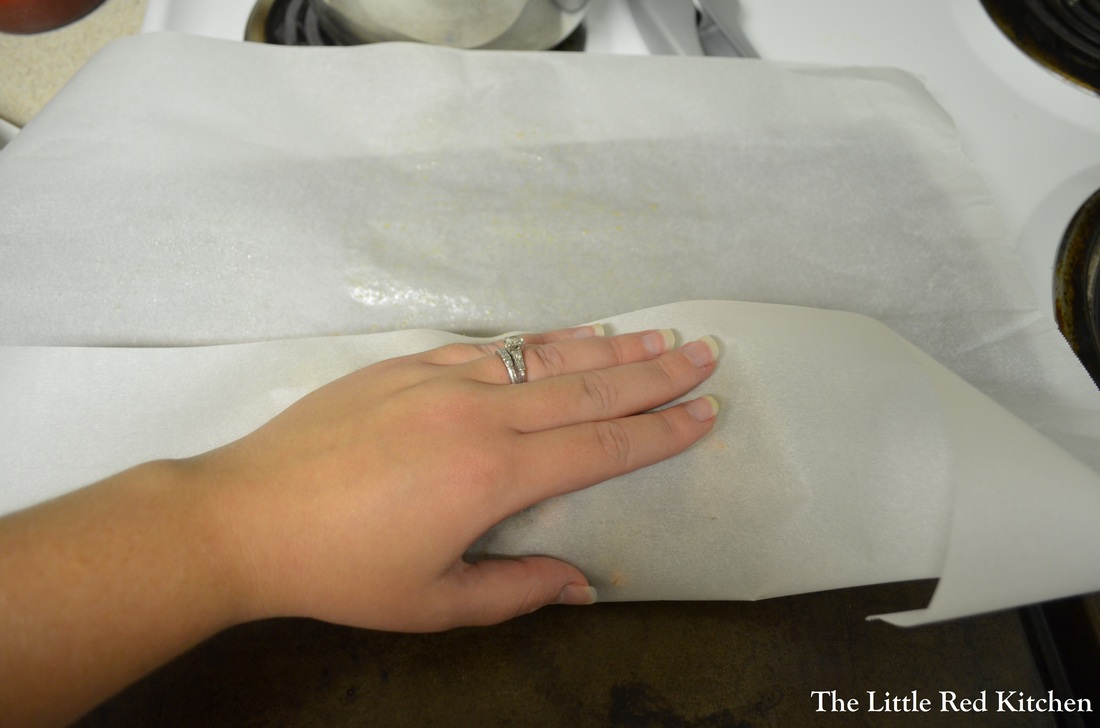
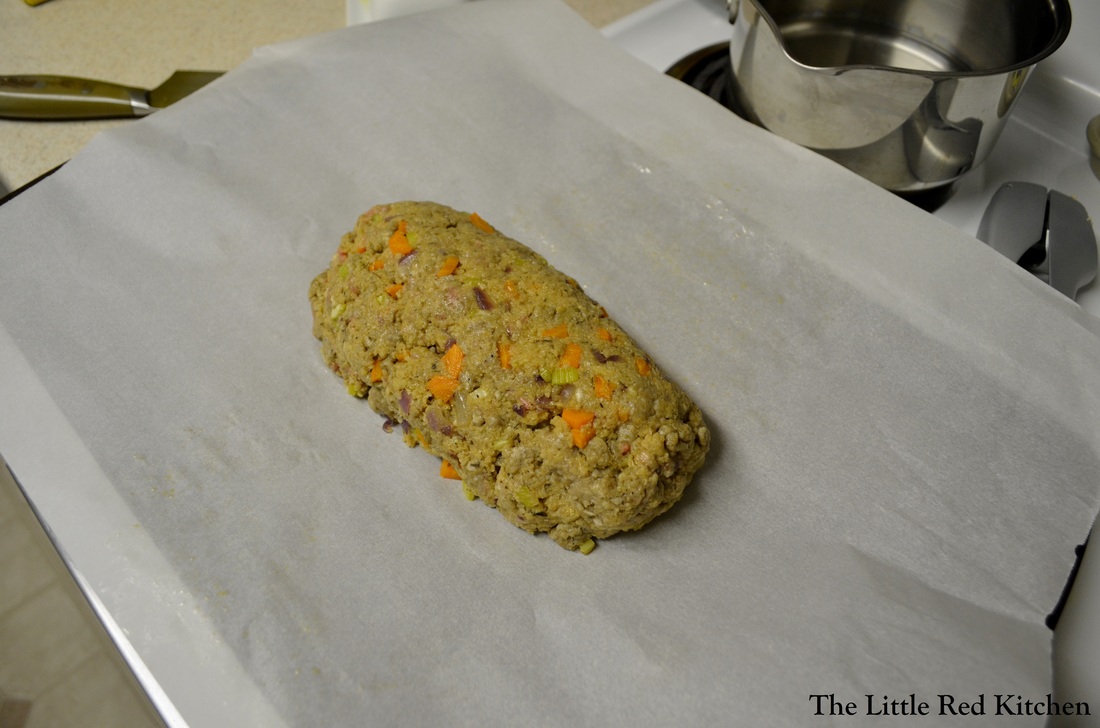
Turn the mixture out onto the parchment, and shape into a loaf. This is where the parchment comes in handy. Bring the sides of the parchment up and use them to gently press the meat into the shape you want. Bake for 20 minutes at 350, then turn the oven up to 400 degrees and cook for an additional 15 minutes, or until the meat registers about 140 degrees, if you have an instaread thermometer (which I recommend having in your kitchen!). Step 5:
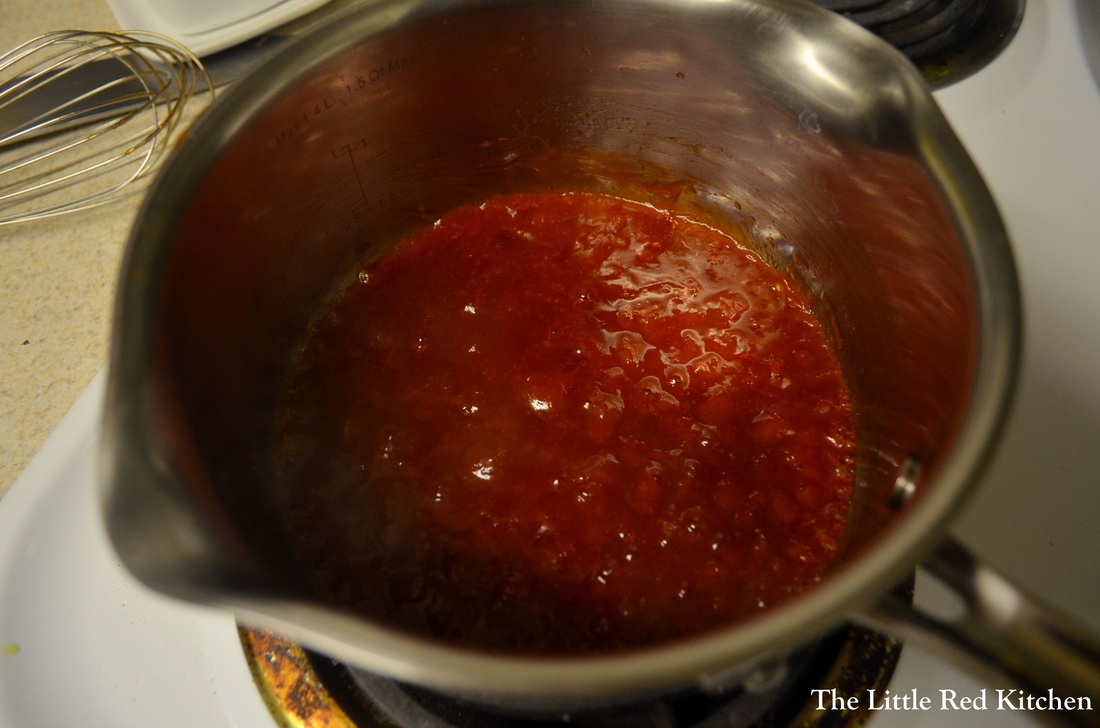
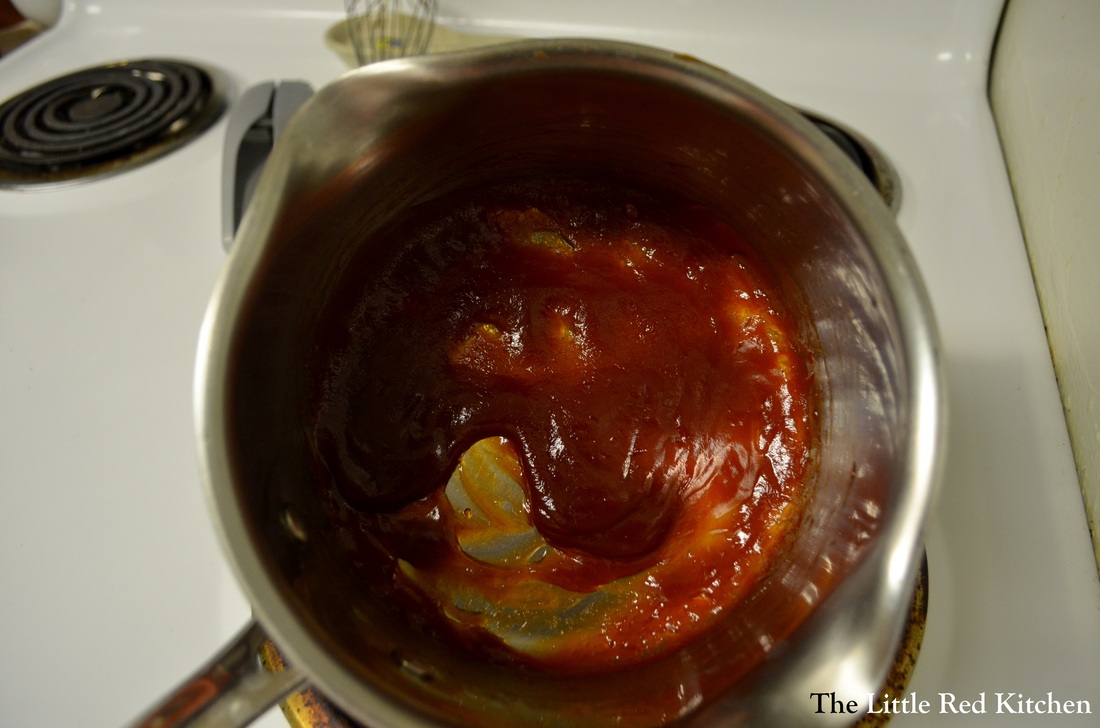
While the meat is cooking, you want to prepare the glaze, which is super easy. Simply add all of the glaze ingredients into a small saucepan and whisk to combine. Bring to a simmer, then reduce the heat to medium-low and simmer for 10 minutes, until the mixture has darkened, and thickened. A good trick is to hold the pan upright, and if the glaze doesn't slide down the bottom but clings to it, you are there. Step 6:
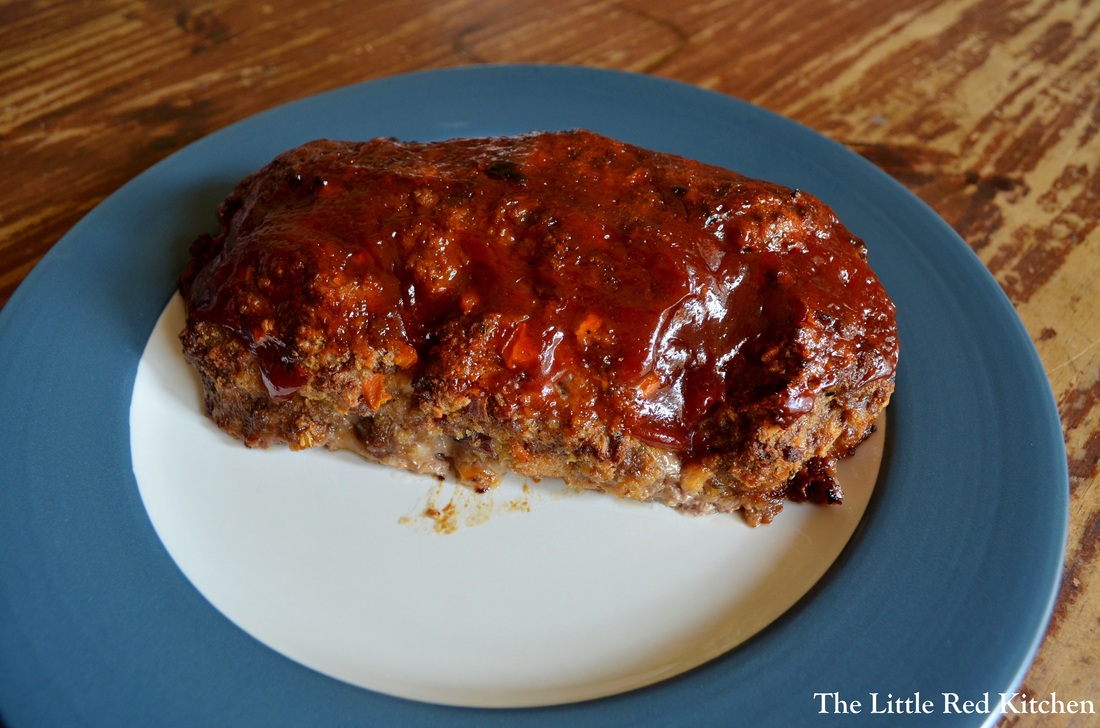
Just set the glaze aside, and once the meatloaf has cooked for those initial increments at 350 and 400, pull it out and paint the top and sides of the meatloaf with the glaze. Then crank the broiler on and bake for about 3 minutes, until the glaze has darkened even more and formed a tantalizingly sticky exterior.
Pull the meatloaf out and let it rest for 5 to 10 minutes before digging in! This meatloaf has great beefy flavor, with subtle kicks of the Dijon, Worcestershire, garlic, and veggies in the background. The glaze adds a great tangy, sweet contrast, and actually if you don't feel like making it yourself, substitute your favorite barbeque sauce. Or even just ketchup and brown sugar would work fine. Just serve it up with mashed potatoes and a nice glass of wine, and I don't think comfort food gets more comforting than that.
~Lauren
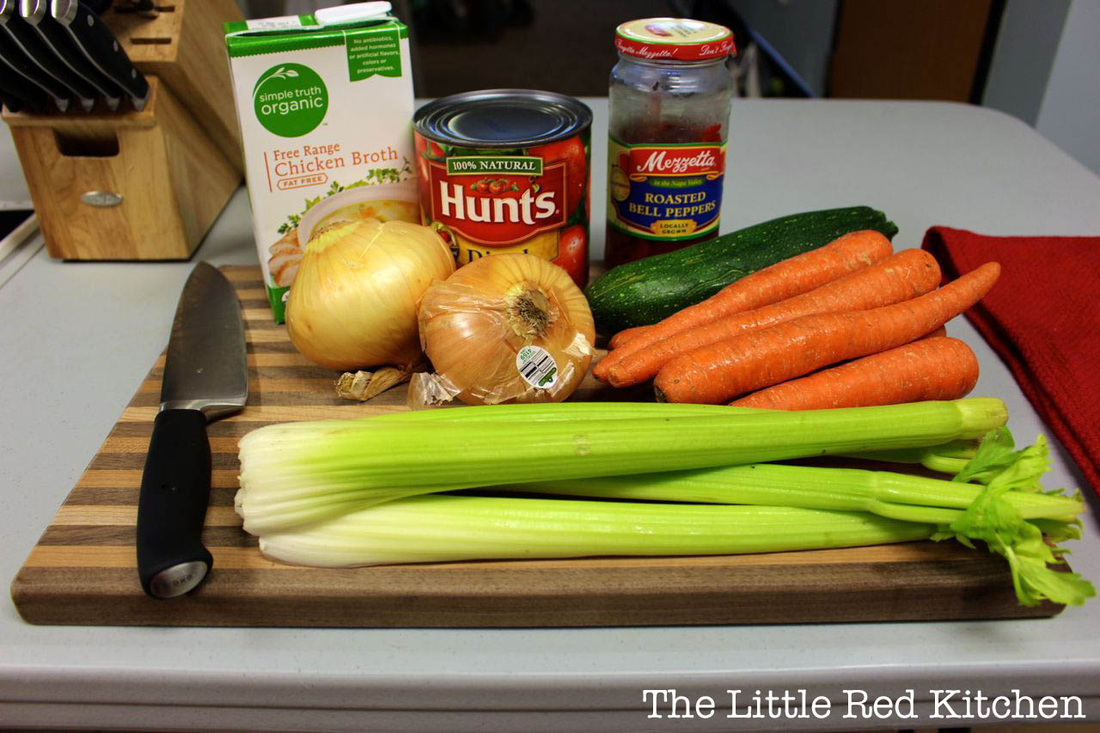
As the weather cools down (I can't wait for 60-degree-and-sunny days), I thought it might be a good idea to start putting together some fall-weather foods...like soup. So much soup. I LOVE some minestrone soup and, originally, I was going to apologize for messing with it (i.e. "Minestrone soup MUST have beans and noodles!"). However! Apparently, that is not the case, as traditional minestrone is made with vegetables, any vegetables, that are in season, usually including carrots, celery, tomatoes, and stock of some kind. Awesome! I've decided to call this "Veggiestrone", because it's literally all vegetables plus chicken stock ( Technically, the tomatoes, zucchini, and red peppers are fruit but... w e won't be getting into the whole botanical vs. culinary definitions here.) If you chop the veggies ahead of time, this recipe is relatively quick (20-30 minutes or so of total cook time), and feeds a whole lot of people: 4-6 depending on how hungry they are! It's also an excellent way to use up a whole mess of whatever you have lying around in your refrigerator (so please feel free to mess with the recipe as much as you like). "Veggiestrone" Soup Ingredients
*These are what I happened to have laying around, and also what I've used to make this dish in the past. I'm sure you could many other veggies to the mix (potatoes immediately come to mind), but the starred items in the ingredient list below are what give this soup its signature "minestrone" flavor. Enjoy!
2.5 cups celery, diced
3 cups carrots, peeled and diced
2 cups yellow onion, diced*
2 cups zucchini, diced
1 cup roasted red bell peppers, diced (I used jarred)*
2.5 cups diced tomatoes (I used Hunt's, canned)*
4 cloves garlic, minced*
2 tbsp olive oil*
1.5 tsp oregano*
1 tsp basil
0.5 tsp salt (skip if using full-sodium chicken stock)
3 cups low-sodium chicken stock
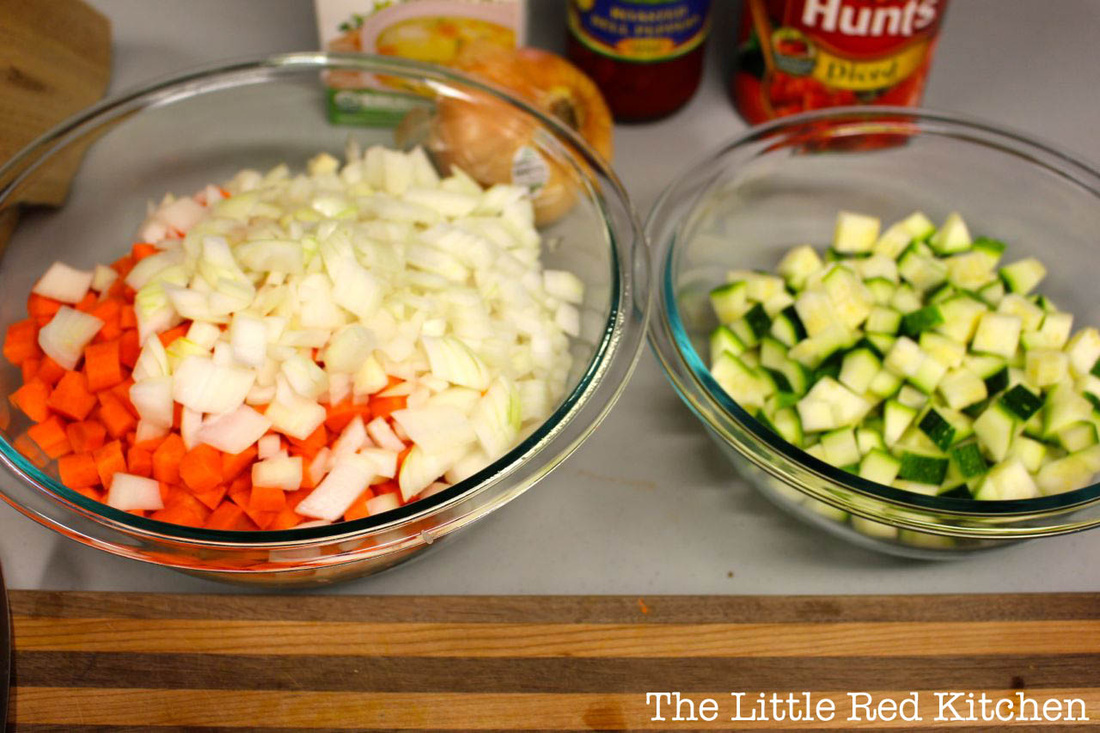
I usually like to prep (dice) my vegetables ahead of time and keep a huge tupperware of them in the fridge. This will definitely speed up the process, since preparing the veggies is the most time consuming part of this dish.
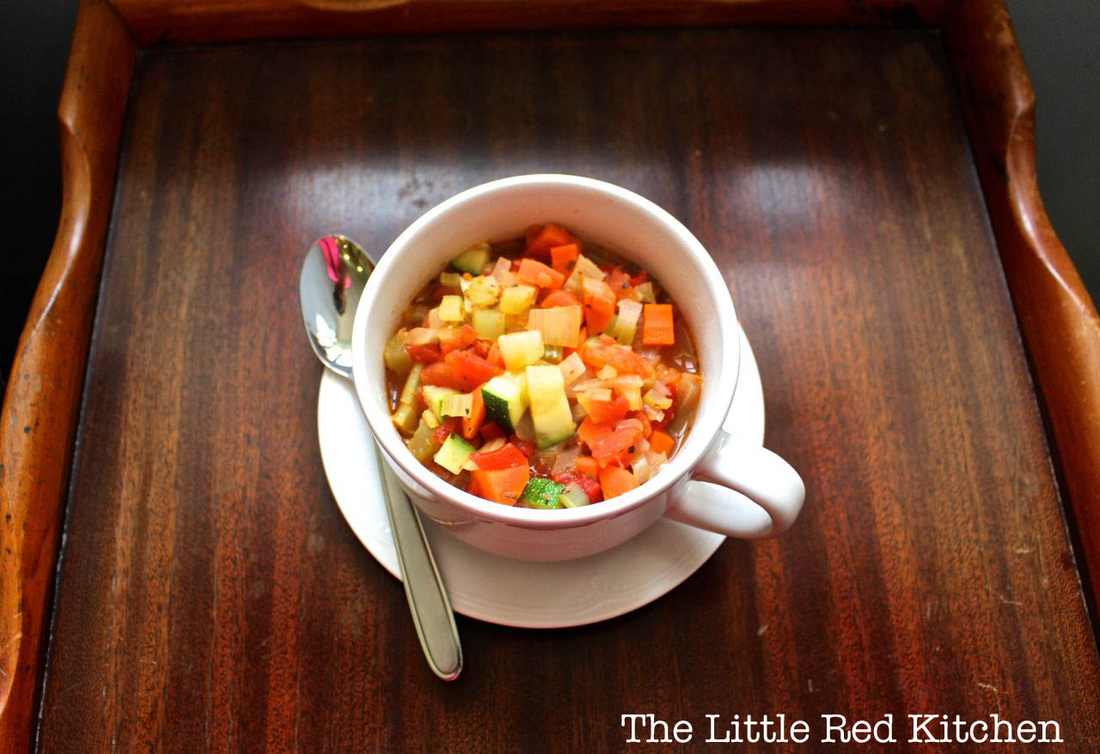
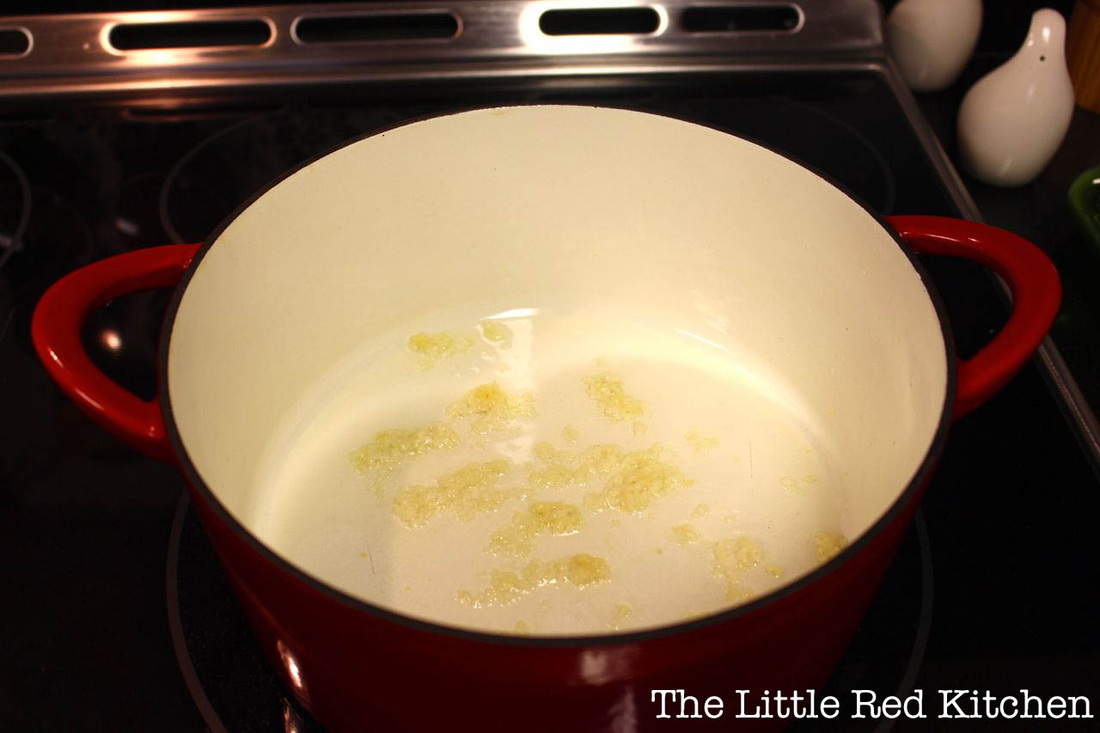
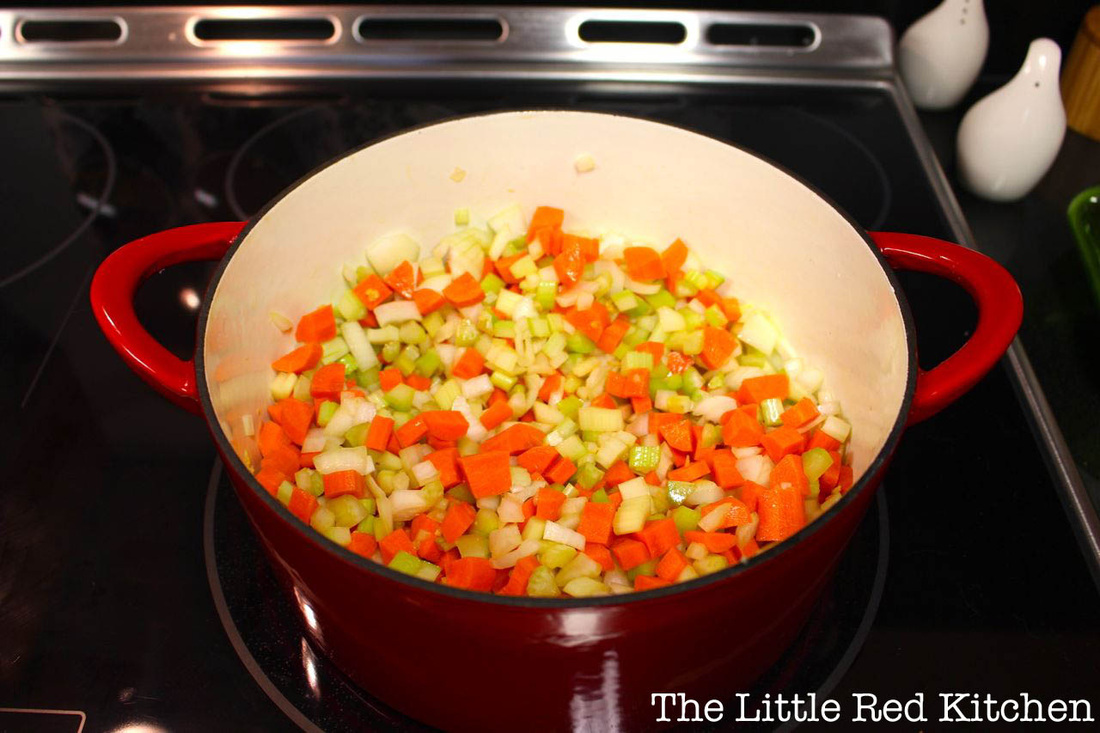
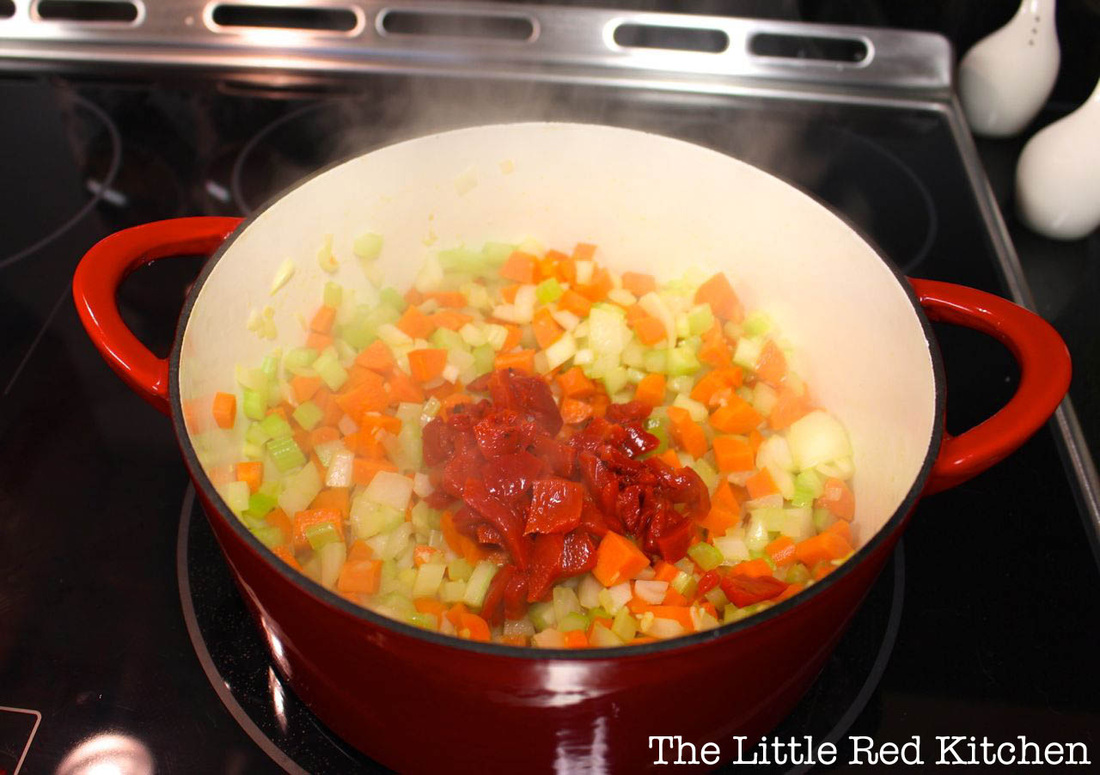
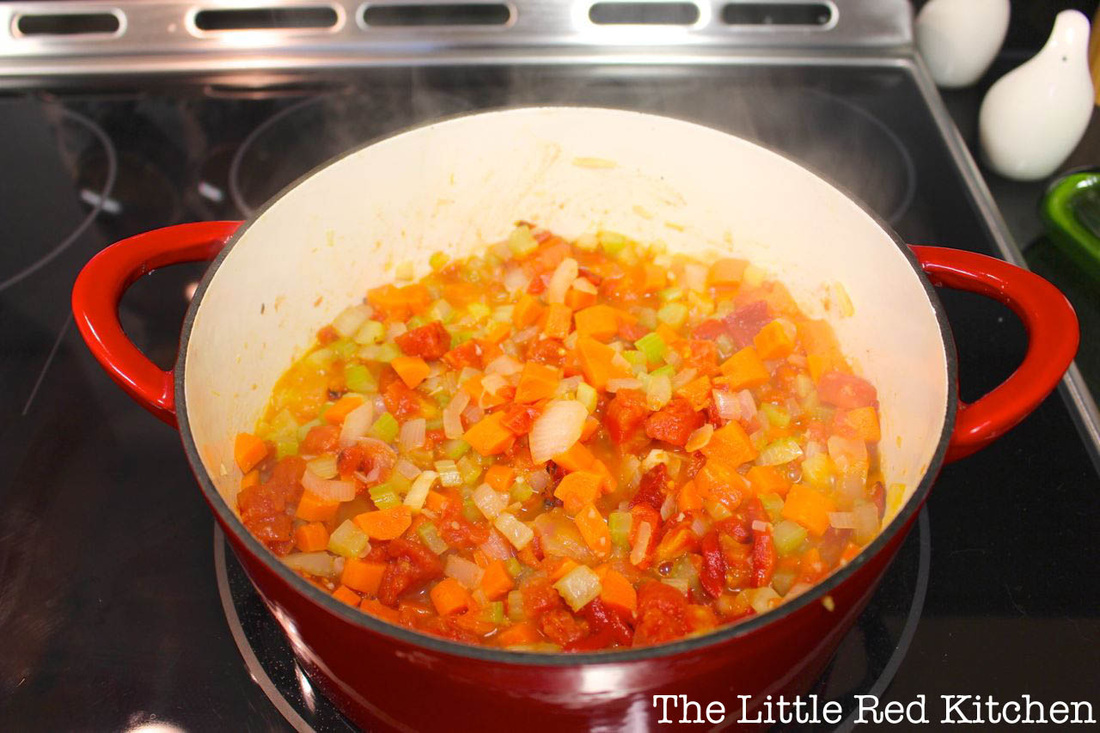
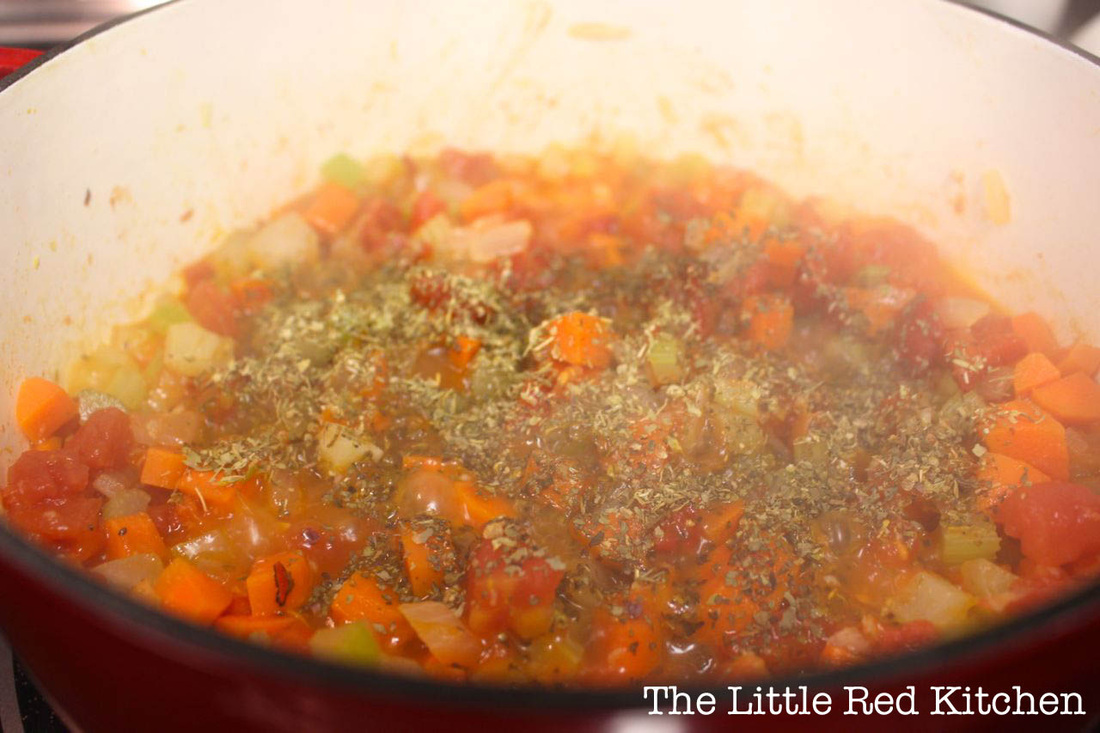
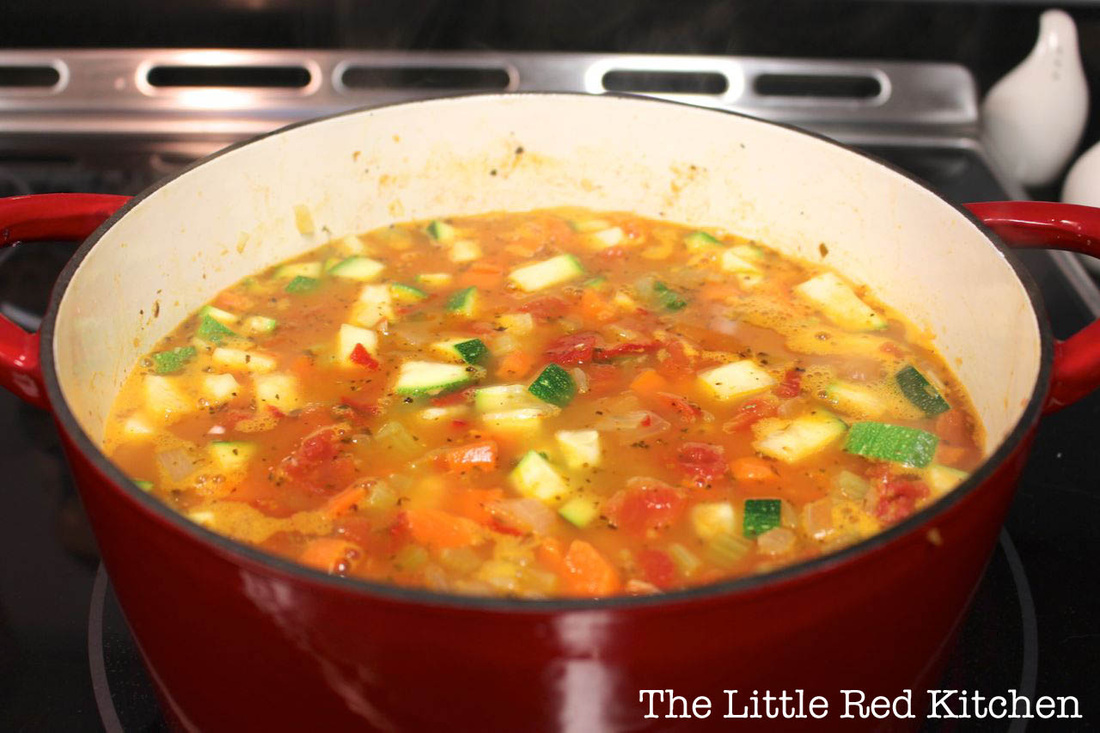
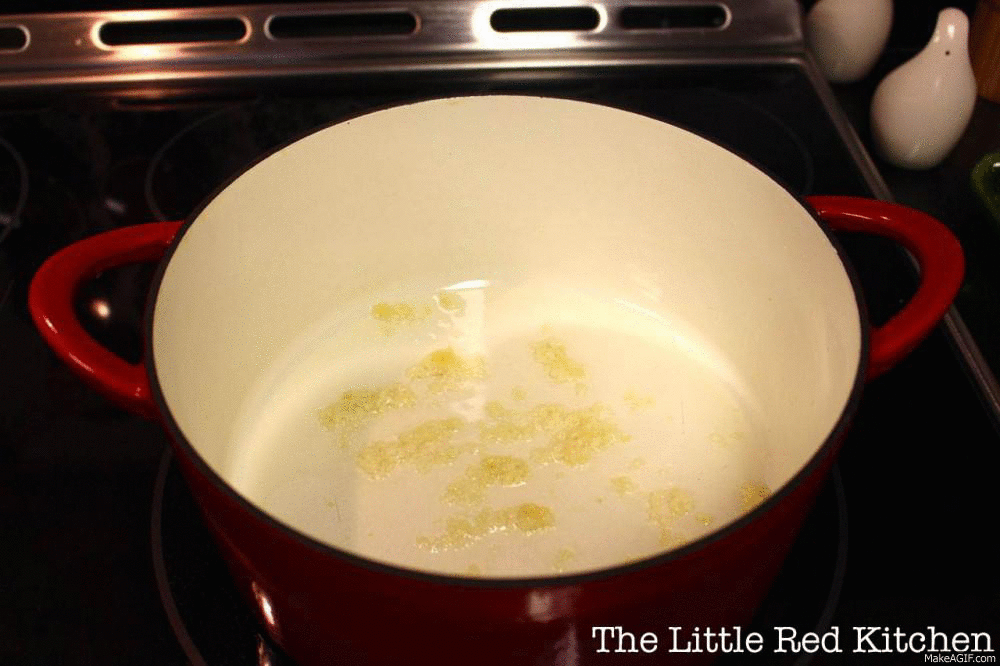
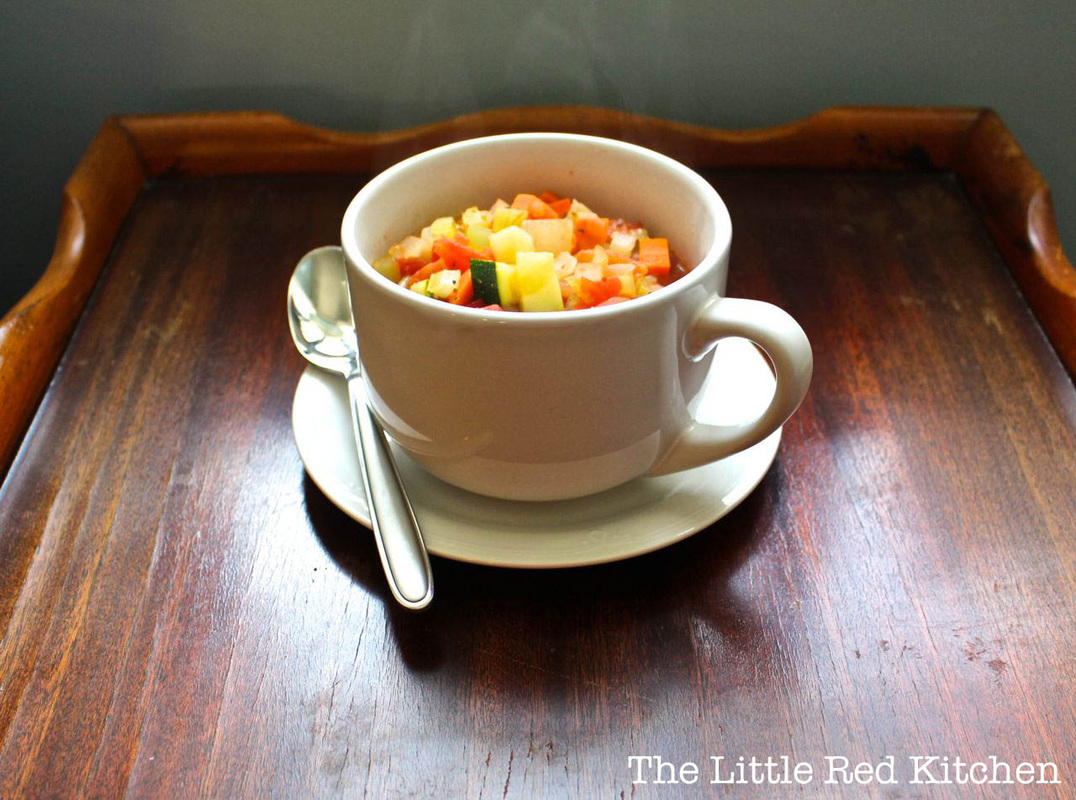
Step 1. Gather your ingredients and prep your vegetables. Step 2. Place olive oil and garlic in a large pot (I love, love my enameled dutch oven for this recipe) over medium-high heat and saute until the garlic is fragrant and lightly browned. Step 3. Add in the "tough" veggies (everything except for the zucchini, because it will cook more quickly-- we don't want it to get soggy), and toss to coat with the oil. Saute until the onions are translucent and the carrots have begun to soften slightly (covering with the lid of the pot will help with this). This step should take about 5-6 minutes. Step 4. Add in the red bell peppers and zucchini, and stir in. Let the flavors meld for a minute or two. Step 5. Add in the tomatoes, stir, and then add in the spices. Step 6. Stir and allow the flavors to blend while simmering for another 2-3 minutes. Then, add in the chicken stock. If you're more of a watch-and-learn kind of person, here's an animation, just for you! (Click the image to view.) Step 7. Simmer on medium-low heat for 10-15 minutes, and serve hot! Imagine coming home to this for dinner on a chilly fall day: Enjoy!
- Kaitlin
It is Monday. Note my specific avoidance of the phrase "Happy Monday". I don't want to be a downer, but Monday mornings are tough, and if you are like me, you are not fully yourself until well after lunchtime.
Believe it or not, having breakfast is a big part of feeling ready to tackle your day. It seems so easy to skip this meal in favor of sleeping in an extra 15 minutes, or grabbing some greasy breakfast sandwich at a fast food joint (I'll admit this is a guilty pleasure on special occasions), but trust me, with either of these options, you are not doing yourself any favors.
I work/study from home, so you'd think it would be easy for me to whip up a fabulous breakfast of eggs and homemade scones every morning, but I've got a schedule to keep to just like everybody else, and if I barely have the energy to shower when that alarm goes off, I'm certainly not going to make a gourmet meal either. However, I do have the energy to press a button, and that's why I love my go-to energizer breakfast, the smoothie!
There are probably thousands of smoothie recipes under the sun, and you should definitely experiment to find the fruits and add-ins that you like, but my Rise and Shine! Smoothie points out a few key things. First of all, frozen fruit. Gasp! But seriously, there is no harm or shame in using it. For one thing, I don't know about you but I don't live in a paradise where fresh Summery fruits are available year round. And a lot of the time, not to burst any bubbles, the stuff they ship frozen is fresher than what you actually buy fresh. When you buy a pint of berries, you don't know how long they've been sitting in your grocery store, let alone how long they took to get there. But most frozen fruit is frozen at the peak of it's freshness, and that freshness is preserved in its icy state. So it's convenient and delicious. Not to mention, rather than adding ice to your smoothie, frozen fruit pulverizes to the perfect consistency. And a second thing to note in this recipe, you don't need a fancy expensive juicer. I have a cheap blender, and it does just fine.
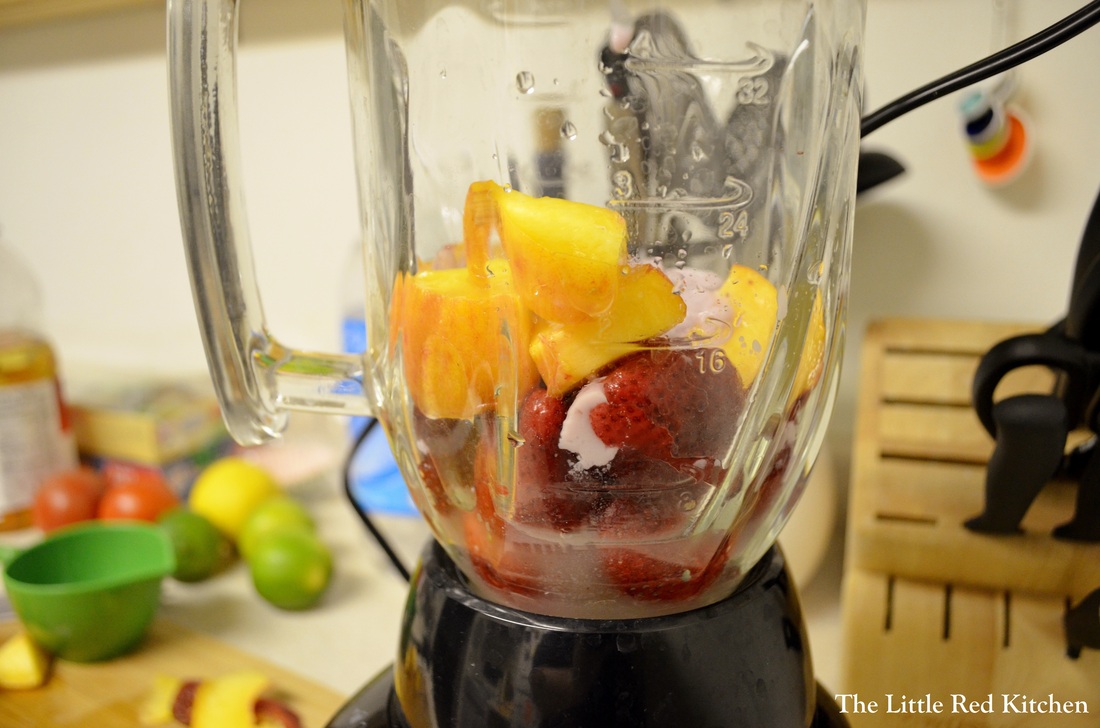
Ingredients:
3/4-1 cup frozen whole strawberries
1 cup peaches, cut into 3/4-inch chunks (I used fresh today, because I happened to have it, but frozen works fine)
1/4 cup yogurt (Anything goes here. You can use what you have on hand; today for me it was mixed berry.)
1/4 cup unfiltered apple cider
*This will make about 12 ounces, or 1.5 cups.
Step 1:
Throw the fruit into the blender, followed by the yogurt and apple cider. Step 2:
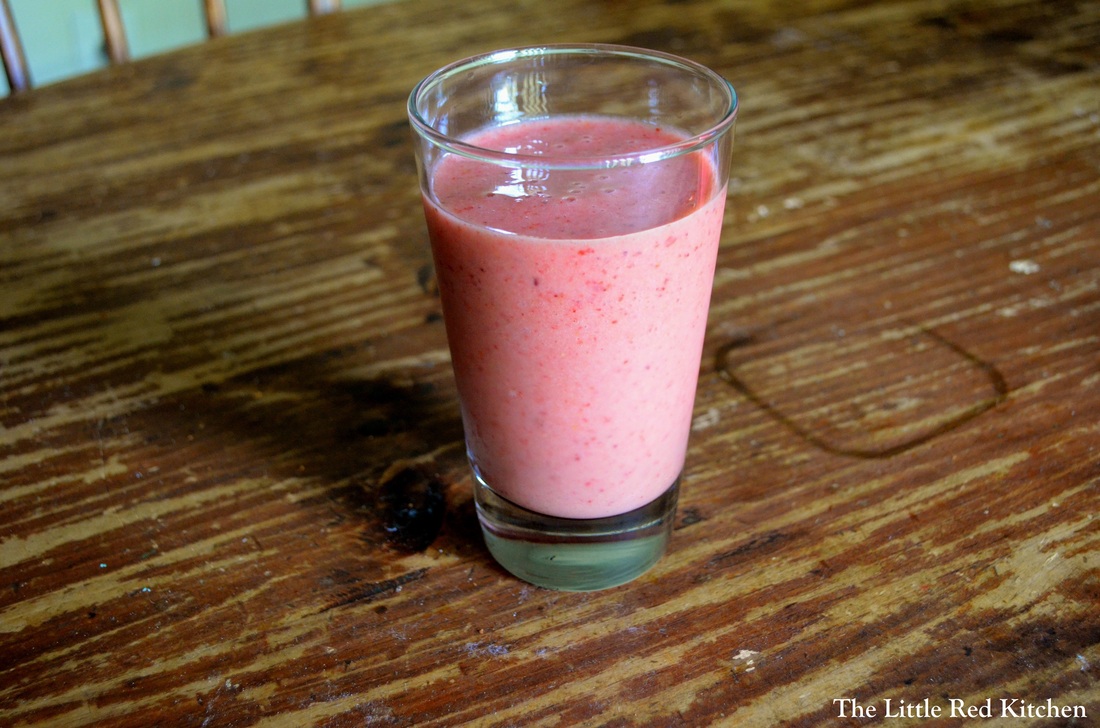
Blend on a high setting for about 15 seconds, until smooth and creamy. Note, sometimes you may have to add a bit more liquid to the mix. If after 15 or 20 seconds the concoction is still chunky and well, NOT a smoothie, drizzle in a bit more cider.
This smoothie is smooth, cold, sweet and slightly tangy. In a word, delicious. Oh, one last thing about this recipe: Don't ever let a recipe hold you back, even this one! If you like plain Greek yogurt, use that. Or omit it entirely if you want. Don't have apple cider, but you have V8 Splash? Great, throw that in instead. Allergic to strawberries but you've got another frozen berry blend in your freezer? Fantastic.
Recipes are guidelines, but they aren't set in stone. You may have to play around with ratios to get the consistency exactly as you want it, but that's fine! That's what cooking is all about, learning the basics and building on them to suit your taste, your life, your pantry.
Maybe, just maybe, it's a Happy Monday after all...
~Lauren
|


 RSS Feed